Run Qwen3-Coder-30B-A3B-Instruct and 480B-A35B locally with Unsloth Dynamic quants.
Qwen3-Coder is Qwen’s new series of coding agent models, available in 30B (Qwen3-Coder-Flash) and 480B parameters. Qwen3-480B-A35B-Instruct achieves SOTA coding performance rivalling Claude Sonnet-4, GPT-4.1, and Kimi K2, with 61.8% on Aider Polygot and support for 256K (extendable to 1M) token context.
We also uploaded Qwen3-Coder with native 1M context length extended by YaRN and full-precision 8bit and 16bit versions. Unsloth also now supports fine-tuning and RL of Qwen3-Coder.
{% hint style="success" %}
UPDATE: We fixed tool-calling for Qwen3-Coder! You can now use tool-calling seamlessly in llama.cpp, Ollama, LMStudio, Open WebUI, Jan etc. This issue was universal and affected all uploads (not just Unsloth), and we've communicated with the Qwen team about our fixes! Read more
DoesUnsloth Dynamic Quantswork? Yes, and very well. In third-party testing on the Aider Polyglot benchmark, the UD-Q4\_K\_XL (276GB) dynamic quant nearly matched the full bf16 (960GB) Qwen3-coder model, scoring 60.9% vs 61.8%. More details here.
Chat template/prompt format with newlines un-rendered
{% code overflow="wrap" %}
Chat template for tool calling (Getting the current temperature for San Francisco). More details here for how to format tool calls.
{% hint style="info" %}
Reminder that this model supports only non-thinking mode and does not generate blocks in its output. Meanwhile, specifying enable_thinking=False is no longer required.
{% endhint %}
Run Qwen3-Coder-30B-A3B-Instruct:
To achieve inference speeds of 6+ tokens per second for our Dynamic 4-bit quant, have at least 18GB of unified memory (combined VRAM and RAM) or 18GB of system RAM alone. As a rule of thumb, your available memory should match or exceed the size of the model you’re using. E.g. the UD\_Q8\_K\_XL quant (full precision), which is 32.5GB, will require at least 33GB of unified memory (VRAM + RAM) or 33GB of RAM for optimal performance.
NOTE: The model can run on less memory than its total size, but this will slow down inference. Maximum memory is only needed for the fastest speeds.
Given that this is a non thinking model, there is no need to set thinking=False and the model does not generate blocks.
#### 🦙 Ollama: Run Qwen3-Coder-30B-A3B-Instruct Tutorial
1. Install ollama if you haven't already! You can only run models up to 32B in size.
2. Run the model! Note you can call ollama servein another terminal if it fails! We include all our fixes and suggested parameters (temperature etc) in params in our Hugging Face upload!
#### :sparkles: Llama.cpp: Run Qwen3-Coder-30B-A3B-Instruct Tutorial
1. Obtain the latest llama.cpp on GitHub here. You can follow the build instructions below as well. Change -DGGML_CUDA=ON to -DGGML_CUDA=OFF if you don't have a GPU or just want CPU inference.
2. You can directly pull from HuggingFace via:
3. Download the model via (after installing pip install huggingface_hub hf_transfer ). You can choose UD\_Q4\_K\_XL or other quantized versions.
Examples:
Example 1 (unknown):
`unknown
<|im_start|>user
Hey there!<|im_end|>
<|im_start|>assistant
What is 1+1?<|im_end|>
<|im_start|>user
2<|im_end|>
<|im_start|>assistant
`
Example 2 (unknown):
`unknown
<|im_start|>user\nHey there!<|im_end|>\n<|im_start|>assistant\nWhat is 1+1?<|im_end|>\n<|im_start|>user\n2<|im_end|>\n<|im_start|>assistant\n
`
Example 3 (unknown):
`unknown
<|im_start|>user
What's the temperature in San Francisco now? How about tomorrow?<|im_end|>
<|im_start|>assistant
\n\n\nSan Francisco, CA, USA
\n\n<|im_end|>
<|im_start|>user
{"temperature": 26.1, "location": "San Francisco, CA, USA", "unit": "celsius"}
\n<|im_end|>
`
Example 4 (bash):
`bash
apt-get update
apt-get install pciutils -y
curl -fsSL https://ollama.com/install.sh | sh
`
Ensure all audio is at 24 kHz sampling rate (Orpheus’s expected rate)
This will download the dataset (\~328 MB for \~1.2k samples). Each item in dataset is a dictionary with at least:
* "audio": the audio clip (waveform array and metadata like sampling rate), and
* "text": the transcript string
Orpheus supports tags like , , , , , , , , etc. For example: "I missed you so much!". These tags are enclosed in angle brackets and will be treated as special tokens by the model (they match Orpheus’s expected tags like and . During training, the model will learn to associate these tags with the corresponding audio patterns. The Elise dataset with tags already has many of these (e.g., 336 occurrences of “laughs”, 156 of “sighs”, etc. as listed in its card). If your dataset lacks such tags but you want to incorporate them, you can manually annotate the transcripts where the audio contains those expressions.
Option 2: Preparing a custom dataset – If you have your own audio files and transcripts:
* Organize audio clips (WAV/FLAC files) in a folder.
* Create a CSV or TSV file with columns for file path and transcript. For example:
`
Example 2 (unknown):
`unknown
* Use load_dataset("csv", data_files="mydata.csv", split="train") to load it. You might need to tell the dataset loader how to handle audio paths. An alternative is using the datasets.Audio feature to load audio data on the fly:
`
Example 3 (unknown):
`unknown
Then dataset[i]["audio"] will contain the audio array.
* Ensure transcripts are normalized (no unusual characters that the tokenizer might not know, except the emotion tags if used). Also ensure all audio have a consistent sampling rate (resample them if necessary to the target rate the model expects, e.g. 24kHz for Orpheus).
In summary, for dataset preparation:
* You need a list of (audio, text) pairs.
* Use the HF datasets library to handle loading and optional preprocessing (like resampling).
* Include any special tags in the text that you want the model to learn (ensure they are in format so the model treats them as distinct tokens).
* (Optional) If multi-speaker, you could include a speaker ID token in the text or use a separate speaker embedding approach, but that’s beyond this basic guide (Elise is single-speaker).
Fine-Tuning TTS with Unsloth
Now, let’s start fine-tuning! We’ll illustrate using Python code (which you can run in a Jupyter notebook, Colab, etc.).
Step 1: Load the Model and Dataset
In all our TTS notebooks, we enable LoRA (16-bit) training and disable QLoRA (4-bit) training with: load_in_4bit = False. This is so the model can usually learn your dataset better and have higher accuracy.
`
Example 4 (unknown):
`unknown
{% hint style="info" %}
If memory is very limited or if dataset is large, you can stream or load in chunks. Here, 3h of audio easily fits in RAM. If using your own dataset CSV, load it similarly.
{% endhint %}
Step 2: Advanced - Preprocess the data for training (Optional)
We need to prepare inputs for the Trainer. For text-to-speech, one approach is to train the model in a causal manner: concatenate text and audio token IDs as the target sequence. However, since Orpheus is a decoder-only LLM that outputs audio, we can feed the text as input (context) and have the audio token ids as labels. In practice, Unsloth’s integration might do this automatically if the model’s config identifies it as text-to-speech. If not, we can do something like:
`
All Our Models
URL: llms-txt#all-our-models
Contents:
- New & recommended models:
- DeepSeek models:
- Llama models:
- Gemma models:
- Qwen models:
- Mistral models:
- Phi models:
- Other (GLM, Orpheus, Smol, Llava etc.) models:
- New models:
- DeepSeek models
Unsloth model catalog for all our Dynamic GGUF, 4-bit, 16-bit models on Hugging Face.
See how to install Unsloth on Windows with or without WSL.
For Windows, pip install unsloth now works, however you must have Pytorch previously installed.
Method #1 - Docker:
Docker might be the easiest way for Windows users to get started with Unsloth as there is no setup needed or dependency issues. unsloth/unsloth is Unsloth's only Docker image. For Blackwell and 50-series GPUs, use this same image - no separate image needed.
For installation instructions, please follow our Docker guide, otherwise here is a quickstart guide:
You should install the latest version of your GPUs driver. Download drivers here: NVIDIA GPU Drive
{% endstep %}
{% step %}
Install Visual Studio C++
You will need Visual Studio, with C++ installed. By default, C++ is not installed with Visual Studio, so make sure you select all of the C++ options. Also select options for Windows 10/11 SDK.
You will need the correct version of PyTorch that is compatible with your CUDA drivers, so make sure to select them carefully. Install PyTorch
{% endstep %}
{% step %}
Install Unsloth
Open Conda command prompt or your terminal with Python and run the command:
{% endstep %}
{% endstepper %}
{% hint style="warning" %}
If you're using GRPO or plan to use vLLM, currently vLLM does not support Windows directly but only via WSL or Linux.
{% endhint %}
To run Unsloth directly on Windows:
* Install Triton from this Windows fork and follow the instructions here (be aware that the Windows fork requires PyTorch >= 2.4 and CUDA 12)
* In the SFTTrainer, set dataset_num_proc=1 to avoid a crashing issue:
Advanced/Troubleshooting
For advanced installation instructions or if you see weird errors during installations:
1. Install torch and triton. Go to to install it. For example pip install torch torchvision torchaudio triton
2. Confirm if CUDA is installed correctly. Try nvcc. If that fails, you need to install cudatoolkit or CUDA drivers.
3. Install xformers manually. You can try installing vllm and seeing if vllm succeeds. Check if xformers succeeded with python -m xformers.info Go to . Another option is to install flash-attn for Ampere GPUs.
4. Double check that your versions of Python, CUDA, CUDNN, torch, triton, and xformers are compatible with one another. The PyTorch Compatibility Matrix may be useful.
5. Finally, install bitsandbytes and check it with python -m bitsandbytes
Method #3 - Windows using PowerShell:
#### Step 1: Install Prerequisites
1. Install NVIDIA CUDA Toolkit:
* Download and install the appropriate version of the NVIDIA CUDA Toolkit from CUDA Downloads.
* Reboot your system after installation if prompted.
* Note: No additional setup is required after installation for Unsloth.
2. Install Microsoft C++ Build Tools:
* Download and install Microsoft Build Tools for Visual Studio from the official website.
* During installation, select the C++ build tools workload.\
Ensure the MSVC compiler toolset is included.
3. Set Environment Variables for the C++ Compiler:
* Open the System Properties window (search for "Environment Variables" in the Start menu).
* Click "Environment Variables…".
* Add or update the following under System variables:
* CC:\
Path to the cl.exe C++ compiler.\
Example (adjust if your version differs):
* CXX:\
Same path as CC.
* Click OK to save changes.
* Verify: Open a new terminal and type cl. It should show version info.
2. Start WSL (Should already be preinstalled). Open command prompt as admin then run:
Optional: If WSL is not preinstalled, go to the Microsoft store and search "Ubuntu" and the app that says Ubuntu will be WSL. Install it and run it and continue from there.
6. Optional: Install Jupyter Notebook to run in a Colab like environment:
7. Launch Jupyter Notebook:
jupyter notebook
8. Download any Colab notebook from Unsloth, import it into your Jupyter Notebook, adjust the parameters as needed, and execute the script.
How to run DeepSeek-V3-0324 locally using our dynamic quants which recovers accuracy
{% hint style="info" %}
Please see (May 28th 2025 update) to learn on how to run DeepSeek faster and more efficiently!
{% endhint %}
DeepSeek is at it again! After releasing V3, R1 Zero and R1 back in December 2024 and January 2025, DeepSeek updated their checkpoints / models for V3, and released a March update!
According to DeepSeek, MMLU-Pro jumped +5.3% to 81.2%. GPQA +9.3% points. AIME + 19.8% and LiveCodeBench + 10.0%! They provided a plot showing how they compared to the previous V3 checkpoint and other models like GPT 4.5 and Claude Sonnet 3.7. But how do we run a 671 billion parameter model locally?
DeepSeek V3's original upload is in float8, which takes 715GB. Using Q4\_K\_M halves the file size to 404GB or so, and our dynamic 1.78bit quant fits in around 151GB. We suggest using our 2.7bit quant to balance size and accuracy! The 2.4bit one also works well!
{% endhint %}
:gear: Official Recommended Settings
According to DeepSeek, these are the recommended settings for inference:
* Temperature of 0.3 (Maybe 0.0 for coding as seen here)
* Min\_P of 0.00 (optional, but 0.01 works well, llama.cpp default is 0.1)
* Chat template: <|User|>Create a simple playable Flappy Bird Game in Python. Place the final game inside of a markdown section.<|Assistant|>
* A BOS token of <|begin▁of▁sentence|> is auto added during tokenization (do NOT add it manually!)
* DeepSeek mentioned using a system prompt as well (optional) - it's in Chinese: 该助手为DeepSeek Chat,由深度求索公司创造。\n今天是3月24日,星期一。 which translates to: The assistant is DeepSeek Chat, created by DeepSeek.\nToday is Monday, March 24th.
* For KV cache quantization, use 8bit, NOT 4bit - we found it to do noticeably worse.
📖 Tutorial: How to Run DeepSeek-V3 in llama.cpp
1. Obtain the latest llama.cpp on GitHub here. You can follow the build instructions below as well. Change -DGGML_CUDA=ON to -DGGML_CUDA=OFF if you don't have a GPU or just want CPU inference.
{% hint style="warning" %}
NOTE using -DGGML_CUDA=ON for GPUs might take 5 minutes to compile. CPU only takes 1 minute to compile. You might be interested in llama.cpp's precompiled binaries.
{% endhint %}
2. Download the model via (after installing pip install huggingface_hub hf_transfer ). You can choose UD-IQ1_S(dynamic 1.78bit quant) or other quantized versions like Q4_K_M . I recommend using our 2.7bit dynamic quantUD-Q2_K_XLto balance size and accuracy. More versions at:
Quantize models to 4-bit with Unsloth and PyTorch to recover accuracy.
In collaboration with PyTorch, we're introducing QAT (Quantization-Aware Training) in Unsloth to enable trainable quantization that recovers as much accuracy as possible. This results in significantly better model quality compared to standard 4-bit naive quantization. QAT can recover up to 70% of the lost accuracy and achieve a 1–3% model performance improvement on benchmarks such as GPQA and MMLU Pro.
Naively quantizing a model is called post-training quantization (PTQ). For example, assume we want to quantize to 8bit integers:
1. Find max(abs(W))
2. Find a = 127/max(abs(W)) where a is int8's maximum range which is 127
3. Quantize via qW = int8(round(W * a))
{% endcolumn %}
{% column width="50%" %}
{% endcolumn %}
{% endcolumns %}
Dequantizing back to 16bits simply does the reverse operation by float16(qW) / a . Post-training quantization (PTQ) can greatly reduce storage and inference costs, but quite often degrades accuracy when representing high-precision values with fewer bits - especially at 4-bit or lower. One way to solve this to utilize our dynamic GGUF quants, which uses a calibration dataset to change the quantization procedure to allocate more importance to important weights. The other way is to make quantization smarter, by making it trainable or learnable!
:fire:Smarter Quantization
To enable smarter quantization, we collaborated with the TorchAO team to add Quantization-Aware Training (QAT) directly inside of Unsloth - so now you can fine-tune models in Unsloth and then export them to 4-bit QAT format directly with accuracy improvements!
In fact, QAT recovers 66.9% of Gemma3-4B on GPQA, and increasing the raw accuracy by +1.0%. Gemma3-12B on BBH recovers 45.5%, and increased the raw accuracy by +2.1%. QAT has no extra overhead during inference, and uses the same disk and memory usage as normal naive quantization! So you get all the benefits of low-bit quantization, but with much increased accuracy!
:mag:Quantization-Aware Training
QAT simulates the true quantization procedure by "fake quantizing" weights and optionally activations during training, which typically means rounding high precision values to quantized ones (while staying in high precision dtype, e.g. bfloat16) and then immediately dequantizing them.
TorchAO enables QAT by first (1) inserting fake quantize operations into linear layers, and (2) transforms the fake quantize operations to actual quantize and dequantize operations after training to make it inference ready. Step 1 enables us to train a more accurate quantization representation.
:sparkles:QAT + LoRA finetuning
QAT in Unsloth can additionally be combined with LoRA fine-tuning to enable the benefits of both worlds: significantly reducing storage and compute requirements during training while mitigating quantization degradation! We support multiple methods via qat_scheme including fp8-int4, fp8-fp8, int8-int4, int4 . We also plan to add custom definitions for QAT in a follow up release!
{% code overflow="wrap" %}
:teapot:Exporting QAT models
After fine-tuning in Unsloth, you can call model.save_pretrained_torchao to save your trained model using TorchAO’s PTQ format. You can also upload these to the HuggingFace hub! We support any config, and we plan to make text based methods as well, and to make the process more simpler for everyone! But first, we have to prepare the QAT model for the final conversion step via:
Run Qwen3-30B-A3B-2507 and 235B-A22B Thinking and Instruct versions locally on your device!
Qwen released 2507 (July 2025) updates for their Qwen3 4B, 30B and 235B models, introducing both "thinking" and "non-thinking" variants. The non-thinking 'Qwen3-30B-A3B-Instruct-2507' and 'Qwen3-235B-A22B-Instruct-2507' features a 256K context window, improved instruction following, multilingual capabilities and alignment.
The thinking models 'Qwen3-30B-A3B-Thinking-2507' and 'Qwen3-235B-A22B-Thinking-2507' excel at reasoning, with the 235B achieving SOTA results in logic, math, science, coding, and advanced academic tasks.
Unsloth also now supports fine-tuning and Reinforcement Learning (RL) of Qwen3-2507 models — 2x faster, with 70% less VRAM, and 8x longer context lengths
presence_penalty = 0.0 to 2.0 (llama.cpp default turns it off, but to reduce repetitions, you can use this)
presence_penalty = 0.0 to 2.0 (llama.cpp default turns it off, but to reduce repetitions, you can use this)
Adequate Output Length: Use an output length of 32,768 tokens for most queries, which is adequate for most queries.
Chat template for both Thinking (thinking has ) and Instruct is below:
📖 Run Qwen3-30B-A3B-2507 Tutorials
Below are guides for the Thinking and Instruct versions of the model.
Instruct: Qwen3-30B-A3B-Instruct-2507
Given that this is a non thinking model, there is no need to set thinking=False and the model does not generate blocks.
#### ⚙️Best Practices
To achieve optimal performance, Qwen recommends the following settings:
* We suggest using temperature=0.7, top_p=0.8, top_k=20, and min_p=0.0presence_penalty between 0 and 2 if the framework supports to reduce endless repetitions.
* temperature = 0.7
* top_k = 20
* min_p = 0.00 (llama.cpp's default is 0.1)
* top_p = 0.80
* presence_penalty = 0.0 to 2.0 (llama.cpp default turns it off, but to reduce repetitions, you can use this) Try 1.0 for example.
* Supports up to 262,144 context natively but you can set it to 32,768 tokens for less RAM use
#### 🦙 Ollama: Run Qwen3-30B-A3B-Instruct-2507 Tutorial
1. Install ollama if you haven't already! You can only run models up to 32B in size.
2. Run the model! Note you can call ollama servein another terminal if it fails! We include all our fixes and suggested parameters (temperature etc) in params in our Hugging Face upload!
#### :sparkles: Llama.cpp: Run Qwen3-30B-A3B-Instruct-2507 Tutorial
1. Obtain the latest llama.cpp on GitHub here. You can follow the build instructions below as well. Change -DGGML_CUDA=ON to -DGGML_CUDA=OFF if you don't have a GPU or just want CPU inference.
2. You can directly pull from HuggingFace via:
3. Download the model via (after installing pip install huggingface_hub hf_transfer ). You can choose UD\_Q4\_K\_XL or other quantized versions.
Examples:
Example 1 (unknown):
`unknown
<|im_start|>user
Hey there!<|im_end|>
<|im_start|>assistant
What is 1+1?<|im_end|>
<|im_start|>user
2<|im_end|>
<|im_start|>assistant
`
Example 2 (bash):
`bash
apt-get update
apt-get install pciutils -y
curl -fsSL https://ollama.com/install.sh | sh
`
Example 3 (bash):
`bash
ollama run hf.co/unsloth/Qwen3-30B-A3B-Instruct-2507-GGUF:UD-Q4_K_XL
- Fine-tuning Voice models vs. Zero-shot voice cloning
This saves the model weights (for LoRA, it might save only adapter weights if the base is not fully fine-tuned). If you used --push_model in CLI or trainer.push_to_hub(), you could upload it to Hugging Face Hub directly.
Now you should have a fine-tuned TTS model in the directory. The next step is to test it out and if supported, you can use llama.cpp to convert it into a GGUF file.
Fine-tuning Voice models vs. Zero-shot voice cloning
People say you can clone a voice with just 30 seconds of audio using models like XTTS - no training required. That’s technically true, but it misses the point.
Zero-shot voice cloning, which is also available in models like Orpheus and CSM, is an approximation. It captures the general tone and timbre of a speaker’s voice, but it doesn’t reproduce the full expressive range. You lose details like speaking speed, phrasing, vocal quirks, and the subtleties of prosody - things that give a voice its personality and uniqueness.
If you just want a different voice and are fine with the same delivery patterns, zero-shot is usually good enough. But the speech will still follow the model’s style, not the speaker’s.
For anything more personalized or expressive, you need training with methods like LoRA to truly capture how someone speaks.
- :shaved\_ice: vLLM LoRA Hot Swapping / Dynamic LoRAs
:shaved\_ice: vLLM LoRA Hot Swapping / Dynamic LoRAs
To enable LoRA serving for at most 4 LoRAs at 1 time (these are hot swapped / changed), first set the environment flag to allow hot swapping:
Then, serve it with LoRA support:
To load a LoRA dynamically (set the lora name as well), do:
To remove it from the pool:
Examples:
Example 1 (bash):
`bash
export VLLM_ALLOW_RUNTIME_LORA_UPDATING=True
`
Example 2 (bash):
`bash
export VLLM_ALLOW_RUNTIME_LORA_UPDATING=True
vllm serve unsloth/Llama-3.3-70B-Instruct \
--quantization fp8 \
--kv-cache-dtype fp8
--gpu-memory-utilization 0.97 \
--max-model-len 65536 \
--enable-lora \
--max-loras 4 \
--max-lora-rank 64
`
Example 3 (bash):
`bash
curl -X POST http://localhost:8000/v1/load_lora_adapter \
-H "Content-Type: application/json" \
-d '{
"lora_name": "LORA_NAME",
"lora_path": "/path/to/LORA"
}'
`
Example 4 (bash):
`bash
curl -X POST http://localhost:8000/v1/unload_lora_adapter \
-H "Content-Type: application/json" \
-d '{
"lora_name": "LORA_NAME"
}'
`
What Model Should I Use?
URL: llms-txt#what-model-should-i-use?
Contents:
- Llama, Qwen, Mistral, Phi or?
- Instruct or Base Model?
- Instruct Models
- Base Models
- Should I Choose Instruct or Base?
- Fine-tuning models with Unsloth
- Experimentation is Key
Llama, Qwen, Mistral, Phi or?
When preparing for fine-tuning, one of the first decisions you'll face is selecting the right model. Here's a step-by-step guide to help you choose:
{% stepper %}
{% step %}
#### Choose a model that aligns with your usecase
E.g. For image-based training, select a vision model such as Llama 3.2 Vision. For code datasets, opt for a specialized model like Qwen Coder 2.5*.
* Licensing and Requirements: Different models may have specific licensing terms and system requirements. Be sure to review these carefully to avoid compatibility issues.
{% endstep %}
#### Assess your storage, compute capacity and dataset
* Use our VRAM guideline to determine the VRAM requirements for the model you’re considering.
* Your dataset will reflect the type of model you will use and amount of time it will take to train
{% endstep %}
#### Select a Model and Parameters
We recommend using the latest model for the best performance and capabilities. For instance, as of January 2025, the leading 70B model is Llama 3.3*.
* You can stay up to date by exploring our model catalog to find the newest and relevant options.
{% endstep %}
#### Choose Between Base and Instruct Models
Further details below:
{% endstep %}
{% endstepper %}
Instruct or Base Model?
When preparing for fine-tuning, one of the first decisions you'll face is whether to use an instruct model or a base model.
Instruct models are pre-trained with built-in instructions, making them ready to use without any fine-tuning. These models, including GGUFs and others commonly available, are optimized for direct usage and respond effectively to prompts right out of the box. Instruct models work with conversational chat templates like ChatML or ShareGPT.
Base models, on the other hand, are the original pre-trained versions without instruction fine-tuning. These are specifically designed for customization through fine-tuning, allowing you to adapt them to your unique needs. Base models are compatible with instruction-style templates like Alpaca or Vicuna, but they generally do not support conversational chat templates out of the box.
Should I Choose Instruct or Base?
The decision often depends on the quantity, quality, and type of your data:
* 1,000+ Rows of Data: If you have a large dataset with over 1,000 rows, it's generally best to fine-tune the base model.
* 300–1,000 Rows of High-Quality Data: With a medium-sized, high-quality dataset, fine-tuning the base or instruct model are both viable options.
* Less than 300 Rows: For smaller datasets, the instruct model is typically the better choice. Fine-tuning the instruct model enables it to align with specific needs while preserving its built-in instructional capabilities. This ensures it can follow general instructions without additional input unless you intend to significantly alter its functionality.
* For information how how big your dataset should be, see here
Fine-tuning models with Unsloth
You can change the model name to whichever model you like by matching it with model's name on Hugging Face e.g. 'unsloth/llama-3.1-8b-unsloth-bnb-4bit'.
We recommend starting with Instruct models, as they allow direct fine-tuning using conversational chat templates (ChatML, ShareGPT etc.) and require less data compared to Base models (which uses Alpaca, Vicuna etc). Learn more about the differences between instruct and base models here.
* Model names ending in unsloth-bnb-4bit indicate they are Unsloth dynamic 4-bitquants. These models consume slightly more VRAM than standard BitsAndBytes 4-bit models but offer significantly higher accuracy.
* If a model name ends with just bnb-4bit, without "unsloth", it refers to a standard BitsAndBytes 4-bit quantization.
* Models with no suffix are in their original 16-bit or 8-bit formats. While they are the original models from the official model creators, we sometimes include important fixes - such as chat template or tokenizer fixes. So it's recommended to use our versions when available.
Experimentation is Key
{% hint style="info" %}
We recommend experimenting with both models when possible. Fine-tune each one and evaluate the outputs to see which aligns better with your goals.
Learn how to fine-tune LLMs on multiple GPUs and parallelism with Unsloth.
Unsloth currently supports multi-GPU setups through libraries like Accelerate and DeepSpeed. This means you can already leverage parallelism methods such as FSDP and DDP with Unsloth.
* You can use our Magistral-2509 Kaggle notebook as an example which utilizes multi-GPU Unsloth to fit the 24B parameter model
However, we know that the process can be complex and requires manual setup. We’re working hard to make multi-GPU support much simpler and more user-friendly, and we’ll be announcing official multi-GPU support for Unsloth soon.
In the meantime, to enable multi GPU for DDP, do the following:
1. Save your training script to train.py and set in SFTConfig or TrainingArguments the flag ddp_find_unused_parameters = False
2. Run accelerate launch train.py or torchrun --nproc_per_node N_GPUS -m train.py where N\_GPUS is the number of GPUs you have.
Pipeline / model splitting loading is also allowed, so if you do not have enough VRAM for 1 GPU to load say Llama 70B, no worries - we will split the model for you on each GPU! To enable this, use the device_map = "balanced" flag:
Also several contributors have created repos to enable or improve multi-GPU support with Unsloth, including:
* unsloth-5090-multiple: A fork enabling Unsloth to run efficiently on multi-GPU systems, particularly for the NVIDIA RTX 5090 and similar setups.
* opensloth: Unsloth with support for multi-GPU training including experimental features.
Stay tuned for our official announcement!\
For more details, check out our ongoing Pull Request discussing multi-GPU support.
If you're a beginner, here might be the first questions you'll ask before your first fine-tune. You can also always ask our community by joining our Reddit page.
We're excited to introduce more efficient reinforcement learning (RL) in Unsloth with multiple algorithmic advancements:
* 1.2 to 1.7x increased context lengths with no slowdown and no extra memory usage!
* 10% faster RL training runs with revamped kernels and async data movements
* 2x faster torch.compile times during model loading
Unsloth already increases RL training speed, context window and reduces VRAM usage by 50–90% vs. all other setups with FA2, but now Unsloth's Standby improves this even further. Our Standby feature uniquely limits speed degradation compared to other implementations and sometimes makes training even faster!
Now, Qwen3-32B LoRA 16-bit can attain 6,144 context lengths vs 3,600 (1.7x longer) before on 1xH100 80GB GPU. Llama-3.1-8B QLoRA 4bit can attain 47,500 lengths vs 42,000 before (1.13x longer).
We made RL runs 10% faster through various kernel optimizations, and removed the LoRA communication channel between the CPU and GPU when switching from training to inference mode. Finally, we used custom torch.compile flags to make vLLM's rollout faster by 10%, and reduced compilation time by 2x.
:sparkles:How to enable optimizations
To enable Unsloth's Standby feature, set the environment variable UNSLOTH_VLLM_STANDBY before any Unsloth import. Then set gpu_memory_utilization = 0.95 and that's it!
:mortar\_board:No more gpu_memory_utilization!
With Unsloth's new RL improvements, you NEVER have to worry about tuning or setting gpu_memory_utilization ever again - simply set it to 90% or 95% of GPU utilization - 100% sadly won't work since some space is needed for small tensors. Previously one had to tune it from 30% to 95% - no more now! Set it to the maximum and Unsloth will handle the rest!
:interrobang:Why does RL use so much memory?
GRPO (and many RL variants) rely heavily on generation which is primarily powered by vLLM. But this comes comes with a steep cost since it requires constant GPU memory for weights, activations, and the KV Cache.
{% columns %}
{% column width="41.66666666666667%" %}
Inference takes a lot of VRAM
{% endcolumn %}
{% column width="58.33333333333333%" %}
Whilst Training also uses VRAM!
{% endcolumn %}
{% endcolumns %}
This means RL needs to keep 2 sets of VRAM / memory on the GPU at the same time:
1. Inference engine (has model weights, KV cache)
2. Training engine (has model weights, activations, gradients, optimizer states)
Current RL frameworks have to split 50/50 for a 80GB GPU with 50% for inference and 50% for training. And moving weights from training mode to inference mode can take quite some time.
80GB GPU
Inference Engine (50%)
Training Engine (50%)
Model Weights
16GB
16GB
KV Cache
24GB
Activations, Gradients, Optimizer States
24GB
Previous Unsloth versions already smartly optimizes the above, as we share vLLM's weight space directly which removes the double memory usage of the model weights. This frees up 16GB of space for example which can be used to increase context length or the speed of generation. Also, we don't need to do memory movements, which makes training faster.
But we can go further - we first note RL does inference then training then inference then training etc.
This means the memory space for inference and training can in theory be re-used, since inference and training are separate modes - this is where vLLM's sleep mode feature comes in, which has 2 options:
1. level = 1 copies weights to the CPU and deletes KV cache
2. level = 2 deletes weights and deletes KV cache
But reminder in Unsloth we share vLLM's memory space for the weights - this means we need a new way to delete the KV cache, and ignore deletion of the weights, and we call this Unsloth Standby.
To enable this, simply add the below to all RL / GRPO training runs before any Unsloth import:
🧪Performance Experiments
Here you will find out how we benchmarked memory usage and context length for GRPO. Note that we do 2 generations per prompt because for GRPO to work, we need at least 2 generations for which to calculate the sample mean and variance. Without 2 generations, the standard deviation of one sample is 0. This causes the advantages which uses this: (reward - mean)/std to be undefined.
This means for GRPO specifically, a maximum context length of 6,144 for Qwen-3 32B is actually 6,144 multiplied by 2 generations ie 12,288 in length.
We provide experiments for Llama-3.1 8B on both LoRA (16bit) and QLoRA (4bit) below:
If you notice any training time differences, it isn’t much. In our apples to apples comparison we noticed <1% training time slowdowns or even speedups which can be attributed to margin of error.
We also theorize speedups are possible due to reduced memory pressure, so there might be less memory cleanup on the CUDA memory allocator side.
In the above image, you see the difference between baseline and standby mode on a single T4 GPU for Qwen 3 4B. We can stretch the vllm'sgpu_memory_utilisationto as high as 0.95 without worrying that it'd affect training. This means you can fit higher context length sequences and more sequences can be processed. In the first case, for example, we have enough memory to fit and process 32K length sequences provided training allows where as previously, any inputs longer than 2K would potentially not fit in and end up causing OOMs (out of memory).
At the same config, we save 2GiB aka 15% memory here. Can be higher for longer sequences
Model
GPU
Seq Len
Num Generations
Grad Acc Steps
--------------------
---------------------
-------
---------------
--------------
Qwen2.5-14B-Instruct
NVIDIA H100 80GB PCIe
32,768
8
4
In our collapsible results below, you can see there is a 9GiB difference in the peak memory used (note that 90% of the time, the GPU memory usage is equal to the peak memory in our case). To put things into perspective, using TRL and LoRA we were able to only fine-tune an 8B parameter model with a context length of 1024 at max (32x less). Anything with higher sequence length (with similar configuration) results in the process failing with OOM.
Click for Unsloth Standby Mode vs. no Standby Benchmarks
The image below shows how standby compares against non standby training with Unsloth. It is averaged over 3 runs to make sure the metrics aren’t noisy. In fact, if you zoom in close enough, you’d see that enabling standby makes it faster as well, probably due to less memory pressure as discussed before.
Previous A100 40GB experiments
In our previous experiments on A100 40GB GPU with Qwen-2.5-3b-instruct and 8 generations per sample, we observed that without standby, the GRPO training (model loaded in 16bit, LoRA, only weights trainable), we could only fit 6K sequence lengths. With our standby feature, we were able to fit 10K and beyond! For comparison TRL can only give you context lengths of up to 1K while holding the same batch size.
:tada:Other optimizations
We now select better compilation flags and reduce compile times by 50% or more. We also managed to dynamically patch any vLLM version to handle gc.collect better for backwards compatibility reasons, as inspired from this vLLM pull request. This reduces compilation times from 2 minutes to under 40 seconds.
We also optimized torch.compile flags and tried turning on some flags - unfortunately combo_kernels and multi_kernel could not function correctly on vLLM 0.10 and Torch 2.8/2.9 nightly and coordinate_descent_tuning made autotuning all kernels dramatically slower. It used to compile in under a minute, but enabling it took over 13 minutes and more, with minimal performance gains.
:books:GRPO Notebooks
All our GRPO notebooks have Unsloth Standby on by default and all optimizations! See for all our GRPO notebooks, or try the below:
You should see the reward increase overtime. We would recommend you train for at least 300 steps which may take 30 mins however, for optimal results, you should train for longer.
{% hint style="warning" %}
If you're having issues with your GRPO model not learning, we'd highly recommend to use our Advanced GRPO notebooks as it has a much better reward function and you should see results much faster and frequently.
{% endhint %}
You will also see sample answers which allows you to see how the model is learning. Some may have steps, XML tags, attempts etc. and the idea is as trains it's going to get better and better because it's going to get scored higher and higher until we get the outputs we desire with long reasoning chains of answers.
{% endstep %}
{% step %}
Run & Evaluate your model
Run your model by clicking the play button. In the first example, there is usually no reasoning in the answer and in order to see the reasoning, we need to first save the LoRA weights we just trained with GRPO first using:
model.save_lora("grpo_saved_lora")
The first inference example run has no reasoning. You must load the LoRA and test it to reveal the reasoning.
Then we load the LoRA and test it. Our reasoning model is much better - it's not always correct, since we only trained it for an hour or so - it'll be better if we extend the sequence length and train for longer!
You can then save your model to GGUF, Ollama etc. by following our guide here.
If you are still not getting any reasoning, you may have either trained for too less steps or your reward function/verifier was not optimal.
{% endstep %}
{% step %}
Save your model
We have multiple options for saving your fine-tuned model, but we’ll focus on the easiest and most popular approaches which you can read more about here
Saving in 16-bit Precision
You can save the model with 16-bit precision using the following command:
`
AMD
URL: llms-txt#amd
Contents:
- :1234:Reinforcement Learning on AMD GPUs
- ### :tools:Troubleshooting
Fine-tune with Unsloth on AMD GPUs.
Unsloth supports Radeon RX, MI300X's (192GB) GPUs and more.
{% stepper %}
{% step %}
Make a new isolated environment (Optional)
To not break any system packages, you can make an isolated pip environment. Reminder to check what Python version you have! It might be pip3, pip3.13, python3, python.3.13 etc.
{% code overflow="wrap" %}
{% endcode %}
{% endstep %}
{% step %}
Install PyTorch
Install the latest PyTorch, TorchAO, Xformers from
You can use our :ledger:gpt-oss RL auto win 2048_Reinforcement_Learning_2048_Game_BF16.ipynb) example on a MI300X (192GB) GPU. The goal is to play the 2048 game automatically and win it with RL. The LLM (gpt-oss 20b) auto devises a strategy to win the 2048 game, and we calculate a high reward for winning strategies, and low rewards for failing strategies.
{% columns %}
{% column %}
{% endcolumn %}
{% column %}
The reward over time is increasing after around 300 steps or so!
The goal for RL is to maximize the average reward to win the 2048 game.
{% endcolumn %}
{% endcolumns %}
We used an AMD MI300X machine (192GB) to run the 2048 RL example with Unsloth, and it worked well!
You can also use our :ledger:automatic kernel gen RL notebook_GRPO_BF16.ipynb) also with gpt-oss to auto create matrix multiplication kernels in Python. The notebook also devices multiple methods to counteract reward hacking.
{% columns %}
{% column width="50%" %}
The RL process learns for example how to apply the Strassen algorithm for faster matrix multiplication inside of Python.
The prompt we used to auto create these kernels was:
{% code overflow="wrap" %}
python
def matmul(A, B):
return ...
`
{% endcode %}
{% endcolumn %}
{% column width="50%" %}
{% endcolumn %}
{% endcolumns %}
:tools:Troubleshooting
As of October 2025, bitsandbytes in AMD is under development - you might get HSA_STATUS_ERROR_EXCEPTION: An HSAIL operation resulted in a hardware exception errors. We disabled bitsandbytes internally in Unsloth automatically until a fix is provided for versions 0.48.2.dev0 and above. This means load_in_4bit = True will instead use 16bit LoRA. Full finetuning also works via full_finetuning = True
To force 4bit, you need to specify the actual model name like unsloth/gemma-3-4b-it-unsloth-bnb-4bit and set use_exact_model_name = True as an extra argument within FastLanguageModel.from_pretrained etc.
AMD GPUs also need the bitsandbytes blocksize to be 128 and not 64 - this also means our pre-quantized models (for example unsloth/Llama-3.2-1B-Instruct-unsloth-bnb-4bit) from HuggingFace for now will not work - we auto switch to downloading the full BF16 weights, then quantize on the fly if we detect an AMD GPU.
--prompt "<|im_start|>user\nCreate a Flappy Bird game in Python. You must include these things:\n1. You must use pygame.\n2. The background color should be randomly chosen and is a light shade. Start with a light blue color.\n3. Pressing SPACE multiple times will accelerate the bird.\n4. The bird's shape should be randomly chosen as a square, circle or triangle. The color should be randomly chosen as a dark color.\n5. Place on the bottom some land colored as dark brown or yellow chosen randomly.\n6. Make a score shown on the top right side. Increment if you pass pipes and don't hit them.\n7. Make randomly spaced pipes with enough space. Color them randomly as dark green or light brown or a dark gray shade.\n8. When you lose, show the best score. Make the text inside the screen. Pressing q or Esc will quit the game. Restarting is pressing SPACE again.\nThe final game should be inside a markdown section in Python. Check your code for errors and fix them before the final markdown section.<|im_end|>\n<|im_start|>assistant\n\n" \
2>&1 | tee Q4_K_M_no_samplers.txt
python
import pygame
import random
Examples:
Example 1 (unknown):
`unknown
{% endcode %}
6. When running it, we get a runnable game!
7. Now try the same without our fixes! So remove --samplers "top_k;top_p;min_p;temperature;dry;typ_p;xtc" This will save the output to Q4_K_M_no_samplers.txt
`
Example 2 (unknown):
`unknown
You will get some looping, but problematically incorrect Python syntax and many other issues. For example the below looks correct, but is wrong! Ie line 39 pipes.clear() ### <<< NameError: name 'pipes' is not defined. Did you forget to import 'pipes'?
Don't forget Unsloth also allows you to save and run your models after fine-tuning so you can locally deploy them directly on your DGX Spark after.
{% endstep %}
{% endstepper %}
Many thanks to Lakshmi Ramesh and Barath Anandan from NVIDIA for helping Unsloth’s DGX Spark launch and building the Docker image.
Unified Memory Usage
gpt-oss-120b QLoRA 4-bit fine-tuning will use around 68GB of unified memory. How your unified memory usage should look before (left) and after (right) training:
And that's it! Have fun training and running LLMs completely locally on your NVIDIA DGX Spark!
Thanks to Tim from AnythingLLM for providing a great fine-tuning tutorial with Unsloth on DGX Spark:
{% embed url="" %}
Examples:
Example 1 (unknown):
`unknown
{% endstep %}
{% step %}
#### Launch container
Launch the training container with GPU access and volume mounts:
`
Example 2 (unknown):
`unknown
{% endstep %}
{% step %}
#### Start Jupyter and Run Notebooks
Inside the container, start Jupyter and run the required notebook. You can use the Reinforcement Learning gpt-oss 20b to win 2048 notebook here_Reinforcement_Learning_2048_Game_DGX_Spark.ipynb). In fact all Unsloth notebooks work in DGX Spark including the 120b notebook! Just remove the installation cells.
The below commands can be used to run the RL notebook as well. After Jupyter Notebook is launched, open up the “gpt_oss_20B_RL_2048_Game.ipynb”
`
4bit pre quantized models we support for 4x faster downloading + no OOMs.
max_seq_length = max_seq_length, # Choose any for long context!
load_in_4bit = True, # 4 bit quantization to reduce memory
full_finetuning = False, # [NEW!] We have full finetuning now!
# token = "hf_...", # use one if using gated models
)
You should see output similar to the example below. Note: We explicitly change the dtype to float32 to ensure correct training behavior.
{% endstep %}
Fine-tuning Hyperparameters (LoRA)
Now it's time to adjust your training hyperparameters. For a deeper dive into how, when, and what to tune, check out our detailed hyperparameters guide.
{% hint style="info" %}
To avoid overfitting, monitor your training loss and avoid setting these values too high.
{% endhint %}
This step adds LoRA adapters for parameter-efficient fine-tuning. Only about 1% of the model’s parameters are trained, which makes the process significantly more efficient.
For this example, we will use the HuggingFaceH4/Multilingual-Thinking. This dataset contains chain-of-thought reasoning examples derived from user questions translated from English into four additional languages.
This is the same dataset referenced in OpenAI's fine-tuning cookbook. The goal of using a multilingual dataset is to help the model learn and generalize reasoning patterns across multiple languages.
gpt-oss introduces a reasoning effort system that controls how much reasoning the model performs. By default, the reasoning effort is set to low, but you can change it by setting the reasoning_effort parameter to low, medium or high.
To format the dataset, we apply a customized version of the gpt-oss prompt:
Let's inspect the dataset by printing the first example:
One unique feature of gpt-oss is its use of the OpenAI Harmony format, which supports structured conversations, reasoning output, and tool calling. This format includes tags such as <|start|> , <|message|> , and <|return|> .
{% hint style="info" %}
🦥 Unsloth fixes the chat template to ensure it is correct. See this tweet for technical details on our template fix.
{% endhint %}
Feel free to adapt the prompt and structure to suit your own dataset or use-case. For more guidance, refer to our dataset guide.
{% endstep %}
We've pre-selected training hyperparameters for optimal results. However, you can modify them based on your specific use case. Refer to our hyperparameters guide.
In this example, we train for 60 steps to speed up the process. For a full training run, set num_train_epochs=1 and disable the step limiting by setting max_steps=None.
During training, monitor the loss to ensure that it is decreasing over time. This confirms that the training process is functioning correctly.
{% endstep %}
Inference: Run Your Trained Model
Now it's time to run inference with your fine-tuned model. You can modify the instruction and input, but leave the output blank.
In this example, we test the model's ability to reason in French by adding a specific instruction to the system prompt, following the same structure used in our dataset.
This should produce an output similar to:
{% endstep %}
Save and Export Your Model
To save your fine-tuned model, it can be exported in the Safetensors format with our new on-demand dequantization of MXFP4 base models (like gpt-oss) during the LoRA merge process. This makes it possible to export your fine-tuned model in bf16 format.
{% hint style="success" %}
New: Saving or merging QLoRA fine-tuned models to GGUF is now supported for use in other frameworks (e.g. Hugging Face, llama.cpp with GGUF).
{% endhint %}
After fine-tuning your gpt-oss model, you can merge it into 16-bit format with:
If you prefer to merge the model and push to the hugging-face hub directly:
:sparkles: Saving to Llama.cpp
1. Obtain the latest llama.cpp on GitHub here. You can follow the build instructions below as well. Change -DGGML_CUDA=ON to -DGGML_CUDA=OFF if you don't have a GPU or just want CPU inference.
2. Convert and quantize the merged model:
3. Run inference on the quantized model:
{% endstep %}
{% endstepper %}
🏁 And that's it!
You've fine-tuned gpt-oss with Unsloth. We're currently working on RL and GRPO implementations, as well as improved model saving and running, so stay tuned.
As always, feel free to drop by our Discord or Reddit if you need any help.
❓FAQ (Frequently Asked Questions)
#### 1. Can I export my model to use in Hugging Face, llama.cpp GGUF or vLLM later?
#### 2. Can I do fp4 or MXFP4 training with gpt-oss?
No, currently no framework supports fp4 or MXFP4 training. Unsloth however is the only framework to support QLoRA 4-bit fine-tuning for the model, enabling more than 4x less VRAM use.
#### 3. Can I export my model to MXFP4 format after training?
No, currently no library or framework supports this.
#### 4. Can I do Reinforcement Learning (RL) or GRPO with gpt-oss?
Yes! Unsloth now supports RL for gpt-oss with GRPO/GSPO. We made it work on a free Kaggle notebook and achieved the fastest inference for RL. Read more here
Acknowledgements: A huge thank you to Eyerafor contributing to this guide!
Examples:
Example 1 (python):
`python
model = FastLanguageModel.get_peft_model(
model,
r = 8, # Choose any number > 0 ! Suggested 8, 16, 32, 64, 128
You can read more about continued pretraining and our release in our blog post.
What is Continued Pretraining?
Continued or continual pretraining (CPT) is necessary to “steer” the language model to understand new domains of knowledge, or out of distribution domains. Base models like Llama-3 8b or Mistral 7b are first pretrained on gigantic datasets of trillions of tokens (Llama-3 for e.g. is 15 trillion).
But sometimes these models have not been well trained on other languages, or text specific domains, like law, medicine or other areas. So continued pretraining (CPT) is necessary to make the language model learn new tokens or datasets.
Advanced Features:
Loading LoRA adapters for continued finetuning
If you saved a LoRA adapter through Unsloth, you can also continue training using your LoRA weights. The optimizer state will be reset as well. To load even optimizer states to continue finetuning, see the next section.
Continued Pretraining & Finetuning the lm_head and embed_tokens matrices
Add lm_head and embed_tokens. For Colab, sometimes you will go out of memory for Llama-3 8b. If so, just add lm_head.
Then use 2 different learning rates - a 2-10x smaller one for the lm_head or embed_tokens like so:
root.title('Bouncing Balls in a Spinning Heptagon')
simulator = HeptagonBounceSimulator(root)
root.mainloop()
`
:detective: Extra Findings & Tips
1. We find using lower KV cache quantization (4bit) seems to degrade generation quality via empirical tests - more tests need to be done, but we suggest using q8_0 cache quantization. The goal of quantization is to support longer context lengths since the KV cache uses quite a bit of memory.
2. We found the down_proj in this model to be extremely sensitive to quantitation. We had to redo some of our dynamic quants which used 2bits for down_proj and now we use 3bits as the minimum for all these matrices.
3. Using llama.cpp 's Flash Attention backend does result in somewhat faster decoding speeds. Use -DGGML_CUDA_FA_ALL_QUANTS=ON when compiling. Note it's also best to set your CUDA architecture as found in to reduce compilation times, then set it via -DCMAKE_CUDA_ARCHITECTURES="80"
4. Using a min_p=0.01is probably enough. llama.cppdefaults to 0.1, which is probably not necessary. Since a temperature of 0.3 is used anyways, we most likely will very unlikely sample low probability tokens, so removing very unlikely tokens is a good idea. DeepSeek recommends 0.0 temperature for coding tasks.
[^1]: MUST USE 8bit - not 4bit
[^2]: CPU threads your machine has
[^3]: Approx 2 for 24GB GPU. Approx 18 for 80GB GPU.
Kimi K2: How to Run Locally
URL: llms-txt#kimi-k2:-how-to-run-locally
Contents:
- :gear: Recommended Settings
- 🌙 Official Recommended Settings:
- :1234: Chat template and prompt format
- :floppy\_disk: Model uploads
- :turtle:Run Kimi K2 Tutorials
- ✨ Run in llama.cpp
Guide on running Kimi K2 and Kimi-K2-Instruct-0905 on your own local device!
Kimi-K2-Instruct-0905 the new version of K2 achieves SOTA performance in knowledge, reasoning, coding, and agentic tasks. The full 1T parameter model from Moonshot AI requires 1.09TB of disk space, while the quantized Unsloth Dynamic 1.8-bit version reduces this to just 245GB (-80% size):Kimi-K2-GGUF
You can now run Kimi-K2-Instruct-0905 with our new GGUFs. Use our same settings below but ensure you change the model name from 'Kimi-K2-Instruct' to 'Kimi-K2-Instruct-0905': K2-0905 GGUFs
All uploads use Unsloth Dynamic 2.0 for SOTA 5-shot MMLU and KL Divergence performance, meaning you can run quantized LLMs with minimal accuracy loss.
You need 250GB of disk space at least to run the 1bit quant!
The only requirement is disk space + RAM + VRAM ≥ 250GB. That means you do not need to have that much RAM or VRAM (GPU) to run the model, but it will just be slower.
{% endhint %}
The 1.8-bit (UD-TQ1\_0) quant will fit in a 1x 24GB GPU (with all MoE layers offloaded to system RAM or a fast disk). Expect around 5 tokens/s with this setup if you have bonus 256GB RAM as well. The full Kimi K2 Q8 quant is 1.09TB in size and will need at least 8 x H200 GPUs.
For optimal performance you will need at least 250GB unified memory or 250GB combined RAM+VRAM for 5+ tokens/s. If you have less than 250GB combined RAM+VRAM, then the speed of the model will definitely take a hit.
If you do not have 250GB of RAM+VRAM, no worries! llama.cpp inherently has disk offloading, so through mmaping, it'll still work, just be slower - for example before you might get 5 to 10 tokens / second, now it's under 1 token.
We suggest using our UD-Q2\_K\_XL (381GB) quant to balance size and accuracy!
{% hint style="success" %}
For the best performance, have your VRAM + RAM combined = the size of the quant you're downloading. If not, it'll still work via disk offloading, just it'll be slower!
{% endhint %}
🌙 Official Recommended Settings:
According to Moonshot AI, these are the recommended settings for Kimi K2 inference:
* Set the temperature 0.6 to reduce repetition and incoherence.
* Original default system prompt is:
* (Optional) Moonshot also suggests the below for the system prompt:
{% hint style="success" %}
We recommend setting min\_p to 0.01 to suppress the occurrence of unlikely tokens with low probabilities.
{% endhint %}
:1234: Chat template and prompt format
Kimi Chat does use a BOS (beginning of sentence token). The system, user and assistant roles are all enclosed with <|im_middle|> which is interesting, and each get their own respective token <|im_system|>, <|im_user|>, <|im_assistant|>.
{% code overflow="wrap" %}
To separate the conversational boundaries (you must remove each new line), we get:
{% code overflow="wrap" %}
:floppy\_disk: Model uploads
ALL our uploads - including those that are not imatrix-based or dynamic, utilize our calibration dataset, which is specifically optimized for conversational, coding, and reasoning tasks.
You can now use the latest update of llama.cpp to run the model:
{% endhint %}
✨ Run in llama.cpp
1. Obtain the latest llama.cpp on GitHub here. You can follow the build instructions below as well. Change -DGGML_CUDA=ON to -DGGML_CUDA=OFF if you don't have a GPU or just want CPU inference.
2. If you want to use llama.cpp directly to load models, you can do the below: (:UD-IQ1\_S) is the quantization type. You can also download via Hugging Face (point 3). This is similar to ollama run . Use export LLAMA_CACHE="folder" to force llama.cpp to save to a specific location.\ To run the new September 2025 update for the model, change the model name from 'Kimi-K2-Instruct' to 'Kimi-K2-Instruct-0905'.
{% hint style="info" %}
Please try out -ot ".ffn_.*_exps.=CPU" to offload all MoE layers to the CPU! This effectively allows you to fit all non MoE layers on 1 GPU, improving generation speeds. You can customize the regex expression to fit more layers if you have more GPU capacity.
If you have a bit more GPU memory, try -ot ".ffn_(up|down)_exps.=CPU" This offloads up and down projection MoE layers.
Try -ot ".ffn_(up)_exps.=CPU" if you have even more GPU memory. This offloads only up projection MoE layers.
And finally offload all layers via -ot ".ffn_.*_exps.=CPU" This uses the least VRAM.
You can also customize the regex, for example -ot "\.(6|7|8|9|[0-9][0-9]|[0-9][0-9][0-9])\.ffn_(gate|up|down)_exps.=CPU" means to offload gate, up and down MoE layers but only from the 6th layer onwards.
{% endhint %}
3. Download the model via (after installing pip install huggingface_hub hf_transfer ). You can choose UD-TQ1_0(dynamic 1.8bit quant) or other quantized versions like Q2_K_XL . We recommend using our 2bit dynamic quantUD-Q2_K_XLto balance size and accuracy. More versions at: huggingface.co/unsloth/Kimi-K2-Instruct-GGUF
{% code overflow="wrap" %}
Examples:
Example 1 (unknown):
`unknown
You are a helpful assistant
`
Example 2 (unknown):
`unknown
You are Kimi, an AI assistant created by Moonshot AI.
`
Example 3 (python):
`python
<|im_system|>system<|im_middle|>You are a helpful assistant<|im_end|><|im_user|>user<|im_middle|>What is 1+1?<|im_end|><|im_assistant|>assistant<|im_middle|>2<|im_end|>
`
Example 4 (unknown):
`unknown
<|im_system|>system<|im_middle|>You are a helpful assistant<|im_end|>
<|im_user|>user<|im_middle|>What is 1+1?<|im_end|>
To share your model, we’ll push it to the Hugging Face Hub using the push_to_hub_merged method. This allows saving the model in multiple quantization formats.
`
Running & Saving Models
URL: llms-txt#running-&-saving-models
Learn how to save your finetuned model so you can run it in your favorite inference engine.
Train Vision/multimodal models via GRPO and RL with Unsloth!
Unsloth now supports vision/multimodal RL with Qwen3-VL, Gemma 3 and more. Due to Unsloth's unique weight sharing and custom kernels, Unsloth makes VLM RL 1.5–2× faster, uses 90% less VRAM, and enables 15× longer context lengths than FA2 setups, with no accuracy loss. This update also introduces Qwen's GSPO algorithm.
Unsloth can train Qwen3-VL-8B with GSPO/GRPO on a free Colab T4 GPU. Other VLMs work too, but may need larger GPUs. Gemma requires newer GPUs than T4 because vLLM restricts to Bfloat16, thus we recommend NVIDIA L4 on Colab. Our notebooks solve numerical math problems involving images and diagrams:
We have also added vLLM VLM integration into Unsloth natively, so all you have to do to use vLLM inference is enable the fast_inference=True flag when initializing the model. Special thanks to Sinoué GAD for providing the first notebook that made integrating VLM RL easier!
This VLM support also integrates our latest update for even more memory efficient + faster RL including our Standby feature, which uniquely limits speed degradation compared to other implementations.
{% hint style="info" %}
You can only use fast_inference for VLMs supported by vLLM. Some models, like Llama 3.2 Vision thus only can run without vLLM, but they still work in Unsloth.
{% endhint %}
It is also important to note, that vLLM does not support LoRA for vision/encoder layers, thus set finetune_vision_layers = False when loading a LoRA adapter.\
However you CAN train the vision layers as well if you use inference via transformers/Unsloth.
Examples:
Example 1 (python):
`python
os.environ['UNSLOTH_VLLM_STANDBY'] = '1' # To enable memory efficient GRPO with vLLM
The installation order is important, since we want the overwrite bundled dependencies with specific versions (namely, xformers and triton).
1. I prefer to use uv over pip as it's faster and better for resolving dependencies, especially for libraries which depend on torch but for which a specific CUDA version is required per this scenario.
Install uv
`
Example 3 (unknown):
`unknown
Create a project dir and venv:
`
Example 4 (unknown):
`unknown
2. Install vllm
`
Gemma 3n: How to Run & Fine-tune
URL: llms-txt#gemma-3n:-how-to-run-&-fine-tune
Contents:
- 🖥️ Running Gemma 3n
- :gear: Official Recommended Settings
- :llama: Tutorial: How to Run Gemma 3n in Ollama
- 📖 Tutorial: How to Run Gemma 3n in llama.cpp
Run Google's new Gemma 3n locally with Dynamic GGUFs on llama.cpp, Ollama, Open WebUI and fine-tune with Unsloth!
Google’s Gemma 3n multimodal model handles image, audio, video, and text inputs. Available in 2B and 4B sizes, it supports 140 languages for text and multimodal tasks. You can now run and fine-tune Gemma-3n-E4B and E2B locally using Unsloth.
* Min\_P of 0.00 (optional, but 0.01 works well, llama.cpp default is 0.1)
* Top\_P of 0.95
* Repetition Penalty of 1.0. (1.0 means disabled in llama.cpp and transformers)
* Chat template:
<bos><start_of_turn>user\nHello!<end_of_turn>\n<start_of_turn>model\nHey there!<end_of_turn>\n<start_of_turn>user\nWhat is 1+1?<end_of_turn>\n<start_of_turn>model\n
* Chat template with \nnewlines rendered (except for the last)
{% code overflow="wrap" %}
{% hint style="danger" %}
llama.cpp an other inference engines auto add a \ - DO NOT add TWO \ tokens! You should ignore the \ when prompting the model!
{% endhint %}
:llama: Tutorial: How to Run Gemma 3n in Ollama
{% hint style="success" %}
Please re download Gemma 3N quants or remove the old ones via Ollama since there are some bug fixes. You can do the below to delete the old file and refresh it:
1. Install ollama if you haven't already!
2. Run the model! Note you can call ollama servein another terminal if it fails! We include all our fixes and suggested parameters (temperature etc) in params in our Hugging Face upload!
📖 Tutorial: How to Run Gemma 3n in llama.cpp
{% hint style="info" %}
We would first like to thank Xuan-Son Nguyen from Hugging Face, Georgi Gerganov from the llama.cpp team on making Gemma 3N work in llama.cpp!
{% endhint %}
1. Obtain the latest llama.cpp on GitHub here. You can follow the build instructions below as well. Change -DGGML_CUDA=ON to -DGGML_CUDA=OFF if you don't have a GPU or just want CPU inference.
2. If you want to use llama.cpp directly to load models, you can do the below: (:Q4\_K\_XL) is the quantization type. You can also download via Hugging Face (point 3). This is similar to ollama run
3. OR download the model via (after installing pip install huggingface_hub hf_transfer ). You can choose Q4\_K\_M, or other quantized versions (like BF16 full precision).
ollama run hf.co/unsloth/gemma-3n-E4B-it-GGUF:UD-Q4_K_XL
`
Example 3 (bash):
`bash
apt-get update
apt-get install pciutils -y
curl -fsSL https://ollama.com/install.sh | sh
`
Example 4 (bash):
`bash
ollama run hf.co/unsloth/gemma-3n-E4B-it-GGUF:UD-Q4_K_XL
`
Troubleshooting Inference
URL: llms-txt#troubleshooting-inference
Contents:
- Running in Unsloth works well, but after exporting & running on other platforms, the results are poor
- Saving to safetensors, not bin format in Colab
- If saving to GGUF or vLLM 16bit crashes
If you're experiencing issues when running or saving your model.
Running in Unsloth works well, but after exporting & running on other platforms, the results are poor
You might sometimes encounter an issue where your model runs and produces good results on Unsloth, but when you use it on another platform like Ollama or vLLM, the results are poor or you might get gibberish, endless/infinite generations or repeated outputs.
* The most common cause of this error is using an incorrect chat template. It’s essential to use the SAME chat template that was used when training the model in Unsloth and later when you run it in another framework, such as llama.cpp or Ollama. When inferencing from a saved model, it's crucial to apply the correct template.
* You must use the correct eos token. If not, you might get gibberish on longer generations.
* It might also be because your inference engine adds an unnecessary "start of sequence" token (or the lack of thereof on the contrary) so ensure you check both hypotheses!
* Use our conversational notebooks to force the chat template - this will fix most issues.
* Qwen-3 14B Conversational notebook Open in Colab-Reasoning-Conversational.ipynb)
* Gemma-3 4B Conversational notebook Open in Colab.ipynb)
* Llama-3.2 3B Conversational notebook Open in Colab-Conversational.ipynb)
We save to .bin in Colab so it's like 4x faster, but set safe_serialization = None to force saving to .safetensors. So model.save_pretrained(..., safe_serialization = None) or model.push_to_hub(..., safe_serialization = None)
If saving to GGUF or vLLM 16bit crashes
You can try reducing the maximum GPU usage during saving by changing maximum_memory_usage.
The default is model.save_pretrained(..., maximum_memory_usage = 0.75). Reduce it to say 0.5 to use 50% of GPU peak memory or lower. This can reduce OOM crashes during saving.
Install xformers from source for blackwell support
Run and fine-tune Mistral Devstral 1.1, including Small-2507 and 2505.
Devstral-Small-2507 (Devstral 1.1) is Mistral's new agentic LLM for software engineering. It excels at tool-calling, exploring codebases, and powering coding agents. Mistral AI released the original 2505 version in May, 2025.
Finetuned from Mistral-Small-3.1, Devstral supports a 128k context window. Devstral Small 1.1 has improved performance, achieving a score of 53.6% performance on SWE-bench verified, making it (July 10, 2025) the #1 open model on the benchmark.
Unsloth Devstral 1.1 GGUFs contain additional tool-calling support and chat template fixes. Devstral 1.1 still works well with OpenHands but now also generalizes better to other prompts and coding environments.
As text-only, Devstral’s vision encoder was removed prior to fine-tuning. We've added optional Vision support for the model.
{% hint style="success" %}
We also worked with Mistral behind the scenes to help debug, test and correct any possible bugs and issues! Make sure to download Mistral's official downloads or Unsloth's GGUFs / dynamic quants to get the correct implementation (ie correct system prompt, correct chat template etc)
Please use --jinja in llama.cpp to enable the system prompt!
{% endhint %}
All Devstral uploads use our Unsloth Dynamic 2.0 methodology, delivering the best performance on 5-shot MMLU and KL Divergence benchmarks. This means, you can run and fine-tune quantized Mistral LLMs with minimal accuracy loss!
According to Mistral AI, these are the recommended settings for inference:
* Temperature from 0.0 to 0.15
* Min\_P of 0.01 (optional, but 0.01 works well, llama.cpp default is 0.1)
* Use--jinjato enable the system prompt.
A system prompt is recommended, and is a derivative of Open Hand's system prompt. The full system prompt is provided here.
{% hint style="success" %}
Our dynamic uploads have the 'UD' prefix in them. Those without are not dynamic however still utilize our calibration dataset.
{% endhint %}
:llama: Tutorial: How to Run Devstral in Ollama
1. Install ollama if you haven't already!
2. Run the model with our dynamic quant. Note you can call ollama serve &in another terminal if it fails! We include all suggested parameters (temperature etc) in params in our Hugging Face upload!
3. Also Devstral supports 128K context lengths, so best to enable KV cache quantization. We use 8bit quantization which saves 50% memory usage. You can also try "q4_0"
📖 Tutorial: How to Run Devstral in llama.cpp
1. Obtain the latest llama.cpp on GitHub here. You can follow the build instructions below as well. Change -DGGML_CUDA=ON to -DGGML_CUDA=OFF if you don't have a GPU or just want CPU inference.
2. If you want to use llama.cpp directly to load models, you can do the below: (:Q4\_K\_XL) is the quantization type. You can also download via Hugging Face (point 3). This is similar to ollama run
3. OR download the model via (after installing pip install huggingface_hub hf_transfer ). You can choose Q4\_K\_M, or other quantized versions (like BF16 full precision).
Examples:
Example 1 (unknown):
`unknown
You are Devstral, a helpful agentic model trained by Mistral AI and using the OpenHands scaffold. You can interact with a computer to solve tasks.
Your primary role is to assist users by executing commands, modifying code, and solving technical problems effectively. You should be thorough, methodical, and prioritize quality over speed.
* If the user asks a question, like "why is X happening", don't try to fix the problem. Just give an answer to the question.
.... SYSTEM PROMPT CONTINUES ....
`
Example 2 (bash):
`bash
apt-get update
apt-get install pciutils -y
curl -fsSL https://ollama.com/install.sh | sh
`
Example 3 (bash):
`bash
export OLLAMA_KV_CACHE_TYPE="q8_0"
ollama run hf.co/unsloth/Devstral-Small-2507-GGUF:UD-Q4_K_XL
If you're stuck on if fine-tuning is right for you, see here! Learn about fine-tuning misconceptions, how it compared to RAG and more:
Understanding Fine-Tuning
Fine-tuning an LLM customizes its behavior, deepens its domain expertise, and optimizes its performance for specific tasks. By refining a pre-trained model (e.g. Llama-3.1-8B) with specialized data, you can:
* Update Knowledge – Introduce new, domain-specific information that the base model didn’t originally include.
* Customize Behavior – Adjust the model’s tone, personality, or response style to fit specific needs or a brand voice.
* Optimize for Tasks – Improve accuracy and relevance on particular tasks or queries your use-case requires.
Think of fine-tuning as creating a specialized expert out of a generalist model. Some debate whether to use Retrieval-Augmented Generation (RAG) instead of fine-tuning, but fine-tuning can incorporate knowledge and behaviors directly into the model in ways RAG cannot. In practice, combining both approaches yields the best results - leading to greater accuracy, better usability, and fewer hallucinations.
Real-World Applications of Fine-Tuning
Fine-tuning can be applied across various domains and needs. Here are a few practical examples of how it makes a difference:
* Sentiment Analysis for Finance – Train an LLM to determine if a news headline impacts a company positively or negatively, tailoring its understanding to financial context.
* Customer Support Chatbots – Fine-tune on past customer interactions to provide more accurate and personalized responses in a company’s style and terminology.
* Legal Document Assistance – Fine-tune on legal texts (contracts, case law, regulations) for tasks like contract analysis, case law research, or compliance support, ensuring the model uses precise legal language.
The Benefits of Fine-Tuning
Fine-tuning offers several notable benefits beyond what a base model or a purely retrieval-based system can provide:
#### Fine-Tuning vs. RAG: What’s the Difference?
Fine-tuning can do mostly everything RAG can - but not the other way around. During training, fine-tuning embeds external knowledge directly into the model. This allows the model to handle niche queries, summarize documents, and maintain context without relying on an outside retrieval system. That’s not to say RAG lacks advantages as it is excels at accessing up-to-date information from external databases. It is in fact possible to retrieve fresh data with fine-tuning as well, however it is better to combine RAG with fine-tuning for efficiency.
#### Task-Specific Mastery
Fine-tuning deeply integrates domain knowledge into the model. This makes it highly effective at handling structured, repetitive, or nuanced queries, scenarios where RAG-alone systems often struggle. In other words, a fine-tuned model becomes a specialist in the tasks or content it was trained on.
#### Independence from Retrieval
A fine-tuned model has no dependency on external data sources at inference time. It remains reliable even if a connected retrieval system fails or is incomplete, because all needed information is already within the model’s own parameters. This self-sufficiency means fewer points of failure in production.
#### Faster Responses
Fine-tuned models don’t need to call out to an external knowledge base during generation. Skipping the retrieval step means they can produce answers much more quickly. This speed makes fine-tuned models ideal for time-sensitive applications where every second counts.
#### Custom Behavior and Tone
Fine-tuning allows precise control over how the model communicates. This ensures the model’s responses stay consistent with a brand’s voice, adhere to regulatory requirements, or match specific tone preferences. You get a model that not only knows what to say, but how to say it in the desired style.
#### Reliable Performance
Even in a hybrid setup that uses both fine-tuning and RAG, the fine-tuned model provides a reliable fallback. If the retrieval component fails to find the right information or returns incorrect data, the model’s built-in knowledge can still generate a useful answer. This guarantees more consistent and robust performance for your system.
Common Misconceptions
Despite fine-tuning’s advantages, a few myths persist. Let’s address two of the most common misconceptions about fine-tuning:
Does Fine-Tuning Add New Knowledge to a Model?
Yes - it absolutely can. A common myth suggests that fine-tuning doesn’t introduce new knowledge, but in reality it does. If your fine-tuning dataset contains new domain-specific information, the model will learn that content during training and incorporate it into its responses. In effect, fine-tuning can and does teach the model new facts and patterns from scratch.
Is RAG Always Better Than Fine-Tuning?
Not necessarily. Many assume RAG will consistently outperform a fine-tuned model, but that’s not the case when fine-tuning is done properly. In fact, a well-tuned model often matches or even surpasses RAG-based systems on specialized tasks. Claims that “RAG is always better” usually stem from fine-tuning attempts that weren’t optimally configured - for example, using incorrect LoRA parameters or insufficient training.
Unsloth takes care of these complexities by automatically selecting the best parameter configurations for you. All you need is a good-quality dataset, and you'll get a fine-tuned model that performs to its fullest potential.
Is Fine-Tuning Expensive?
Not at all! While full fine-tuning or pretraining can be costly, these are not necessary (pretraining is especially not necessary). In most cases, LoRA or QLoRA fine-tuning can be done for minimal cost. In fact, with Unsloth’s free notebooks for Colab or Kaggle, you can fine-tune models without spending a dime. Better yet, you can even fine-tune locally on your own device.
Why You Should Combine RAG & Fine-Tuning
Instead of choosing between RAG and fine-tuning, consider using both together for the best results. Combining a retrieval system with a fine-tuned model brings out the strengths of each approach. Here’s why:
* Task-Specific Expertise – Fine-tuning excels at specialized tasks or formats (making the model an expert in a specific area), while RAG keeps the model up-to-date with the latest external knowledge.
* Better Adaptability – A fine-tuned model can still give useful answers even if the retrieval component fails or returns incomplete information. Meanwhile, RAG ensures the system stays current without requiring you to retrain the model for every new piece of data.
* Efficiency – Fine-tuning provides a strong foundational knowledge base within the model, and RAG handles dynamic or quickly-changing details without the need for exhaustive re-training from scratch. This balance yields an efficient workflow and reduces overall compute costs.
LoRA vs. QLoRA: Which One to Use?
When it comes to implementing fine-tuning, two popular techniques can dramatically cut down the compute and memory requirements: LoRA and QLoRA. Here’s a quick comparison of each:
* LoRA (Low-Rank Adaptation) – Fine-tunes only a small set of additional “adapter” weight matrices (in 16-bit precision), while leaving most of the original model unchanged. This significantly reduces the number of parameters that need updating during training.
* QLoRA (Quantized LoRA) – Combines LoRA with 4-bit quantization of the model weights, enabling efficient fine-tuning of very large models on minimal hardware. By using 4-bit precision where possible, it dramatically lowers memory usage and compute overhead.
We recommend starting with QLoRA, as it’s one of the most efficient and accessible methods available. Thanks to Unsloth’s dynamic 4-bit quants, the accuracy loss compared to standard 16-bit LoRA fine-tuning is now negligible.
Experimentation is Key
There’s no single “best” approach to fine-tuning - only best practices for different scenarios. It’s important to experiment with different methods and configurations to find what works best for your dataset and use case. A great starting point is QLoRA (4-bit), which offers a very cost-effective, resource-friendly way to fine-tune models without heavy computational requirements.
Running in Unsloth works well, but after exporting & running on other platforms, the results are poor
You might sometimes encounter an issue where your model runs and produces good results on Unsloth, but when you use it on another platform like Ollama or vLLM, the results are poor or you might get gibberish, endless/infinite generations or repeated outputs.
* The most common cause of this error is using an incorrect chat template. It’s essential to use the SAME chat template that was used when training the model in Unsloth and later when you run it in another framework, such as llama.cpp or Ollama. When inferencing from a saved model, it's crucial to apply the correct template.
* It might also be because your inference engine adds an unnecessary "start of sequence" token (or the lack of thereof on the contrary) so ensure you check both hypotheses!
* Use our conversational notebooks to force the chat template - this will fix most issues.
* Qwen-3 14B Conversational notebook Open in Colab-Reasoning-Conversational.ipynb)
* Gemma-3 4B Conversational notebook Open in Colab.ipynb)
* Llama-3.2 3B Conversational notebook Open in Colab-Conversational.ipynb)
You can try reducing the maximum GPU usage during saving by changing maximum_memory_usage.
The default is model.save_pretrained(..., maximum_memory_usage = 0.75). Reduce it to say 0.5 to use 50% of GPU peak memory or lower. This can reduce OOM crashes during saving.
A guide on how to run DeepSeek-R1-0528 including Qwen3 on your own local device!
DeepSeek-R1-0528 is DeepSeek's new update to their R1 reasoning model. The full 671B parameter model requires 715GB of disk space. The quantized dynamic 1.66-bit version uses 162GB (-80% reduction in size). GGUF: DeepSeek-R1-0528-GGUF
DeepSeek also released a R1-0528 distilled version by fine-tuning Qwen3 (8B). The distill achieves similar performance to Qwen3 (235B). You can alsofine-tune Qwen3 Distillwith Unsloth. Qwen3 GGUF: DeepSeek-R1-0528-Qwen3-8B-GGUF
All uploads use Unsloth Dynamic 2.0 for SOTA 5-shot MMLU and KL Divergence performance, meaning you can run & fine-tune quantized DeepSeek LLMs with minimal accuracy loss.
NEW: Huge improvements to tool calling and chat template fixes.\
\
New TQ1\_0 dynamic 1.66-bit quant - 162GB in size. Ideal for 192GB RAM (including Mac) and Ollama users. Try: ollama run hf.co/unsloth/DeepSeek-R1-0528-GGUF:TQ1_0
{% endhint %}
:gear: Recommended Settings
For DeepSeek-R1-0528-Qwen3-8B, the model can pretty much fit in any setup, and even those with as less as 20GB RAM. There is no need for any prep beforehand.\
\
However, for the full R1-0528 model which is 715GB in size, you will need extra prep. The 1.78-bit (IQ1\_S) quant will fit in a 1x 24GB GPU (with all layers offloaded). Expect around 5 tokens/s with this setup if you have bonus 128GB RAM as well.
It is recommended to have at least 64GB RAM to run this quant (you will get 1 token/s without a GPU). For optimal performance you will need at least 180GB unified memory or 180GB combined RAM+VRAM for 5+ tokens/s.
We suggest using our 2.7bit (Q2\_K\_XL) or 2.4bit (IQ2\_XXS) quant to balance size and accuracy! The 2.4bit one also works well.
{% hint style="success" %}
Though not necessary, for the best performance, have your VRAM + RAM combined = to the size of the quant you're downloading.
{% endhint %}
🐳 Official Recommended Settings:
According to DeepSeek, these are the recommended settings for R1 (R1-0528 and Qwen3 distill should use the same settings) inference:
* Set the temperature 0.6 to reduce repetition and incoherence.
* Set top\_p to 0.95 (recommended)
* Run multiple tests and average results for reliable evaluation.
:1234: Chat template/prompt format
R1-0528 uses the same chat template as the original R1 model. You do not need to force \n , but you can still add it in!
A BOS is forcibly added, and an EOS separates each interaction. To counteract double BOS tokens during inference, you should only call tokenizer.encode(..., add_special_tokens = False) since the chat template auto adds a BOS token as well.\
For llama.cpp / GGUF inference, you should skip the BOS since it’ll auto add it:
The and tokens get their own designated tokens.
ALL our uploads - including those that are not imatrix-based or dynamic, utilize our calibration dataset, which is specifically optimized for conversational, coding, and language tasks.
1. Install ollama if you haven't already! You can only run models up to 32B in size. To run the full 720GB R1-0528 model, see here.
2. Run the model! Note you can call ollama servein another terminal if it fails! We include all our fixes and suggested parameters (temperature etc) in params in our Hugging Face upload!
3. (NEW) To run the full R1-0528 model in Ollama, you can use our TQ1\_0 (162GB quant):
(NEW) To run the full R1-0528 model in Ollama, you can use our TQ1\_0 (162GB quant):
If you want to use any of the quants that are larger than TQ1\_0 (162GB) on Ollama, you need to first merge the 3 GGUF split files into 1 like the code below. Then you will need to run the model locally.
✨ Run Qwen3 distilled R1 in llama.cpp
1. To run the full 720GB R1-0528 model,see here. Obtain the latest llama.cpp on GitHub here. You can follow the build instructions below as well. Change -DGGML_CUDA=ON to -DGGML_CUDA=OFF if you don't have a GPU or just want CPU inference.
2. Then use llama.cpp directly to download the model:
✨ Run Full R1-0528 on llama.cpp
1. Obtain the latest llama.cpp on GitHub here. You can follow the build instructions below as well. Change -DGGML_CUDA=ON to -DGGML_CUDA=OFF if you don't have a GPU or just want CPU inference.
2. If you want to use llama.cpp directly to load models, you can do the below: (:IQ1\_S) is the quantization type. You can also download via Hugging Face (point 3). This is similar to ollama run . Use export LLAMA_CACHE="folder" to force llama.cpp to save to a specific location.
{% hint style="success" %}
Please try out -ot ".ffn_.*_exps.=CPU" to offload all MoE layers to the CPU! This effectively allows you to fit all non MoE layers on 1 GPU, improving generation speeds. You can customize the regex expression to fit more layers if you have more GPU capacity.
If you have a bit more GPU memory, try -ot ".ffn_(up|down)_exps.=CPU" This offloads up and down projection MoE layers.
Try -ot ".ffn_(up)_exps.=CPU" if you have even more GPU memory. This offloads only up projection MoE layers.
And finally offload all layers via -ot ".ffn_.*_exps.=CPU" This uses the least VRAM.
You can also customize the regex, for example -ot "\.(6|7|8|9|[0-9][0-9]|[0-9][0-9][0-9])\.ffn_(gate|up|down)_exps.=CPU" means to offload gate, up and down MoE layers but only from the 6th layer onwards.
{% endhint %}
3. Download the model via (after installing pip install huggingface_hub hf_transfer ). You can choose UD-IQ1_S(dynamic 1.78bit quant) or other quantized versions like Q4_K_M . We recommend using our 2.7bit dynamic quantUD-Q2_K_XLto balance size and accuracy. More versions at: https://huggingface.co/unsloth/DeepSeek-R1-0528-GGUF
{% code overflow="wrap" %}
Examples:
Example 1 (unknown):
`unknown
<|begin▁of▁sentence|><|User|>What is 1+1?<|Assistant|>It's 2.<|end▁of▁sentence|><|User|>Explain more!<|Assistant|>
`
Example 2 (unknown):
`unknown
<|User|>What is 1+1?<|Assistant|>
`
Example 3 (bash):
`bash
apt-get update
apt-get install pciutils -y
curl -fsSL https://ollama.com/install.sh | sh
`
Example 4 (bash):
`bash
ollama run hf.co/unsloth/DeepSeek-R1-0528-Qwen3-8B-GGUF:Q4_K_XL
`
GLM-4.6: How to Run Locally
URL: llms-txt#glm-4.6:-how-to-run-locally
Contents:
- Unsloth Chat Template fixes
- :gear: Recommended Settings
- Official Recommended Settings
- Run GLM-4.6 Tutorials:
- :llama: Run in Ollama
- ✨ Run in llama.cpp
A guide on how to run Z.ai's new GLM-4.6 model on your own local device!
GLM-4.6 is the latest reasoning model from Z.ai, achieving SOTA performance on coding and agent benchmarks while offering improved conversational chats. The full 355B parameter model requires 400GB of disk space, while the Unsloth Dynamic 2-bit GGUF reduces the size to 135GB (-75%). GLM-4.6-GGUF
There is currently no smaller GLM-4.6-Air model available, however Z.ai's team says that it is expected soon.
{% hint style="success" %}
We did multiple chat template fixes for GLM-4.6 to make llama.cpp/llama-cli --jinja work - please only use --jinja otherwise the output will be wrong!
You asked for benchmarks on our quants, so we’re showcasing Aider Polyglot results! Our Dynamic 3-bit DeepSeek V3.1 GGUF scores 75.6%, surpassing many full-precision SOTA LLMs. Read more.
{% endhint %}
All uploads use Unsloth Dynamic 2.0 for SOTA 5-shot MMLU and Aider performance, meaning you can run & fine-tune quantized GLM LLMs with minimal accuracy loss.
One of the significant fixes we did addresses an issue with prompting GGUFs, where the second prompt wouldn’t work. We fixed this issue however, this problem still persists in GGUFs without our fixes. For example, when using any non-Unsloth GLM-4.6 GGUF, the first conversation works fine, but the second one breaks.
We’ve resolved this in our chat template, so when using our version, conversations beyond the second (third, fourth, etc.) work without any errors. There are still some issues with tool-calling, which we haven’t fully investigated yet due to bandwidth limitations. We’ve already informed the GLM team about these remaining issues.
:gear: Recommended Settings
The 2-bit dynamic quant UD-Q2\_K\_XL uses 135GB of disk space - this works well in a 1x24GB card and 128GB of RAM with MoE offloading. The 1-bit UD-TQ1 GGUF also works natively in Ollama!
{% hint style="info" %}
You must use --jinja for llama.cpp quants - this uses our fixed chat templates and enables the correct template! You might get incorrect results if you do not use --jinja
{% endhint %}
The 4-bit quants will fit in a 1x 40GB GPU (with MoE layers offloaded to RAM). Expect around 5 tokens/s with this setup if you have bonus 165GB RAM as well. It is recommended to have at least 205GB RAM to run this 4-bit. For optimal performance you will need at least 205GB unified memory or 205GB combined RAM+VRAM for 5+ tokens/s. To learn how to increase generation speed and fit longer contexts, read here.
{% hint style="success" %}
Though not a must, for best performance, have your VRAM + RAM combined equal to the size of the quant you're downloading. If not, hard drive / SSD offloading will work with llama.cpp, just inference will be slower.
{% endhint %}
Official Recommended Settings
According to Z.ai, these are the recommended settings for GLM inference:
* Set the temperature 1.0
* Set top\_p to 0.95 (recommended for coding)
* Set top\_k to 40 (recommended for coding)
* 200K context length or less
* Use --jinja for llama.cpp variants - we fixed some chat template issues as well!
Run GLM-4.6 Tutorials:
:llama: Run in Ollama
{% stepper %}
{% step %}
Install ollama if you haven't already! To run more variants of the model, see here.
{% step %}
Run the model! Note you can call ollama servein another terminal if it fails! We include all our fixes and suggested parameters (temperature etc) in params in our Hugging Face upload!
{% step %}
To run other quants, you need to first merge the GGUF split files into 1 like the code below. Then you will need to run the model locally.
{% endstep %}
{% endstepper %}
✨ Run in llama.cpp
{% stepper %}
{% step %}
Obtain the latest llama.cpp on GitHub here. You can follow the build instructions below as well. Change -DGGML_CUDA=ON to -DGGML_CUDA=OFF if you don't have a GPU or just want CPU inference.
{% step %}
If you want to use llama.cpp directly to load models, you can do the below: (:Q2\_K\_XL) is the quantization type. You can also download via Hugging Face (point 3). This is similar to ollama run . Use export LLAMA_CACHE="folder" to force llama.cpp to save to a specific location. Remember the model has only a maximum of 128K context length.
{% hint style="success" %}
Please try out -ot ".ffn_.*_exps.=CPU" to offload all MoE layers to the CPU! This effectively allows you to fit all non MoE layers on 1 GPU, improving generation speeds. You can customize the regex expression to fit more layers if you have more GPU capacity.
If you have a bit more GPU memory, try -ot ".ffn_(up|down)_exps.=CPU" This offloads up and down projection MoE layers.
Try -ot ".ffn_(up)_exps.=CPU" if you have even more GPU memory. This offloads only up projection MoE layers.
And finally offload all layers via -ot ".ffn_.*_exps.=CPU" This uses the least VRAM.
You can also customize the regex, for example -ot "\.(6|7|8|9|[0-9][0-9]|[0-9][0-9][0-9])\.ffn_(gate|up|down)_exps.=CPU" means to offload gate, up and down MoE layers but only from the 6th layer onwards.
{% endhint %}
{% step %}
Download the model via (after installing pip install huggingface_hub hf_transfer ). You can choose UD-Q2\_K\_XL (dynamic 2bit quant) or other quantized versions like Q4_K_XL . We recommend using our 2.7bit dynamic quantUD-Q2_K_XLto balance size and accuracy.
Examples:
Example 1 (bash):
`bash
apt-get update
apt-get install pciutils -y
curl -fsSL https://ollama.com/install.sh | sh
`
Example 2 (unknown):
`unknown
OLLAMA_MODELS=unsloth ollama serve &
OLLAMA_MODELS=unsloth ollama run hf.co/unsloth/GLM-4.6-GGUF:TQ1_0
* /workspace/unsloth-notebooks/ — Example fine-tuning notebooks
* /home/unsloth/ — User home directory
#### Setting up SSH Key
If you don't have an SSH key pair:
Examples:
Example 1 (bash):
`bash
docker run -d -e JUPYTER_PASSWORD="mypassword" \
-p 8888:8888 -p 2222:22 \
-v $(pwd)/work:/workspace/work \
--gpus all \
unsloth/unsloth
`
Example 2 (bash):
`bash
docker run -d -e JUPYTER_PORT=8000 \
-e JUPYTER_PASSWORD="mypassword" \
-e "SSH_KEY=$(cat ~/.ssh/container_key.pub)" \
-e USER_PASSWORD="unsloth2024" \
-p 8000:8000 -p 2222:22 \
-v $(pwd)/work:/workspace/work \
--gpus all \
unsloth/unsloth
`
Datasets Guide
URL: llms-txt#datasets-guide
Contents:
- What is a Dataset?
- Data Format
- Getting Started
- Formatting the Data
- Common Data Formats for LLM Training
- Applying Chat Templates with Unsloth
- Formatting Data Q\&A
- Synthetic Data Generation
- Synthetic Dataset Notebook
- Using a local LLM or ChatGPT for synthetic data
Learn how to create & prepare a dataset for fine-tuning.
What is a Dataset?
For LLMs, datasets are collections of data that can be used to train our models. In order to be useful for training, text data needs to be in a format that can be tokenized. You'll also learn how to use datasets inside of Unsloth.
One of the key parts of creating a dataset is your chat template and how you are going to design it. Tokenization is also important as it breaks text into tokens, which can be words, sub-words, or characters so LLMs can process it effectively. These tokens are then turned into embeddings and are adjusted to help the model understand the meaning and context.
To enable the process of tokenization, datasets need to be in a format that can be read by a tokenizer.
Format
Description
Training Type
Raw Corpus
Raw text from a source such as a website, book, or article.
Continued Pretraining (CPT)
Instruct
Instructions for the model to follow and an example of the output to aim for.
Supervised fine-tuning (SFT)
Conversation
Multiple-turn conversation between a user and an AI assistant.
Supervised fine-tuning (SFT)
RLHF
Conversation between a user and an AI assistant, with the assistant's responses being ranked by a script, another model or human evaluator.
Reinforcement Learning (RL)
{% hint style="info" %}
It's worth noting that different styles of format exist for each of these types.
{% endhint %}
Before we format our data, we want to identify the following:
{% stepper %}
{% step %} Purpose of dataset
Knowing the purpose of the dataset will help us determine what data we need and format to use.
The purpose could be, adapting a model to a new task such as summarization or improving a model's ability to role-play a specific character. For example:
* Chat-based dialogues (Q\&A, learn a new language, customer support, conversations).
* Domain-specific data (medical, finance, technical).
{% endstep %}
{% step %} Style of output
The style of output will let us know what sources of data we will use to reach our desired output.
For example, the type of output you want to achieve could be JSON, HTML, text or code. Or perhaps you want it to be Spanish, English or German etc.
{% endstep %}
{% step %} Data source
When we know the purpose and style of the data we need, we need to analyze the quality and quantity of the data. Hugging Face and Wikipedia are great sources of datasets and Wikipedia is especially useful if you are looking to train a model to learn a language.
The Source of data can be a CSV file, PDF or even a website. You can also synthetically generate data but extra care is required to make sure each example is high quality and relevant.
{% endstep %}
{% endstepper %}
{% hint style="success" %}
One of the best ways to create a better dataset is by combining it with a more generalized dataset from Hugging Face like ShareGPT to make your model smarter and diverse. You could also add synthetically generated data.
{% endhint %}
Formatting the Data
When we have identified the relevant criteria, and collected the necessary data, we can then format our data into a machine readable format that is ready for training.
This format preserves natural language flow and allows the model to learn from continuous text.
If we are adapting a model to a new task, and intend for the model to output text in a single turn based on a specific set of instructions, we can use Instruction format in Alpaca style
When we want multiple turns of conversation we can use the ShareGPT format:
The template format uses the "from"/"value" attribute keys and messages alternates between humanand gpt, allowing for natural dialogue flow.
The other common format is OpenAI's ChatML format and is what Hugging Face defaults to. This is probably the most used format, and alternates between user and assistant
Applying Chat Templates with Unsloth
For datasets that usually follow the common chatml format, the process of preparing the dataset for training or finetuning, consists of four simple steps:
* Check the chat templates that Unsloth currently supports:\\
\
This will print out the list of templates currently supported by Unsloth. Here is an example output:\\
* Use get_chat_template to apply the right chat template to your tokenizer:\\
* Define your formatting function. Here's an example:\\
\
\
This function loops through your dataset applying the chat template you defined to each sample.\\
* Finally, let's load the dataset and apply the required modifications to our dataset: \\
\
If your dataset uses the ShareGPT format with "from"/"value" keys instead of the ChatML "role"/"content" format, you can use the standardize_sharegpt function to convert it first. The revised code will now look as follows:\
\\
Formatting Data Q\&A
Q: How can I use the Alpaca instruct format?
A: If your dataset is already formatted in the Alpaca format, then follow the formatting steps as shown in the Llama3.1 notebook -Alpaca.ipynb#scrollTo=LjY75GoYUCB8). If you need to convert your data to the Alpaca format, one approach is to create a Python script to process your raw data. If you're working on a summarization task, you can use a local LLM to generate instructions and outputs for each example.
Q: Should I always use the standardize\_sharegpt method?
A: Only use the standardize\_sharegpt method if your target dataset is formatted in the sharegpt format, but your model expect a ChatML format instead.
\ Q: Why not use the apply\_chat\_template function that comes with the tokenizer.
A: The chat_template attribute when a model is first uploaded by the original model owners sometimes contains errors and may take time to be updated. In contrast, at Unsloth, we thoroughly check and fix any errors in the chat_template for every model when we upload the quantized versions to our repositories. Additionally, our get_chat_template and apply_chat_template methods offer advanced data manipulation features, which are fully documented on our Chat Templates documentation page.
Q: What if my template is not currently supported by Unsloth?
A: Submit a feature request on the unsloth github issues forum. As a temporary workaround, you could also use the tokenizer's own apply\_chat\_template function until your feature request is approved and merged.
Synthetic Data Generation
You can also use any local LLM like Llama 3.3 (70B) or OpenAI's GPT 4.5 to generate synthetic data. Generally, it is better to use a bigger like Llama 3.3 (70B) to ensure the highest quality outputs. You can directly use inference engines like vLLM, Ollama or llama.cpp to generate synthetic data but it will require some manual work to collect it and prompt for more data. There's 3 goals for synthetic data:
* Produce entirely new data - either from scratch or from your existing dataset
* Diversify your dataset so your model does not overfit and become too specific
* Augment existing data e.g. automatically structure your dataset in the correct chosen format
Synthetic Dataset Notebook
We collaborated with Meta to launch a free notebook for creating Synthetic Datasets automatically using local models like Llama 3.2. Access the notebook here..ipynb)
What the notebook does:
* Auto-parses PDFs, websites, YouTube videos and more
* Uses Meta’s Synthetic Data Kit + Llama 3.2 (3B) to generate QA pairs
* Cleans and filters the data automatically
* Fine-tunes the dataset with Unsloth + Llama
* Notebook is fully done locally with no API calling necessary
Using a local LLM or ChatGPT for synthetic data
Your goal is to prompt the model to generate and process QA data that is in your specified format. The model will need to learn the structure that you provided and also the context so ensure you at least have 10 examples of data already. Examples prompts:
* Prompt for generating more dialogue on an existing dataset:
Using the dataset example I provided, follow the structure and generate conversations based on the examples.
* Prompt if you no have dataset:
{% code overflow="wrap" %}
{% endcode %}
* Prompt for a dataset without formatting:
{% code overflow="wrap" %}
It is recommended to check the quality of generated data to remove or improve on irrelevant or poor-quality responses. Depending on your dataset it may also have to be balanced in many areas so your model does not overfit. You can then feed this cleaned dataset back into your LLM to regenerate data, now with even more guidance.
Dataset FAQ + Tips
How big should my dataset be?
We generally recommend using a bare minimum of at least 100 rows of data for fine-tuning to achieve reasonable results. For optimal performance, a dataset with over 1,000 rows is preferable, and in this case, more data usually leads to better outcomes. If your dataset is too small you can also add synthetic data or add a dataset from Hugging Face to diversify it. However, the effectiveness of your fine-tuned model depends heavily on the quality of the dataset, so be sure to thoroughly clean and prepare your data.
How should I structure my dataset if I want to fine-tune a reasoning model?
If you want to fine-tune a model that already has reasoning capabilities like the distilled versions of DeepSeek-R1 (e.g. DeepSeek-R1-Distill-Llama-8B), you will need to still follow question/task and answer pairs however, for your answer you will need to change the answer so it includes reasoning/chain-of-thought process and the steps it took to derive the answer.\
\
For a model that does not have reasoning and you want to train it so that it later encompasses reasoning capabilities, you will need to utilize a standard dataset but this time without reasoning in its answers. This is training process is known as Reinforcement Learning and GRPO.
Multiple datasets
If you have multiple datasets for fine-tuning, you can either:
* Standardize the format of all datasets, combine them into a single dataset, and fine-tune on this unified dataset.
* Use the Multiple Datasets notebook to fine-tune on multiple datasets directly.
Can I fine-tune the same model multiple times?
You can fine-tune an already fine-tuned model multiple times, but it's best to combine all the datasets and perform the fine-tuning in a single process instead. Training an already fine-tuned model can potentially alter the quality and knowledge acquired during the previous fine-tuning process.
Using Datasets in Unsloth
See an example of using the Alpaca dataset inside of Unsloth on Google Colab:
We will now use the Alpaca Dataset created by calling GPT-4 itself. It is a list of 52,000 instructions and outputs which was very popular when Llama-1 was released, since it made finetuning a base LLM be competitive with ChatGPT itself.
You can access the GPT4 version of the Alpaca dataset here. Below shows some examples of the dataset:
You can see there are 3 columns in each row - an instruction, and input and an output. We essentially combine each row into 1 large prompt like below. We then use this to finetune the language model, and this made it very similar to ChatGPT. We call this process supervised instruction finetuning.
Multiple columns for finetuning
But a big issue is for ChatGPT style assistants, we only allow 1 instruction / 1 prompt, and not multiple columns / inputs. For example in ChatGPT, you can see we must submit 1 prompt, and not multiple prompts.
This essentially means we have to "merge" multiple columns into 1 large prompt for finetuning to actually function!
For example the very famous Titanic dataset has many many columns. Your job was to predict whether a passenger has survived or died based on their age, passenger class, fare price etc. We can't simply pass this into ChatGPT, but rather, we have to "merge" this information into 1 large prompt.
For example, if we ask ChatGPT with our "merged" single prompt which includes all the information for that passenger, we can then ask it to guess or predict whether the passenger has died or survived.
Other finetuning libraries require you to manually prepare your dataset for finetuning, by merging all your columns into 1 prompt. In Unsloth, we simply provide the function called to_sharegpt which does this in 1 go!
Now this is a bit more complicated, since we allow a lot of customization, but there are a few points:
* You must enclose all columns in curly braces {}. These are the column names in the actual CSV / Excel file.
* Optional text components must be enclosed in [[]]. For example if the column "input" is empty, the merging function will not show the text and skip this. This is useful for datasets with missing values.
* Select the output or target / prediction column in output_column_name. For the Alpaca dataset, this will be output.
For example in the Titanic dataset, we can create a large merged prompt format like below, where each column / piece of text becomes optional.
For example, pretend the dataset looks like this with a lot of missing data:
Embarked
Age
Fare
--------
---
----
S
23
18
7.25
Then, we do not want the result to be:
1. The passenger embarked from S. Their age is 23. Their fare is EMPTY.
2. The passenger embarked from EMPTY. Their age is 18. Their fare is $7.25.
Instead by optionally enclosing columns using [[]], we can exclude this information entirely.
1. \[\[The passenger embarked from S.]] \[\[Their age is 23.]] \[\[Their fare is EMPTY.]]
2. \[\[The passenger embarked from EMPTY.]] \[\[Their age is 18.]] \[\[Their fare is $7.25.]]
1. The passenger embarked from S. Their age is 23.
2. Their age is 18. Their fare is $7.25.
Multi turn conversations
A bit issue if you didn't notice is the Alpaca dataset is single turn, whilst remember using ChatGPT was interactive and you can talk to it in multiple turns. For example, the left is what we want, but the right which is the Alpaca dataset only provides singular conversations. We want the finetuned language model to somehow learn how to do multi turn conversations just like ChatGPT.
So we introduced the conversation_extension parameter, which essentially selects some random rows in your single turn dataset, and merges them into 1 conversation! For example, if you set it to 3, we randomly select 3 rows and merge them into 1! Setting them too long can make training slower, but could make your chatbot and final finetune much better!
Then set output_column_name to the prediction / output column. For the Alpaca dataset dataset, it would be the output column.
We then use the standardize_sharegpt function to just make the dataset in a correct format for finetuning! Always call this!
Vision Fine-tuning
The dataset for fine-tuning a vision or multimodal model also includes image inputs. For example, the Llama 3.2 Vision Notebook-Vision.ipynb#scrollTo=vITh0KVJ10qX) uses a radiography case to show how AI can help medical professionals analyze X-rays, CT scans, and ultrasounds more efficiently.
We'll be using a sampled version of the ROCO radiography dataset. You can access the dataset here. The dataset includes X-rays, CT scans and ultrasounds showcasing medical conditions and diseases. Each image has a caption written by experts describing it. The goal is to finetune a VLM to make it a useful analysis tool for medical professionals.
Let's take a look at the dataset, and check what the 1st example shows:
Panoramic radiography shows an osteolytic lesion in the right posterior maxilla with resorption of the floor of the maxillary sinus (arrows).
To format the dataset, all vision finetuning tasks should be formatted as follows:
We will craft an custom instruction asking the VLM to be an expert radiographer. Notice also instead of just 1 instruction, you can add multiple turns to make it a dynamic conversation.
Let's convert the dataset into the "correct" format for finetuning:
The first example is now structured like below:
{% code overflow="wrap" %}
Before we do any finetuning, maybe the vision model already knows how to analyse the images? Let's check if this is the case!
For more details, view our dataset section in the notebook here-Vision.ipynb#scrollTo=vITh0KVJ10qX).
Examples:
Example 1 (json):
`json
"text": "Pasta carbonara is a traditional Roman pasta dish. The sauce is made by mixing raw eggs with grated Pecorino Romano cheese and black pepper. The hot pasta is then tossed with crispy guanciale (cured pork cheek) and the egg mixture, creating a creamy sauce from the residual heat. Despite popular belief, authentic carbonara never contains cream or garlic. The dish likely originated in Rome in the mid-20th century, though its exact origins are debated..."
`
Example 2 (json):
`json
"Instruction": "Task we want the model to perform."
"Input": "Optional, but useful, it will essentially be the user's query."
"Output": "The expected result of the task and the output of the model."
`
Example 3 (json):
`json
{
"conversations": [
{
"from": "human",
"value": "Can you help me make pasta carbonara?"
},
{
"from": "gpt",
"value": "Would you like the traditional Roman recipe, or a simpler version?"
},
{
"from": "human",
"value": "The traditional version please"
},
{
"from": "gpt",
"value": "The authentic Roman carbonara uses just a few ingredients: pasta, guanciale, eggs, Pecorino Romano, and black pepper. Would you like the detailed recipe?"
}
]
}
`
Example 4 (unknown):
`unknown
{
"messages": [
{
"role": "user",
"content": "What is 1+1?"
},
{
"role": "assistant",
"content": "It's 2!"
},
]
}
`
Unsloth Requirements
URL: llms-txt#unsloth-requirements
Contents:
- System Requirements
- Fine-tuning VRAM requirements:
Here are Unsloth's requirements including system and GPU VRAM requirements.
* Unsloth works on AMD and Intel GPUs! Apple/Silicon/MLX is in the works.
* If you have different versions of torch, transformers etc., pip install unsloth will automatically install all the latest versions of those libraries so you don't need to worry about version compatibility.
* Your device should have xformers, torch, BitsandBytes and triton support.
{% hint style="info" %}
Python 3.13 is now supported!
{% endhint %}
Fine-tuning VRAM requirements:
How much GPU memory do I need for LLM fine-tuning using Unsloth?
{% hint style="info" %}
A common issue when you OOM or run out of memory is because you set your batch size too high. Set it to 1, 2, or 3 to use less VRAM.
Check this table for VRAM requirements sorted by model parameters and fine-tuning method. QLoRA uses 4-bit, LoRA uses 16-bit. Keep in mind that sometimes more VRAM is required depending on the model so these numbers are the absolute minimum:
Model parameters
QLoRA (4-bit) VRAM
LoRA (16-bit) VRAM
----------------
------------------
------------------
3B
3.5 GB
8 GB
7B
5 GB
19 GB
8B
6 GB
22 GB
9B
6.5 GB
24 GB
11B
7.5 GB
29 GB
14B
8.5 GB
33 GB
27B
22GB
64GB
32B
26 GB
76 GB
40B
30GB
96GB
70B
41 GB
164 GB
81B
48GB
192GB
90B
53GB
212GB
405B
237 GB
950 GB
vLLM Engine Arguments
URL: llms-txt#vllm-engine-arguments
Contents:
- :tada:Float8 Quantization
- :shaved\_ice:LoRA Hot Swapping / Dynamic LoRAs
vLLM engine arguments, flags, options for serving models on vLLM.
Argument
Example and use-case
--gpu-memory-utilization
Default 0.9. How much VRAM usage vLLM can use. Reduce if going out of memory. Try setting this to 0.95 or 0.97.
--max-model-len
Set maximum sequence length. Reduce this if going out of memory! For example set --max-model-len 32768 to use only 32K sequence lengths.
--quantization
Use fp8 for dynamic float8 quantization. Use this in tandem with --kv-cache-dtype fp8 to enable float8 KV cache as well.
--kv-cache-dtype
Use fp8 for float8 KV cache to reduce memory usage by 50%.
--port
Default is 8000. How to access vLLM's localhost ie http://localhost:8000
--api-key
Optional - Set the password (or no password) to access the model.
--tensor-parallel-size
Default is 1. Splits model across tensors. Set this to how many GPUs you are using - if you have 4, set this to 4. 8, then 8. You should have NCCL, otherwise this might be slow.
--pipeline-parallel-size
Default is 1. Splits model across layers. Use this with --pipeline-parallel-size where TP is used within each node, and PP is used across multi-node setups (set PP to number of nodes)
--enable-lora
Enables LoRA serving. Useful for serving Unsloth finetuned LoRAs.
--max-loras
How many LoRAs you want to serve at 1 time. Set this to 1 for 1 LoRA, or say 16. This is a queue so LoRAs can be hot-swapped.
--max-lora-rank
Maximum rank of all LoRAs. Possible choices are 8, 16, 32, 64, 128, 256, 320, 512
--dtype
Allows auto, bfloat16, float16 Float8 and other quantizations use a different flag - see --quantization
--tokenizer
Specify the tokenizer path like unsloth/gpt-oss-20b if the served model has a different tokenizer.
--hf-token
Add your HuggingFace token if needed for gated models
--swap-space
Default is 4GB. CPU offloading usage. Reduce if you have VRAM, or increase for low memory GPUs.
--seed
Default is 0 for vLLM
--disable-log-stats
Disables logging like throughput, server requests.
--enforce-eager
Disables compilation. Faster to load, but slower for inference.
--disable-cascade-attn
Useful for Reinforcement Learning runs for vLLM < 0.11.0, as Cascade Attention was slightly buggy on A100 GPUs (Unsloth fixes this)
:tada:Float8 Quantization
For example to host Llama 3.3 70B Instruct (supports 128K context length) with Float8 KV Cache and quantization, try:
:shaved\_ice:LoRA Hot Swapping / Dynamic LoRAs
To enable LoRA serving for at most 4 LoRAs at 1 time (these are hot swapped / changed), first set the environment flag to allow hot swapping:
Then, serve it with LoRA support:
To load a LoRA dynamically (set the lora name as well), do:
To remove it from the pool:
Examples:
Example 1 (bash):
`bash
vllm serve unsloth/Llama-3.3-70B-Instruct \
--quantization fp8 \
--kv-cache-dtype fp8
--gpu-memory-utilization 0.97 \
--max-model-len 65536
`
Example 2 (bash):
`bash
export VLLM_ALLOW_RUNTIME_LORA_UPDATING=True
`
Example 3 (bash):
`bash
export VLLM_ALLOW_RUNTIME_LORA_UPDATING=True
vllm serve unsloth/Llama-3.3-70B-Instruct \
--quantization fp8 \
--kv-cache-dtype fp8
--gpu-memory-utilization 0.97 \
--max-model-len 65536 \
--enable-lora \
--max-loras 4 \
--max-lora-rank 64
`
Example 4 (bash):
`bash
curl -X POST http://localhost:8000/v1/load_lora_adapter \
-H "Content-Type: application/json" \
-d '{
"lora_name": "LORA_NAME",
"lora_path": "/path/to/LORA"
}'
`
QwQ-32B: How to Run effectively
URL: llms-txt#qwq-32b:-how-to-run-effectively
Contents:
- :gear: Official Recommended Settings
- :thumbsup: Recommended settings for llama.cpp
- :sunny: Dry Repetition Penalty
- :llama: Tutorial: How to Run QwQ-32B in Ollama
- 📖 Tutorial: How to Run QwQ-32B in llama.cpp
How to run QwQ-32B effectively with our bug fixes and without endless generations + GGUFs.
Qwen released QwQ-32B - a reasoning model with performance comparable to DeepSeek-R1 on many benchmarks. However, people have been experiencing infinite generations, many repetitions, \ token issues and finetuning issues. We hope this guide will help debug and fix most issues!
{% hint style="info" %}
Our model uploads with our bug fixes work great for fine-tuning, vLLM and Transformers. If you're using llama.cpp and engines that use llama.cpp as backend, follow our instructions here to fix endless generations.
According to Qwen, these are the recommended settings for inference:
* Temperature of 0.6
* Top\_K of 40 (or 20 to 40)
* Min\_P of 0.00 (optional, but 0.01 works well, llama.cpp default is 0.1)
* Top\_P of 0.95
* Repetition Penalty of 1.0. (1.0 means disabled in llama.cpp and transformers)
* Chat template: <|im_start|>user\nCreate a Flappy Bird game in Python.<|im_end|>\n<|im_start|>assistant\n\n
{% hint style="warning" %}
llama.cpp uses min_p = 0.1by default, which might cause issues. Force it to 0.0.
{% endhint %}
:thumbsup: Recommended settings for llama.cpp
We noticed many people use a Repetition Penalty greater than 1.0. For example 1.1 to 1.5. This actually interferes with llama.cpp's sampling mechanisms. The goal of a repetition penalty is to penalize repeated generations, but we found this doesn't work as expected.
Turning off Repetition Penalty also works (ie setting it to 1.0), but we found using it to be useful to penalize endless generations.
To use it, we found you must also edit the ordering of samplers in llama.cpp to before applying Repetition Penalty, otherwise there will be endless generations. So add this:
By default, llama.cpp uses this ordering:
We reorder essentially temperature and dry, and move min\_p forward. This means we apply samplers in this order:
If you still encounter issues, you can increase the--repeat-penalty 1.0 to 1.2 or 1.3.
Courtesy to @krist486 for bringing llama.cpp sampling directions to my attention.
:sunny: Dry Repetition Penalty
We investigated usage of dry penalty as suggested in using a value of 0.8, but we actually found this to rather cause syntax issues especially for coding. If you still encounter issues, you can increase thedry penalty to 0.8.
Utilizing our swapped sampling ordering can also help if you decide to use dry penalty.
:llama: Tutorial: How to Run QwQ-32B in Ollama
1. Install ollama if you haven't already!
2. Run run the model! Note you can call ollama servein another terminal if it fails! We include all our fixes and suggested parameters (temperature, min\_p etc) in param in our Hugging Face upload!
📖 Tutorial: How to Run QwQ-32B in llama.cpp
1. Obtain the latest llama.cpp on GitHub here. You can follow the build instructions below as well. Change -DGGML_CUDA=ON to -DGGML_CUDA=OFF if you don't have a GPU or just want CPU inference.
2. Download the model via (after installing pip install huggingface_hub hf_transfer ). You can choose Q4\_K\_M, or other quantized versions (like BF16 full precision). More versions at:
Learn to fine-tune and run Qwen3-VL locally with Unsloth.
Qwen3-VL is Qwen’s new vision models with instruct and thinking versions. The 2B, 4B, 8B and 32B models are dense, while 30B and 235B are MoE. The 235B thinking LLM delivers SOTA vision and coding performance rivaling GPT-5 (high) and Gemini 2.5 Pro.\
\
Qwen3-VL has vision, video and OCR capabilities as well as 256K context (can be extended to 1M).\
\
Unsloth supports Qwen3-VL fine-tuning andRL. Train Qwen3-VL (8B) for free with our notebooks.
Qwen3-VL also used the below settings for their benchmarking numbers, as mentioned on GitHub.
{% columns %}
{% column %}
Instruct Settings:
{% column %}
Thinking Settings:
{% endcolumn %}
{% endcolumns %}
:bug:Chat template bug fixes
At Unsloth, we care about accuracy the most, so we investigated why after the 2nd turn of running the Thinking models, llama.cpp would break, as seen below:
{% columns %}
{% column %}
{% column %}
The error code:
{% endcolumn %}
{% endcolumns %}
We have successfully fixed the Thinking chat template for the VL models so we re-uploaded all Thinking quants and Unsloth's quants. They should now all work after the 2nd conversation - other quants will fail to load after the 2nd conversation.
📖 Llama.cpp: Run Qwen3-VL Tutorial
1. Obtain the latest llama.cpp on GitHub here. You can follow the build instructions below as well. Change -DGGML_CUDA=ON to -DGGML_CUDA=OFF if you don't have a GPU or just want CPU inference.
2. Let's first get an image! You can also upload images as well. We shall use , which is just our mini logo showing how finetunes are made with Unsloth:
3. Let's download this image
{% code overflow="wrap" %}
4. Let's get the 2nd image at
{% code overflow="wrap" %}
5. Then, let's use llama.cpp's auto model downloading feature, try this for the 8B Instruct model:
6. Once in, you will see the below screen:
7. Load up the image via /image PATH ie /image unsloth.png then press ENTER
8. When you hit ENTER, it'll say "unsloth.png image loaded"
9. Now let's ask a question like "What is this image?":
10. Now load in picture 2 via /image picture.png then hit ENTER and ask "What is this image?"
11. And finally let's ask how are both images are related (it works!)
{% code overflow="wrap" %}
12. You can also download the model via (after installing pip install huggingface_hub hf_transfer ) HuggingFace's snapshot_download which is useful for large model downloads, since llama.cpp's auto downloader might lag. You can choose Q4\_K\_M, or other quantized versions.
Examples:
Example 1 (bash):
`bash
export greedy='false'
export seed=3407
export top_p=0.8
export top_k=20
export temperature=0.7
export repetition_penalty=1.0
export presence_penalty=1.5
export out_seq_length=32768
`
Example 2 (bash):
`bash
export greedy='false'
export seed=1234
export top_p=0.95
export top_k=20
export temperature=1.0
export repetition_penalty=1.0
export presence_penalty=0.0
export out_seq_length=40960
`
Example 3 (unknown):
`unknown
terminate called after throwing an instance of 'std::runtime_error'
what(): Value is not callable: null at row 63, column 78:
{%- if '' in content %}
{%- set reasoning_content = ((content.split('')|first).rstrip('\n').split('')|last).lstrip('\n') %}
--prompt "<|im_start|>user\nCreate a Flappy Bird game in Python. You must include these things:\n1. You must use pygame.\n2. The background color should be randomly chosen and is a light shade. Start with a light blue color.\n3. Pressing SPACE multiple times will accelerate the bird.\n4. The bird's shape should be randomly chosen as a square, circle or triangle. The color should be randomly chosen as a dark color.\n5. Place on the bottom some land colored as dark brown or yellow chosen randomly.\n6. Make a score shown on the top right side. Increment if you pass pipes and don't hit them.\n7. Make randomly spaced pipes with enough space. Color them randomly as dark green or light brown or a dark gray shade.\n8. When you lose, show the best score. Make the text inside the screen. Pressing q or Esc will quit the game. Restarting is pressing SPACE again.\nThe final game should be inside a markdown section in Python. Check your code for errors and fix them before the final markdown section.<|im_end|>\n<|im_start|>assistant\n\n"
--prompt "<|im_start|>user\nCreate a Flappy Bird game in Python. You must include these things:\n1. You must use pygame.\n2. The background color should be randomly chosen and is a light shade. Start with a light blue color.\n3. Pressing SPACE multiple times will accelerate the bird.\n4. The bird's shape should be randomly chosen as a square, circle or triangle. The color should be randomly chosen as a dark color.\n5. Place on the bottom some land colored as dark brown or yellow chosen randomly.\n6. Make a score shown on the top right side. Increment if you pass pipes and don't hit them.\n7. Make randomly spaced pipes with enough space. Color them randomly as dark green or light brown or a dark gray shade.\n8. When you lose, show the best score. Make the text inside the screen. Pressing q or Esc will quit the game. Restarting is pressing SPACE again.\nThe final game should be inside a markdown section in Python. Check your code for errors and fix them before the final markdown section.<|im_end|>\n<|im_start|>assistant\n\n"
{%- if tools %} {{- '<|im_start|>system\n' }} {%- if messages[0]['role'] == 'system' %} {{- messages[0]['content'] }} {%- else %} {{- '' }} {%- endif %} {{- "\n\n# Tools\n\nYou may call one or more functions to assist with the user query.\n\nYou are provided with function signatures within XML tags:\n" }} {%- for tool in tools %} {{- "\n" }} {{- tool | tojson }} {%- endfor %} {{- "\n\n\nFor each function call, return a json object with function name and arguments within XML tags:\n\n{\"name\": , \"arguments\": }\n<|im_end|>\n" }} {%- else %} {%- if messages[0]['role'] == 'system' %} {{- '<|im_start|>system\n' + messages[0]['content'] + '<|im_end|>\n' }} {%- endif %} {%- endif %} {%- for message in messages %} {%- if (message.role == "user") or (message.role == "system" and not loop.first) %} {{- '<|im_start|>' + message.role + '\n' + message.content + '<|im_end|>' + '\n' }} {%- elif message.role == "assistant" and not message.tool_calls %} {%- set content = message.content.split('')[-1].lstrip('\n') %} {{- '<|im_start|>' + message.role + '\n' + content + '<|im_end|>' + '\n' }} {%- elif message.role == "assistant" %} {%- set content = message.content.split('')[-1].lstrip('\n') %} {{- '<|im_start|>' + message.role }} {%- if message.content %} {{- '\n' + content }} {%- endif %} {%- for tool_call in message.tool_calls %} {%- if tool_call.function is defined %} {%- set tool_call = tool_call.function %} {%- endif %} {{- '\n\n{"name": "' }} {{- tool_call.name }} {{- '", "arguments": ' }} {{- tool_call.arguments | tojson }} {{- '}\n' }} {%- endfor %} {{- '<|im_end|>\n' }} {%- elif message.role == "tool" %} {%- if (loop.index0 == 0) or (messages[loop.index0 - 1].role != "tool") %} {{- '<|im_start|>user' }} {%- endif %} {{- '\n\n' }} {{- message.content }} {{- '\n' }} {%- if loop.last or (messages[loop.index0 + 1].role != "tool") %} {{- '<|im_end|>\n' }} {%- endif %} {%- endif %} {%- endfor %} {%- if add_generation_prompt %} {{- '<|im_start|>assistant\n\n' }} {%- endif %}
{%- if tools %} {{- '<|im_start|>system\n' }} {%- if messages[0]['role'] == 'system' %} {{- messages[0]['content'] }} {%- else %} {{- '' }} {%- endif %} {{- "\n\n# Tools\n\nYou may call one or more functions to assist with the user query.\n\nYou are provided with function signatures within XML tags:\n" }} {%- for tool in tools %} {{- "\n" }} {{- tool | tojson }} {%- endfor %} {{- "\n\n\nFor each function call, return a json object with function name and arguments within XML tags:\n\n{\"name\": , \"arguments\": }\n<|im_end|>\n" }} {%- else %} {%- if messages[0]['role'] == 'system' %} {{- '<|im_start|>system\n' + messages[0]['content'] + '<|im_end|>\n' }} {%- endif %} {%- endif %} {%- for message in messages %} {%- if (message.role == "user") or (message.role == "system" and not loop.first) %} {{- '<|im_start|>' + message.role + '\n' + message.content + '<|im_end|>' + '\n' }} {%- elif message.role == "assistant" and not message.tool_calls %} {%- set content = message.content.split('')[-1].lstrip('\n') %} {{- '<|im_start|>' + message.role + '\n' + content + '<|im_end|>' + '\n' }} {%- elif message.role == "assistant" %} {%- set content = message.content.split('')[-1].lstrip('\n') %} {{- '<|im_start|>' + message.role }} {%- if message.content %} {{- '\n' + content }} {%- endif %} {%- for tool_call in message.tool_calls %} {%- if tool_call.function is defined %} {%- set tool_call = tool_call.function %} {%- endif %} {{- '\n\n{"name": "' }} {{- tool_call.name }} {{- '", "arguments": ' }} {{- tool_call.arguments | tojson }} {{- '}\n' }} {%- endfor %} {{- '<|im_end|>\n' }} {%- elif message.role == "tool" %} {%- if (loop.index0 == 0) or (messages[loop.index0 - 1].role != "tool") %} {{- '<|im_start|>user' }} {%- endif %} {{- '\n\n' }} {{- message.content }} {{- '\n' }} {%- if loop.last or (messages[loop.index0 + 1].role != "tool") %} {{- '<|im_end|>\n' }} {%- endif %} {%- endif %} {%- endfor %} {%- if add_generation_prompt %} {{- '<|im_start|>assistant\n' }} {%- endif %}
We also uploaded dynamic 4bit quants which increase accuracy vs naive 4bit quantizations! We attach the QwQ quantization error plot analysis for both activation and weight quantization errors:
We uploaded dynamic 4-bit quants to:
Since vLLM 0.7.3 (2025 February 20th) , vLLM now supports loading Unsloth dynamic 4bit quants!
All our GGUFs are at !
Examples:
Example 1 (unknown):
`unknown
9. You might be wondering maybe it's Q4\_K\_M? B16 ie full precision should work fine right? Incorrect - the outputs again fail if we do not use our fix of --samplers "top_k;top_p;min_p;temperature;dry;typ_p;xtc" when using a Repetition Penalty.
:sunrise\_over\_mountains: Still doesn't work? Try Min\_p = 0.1, Temperature = 1.5
According to the Min\_p paper , for more creative and diverse outputs, and if you still see repetitions, try disabling top\_p and top\_k!
`
Example 2 (unknown):
`unknown
Another approach is to disable min_p directly, since llama.cpp by default uses min_p = 0.1!
`
Example 3 (unknown):
`unknown
:thinking: \ token not shown?
Some people are reporting that because \ is default added in the chat template, some systems are not outputting the thinking traces correctly. You will have to manually edit the Jinja template from:
{% code overflow="wrap" %}
`
Example 4 (unknown):
`unknown
{% endcode %}
to another by removing the \n at the end. The model will now have to manually add \n during inference, which might not always succeed. DeepSeek also edited all models to default add a token to force the model to go into reasoning model.
So change {%- if add_generation_prompt %} {{- '<|im_start|>assistant\n\n' }} {%- endif %} to {%- if add_generation_prompt %} {{- '<|im_start|>assistant\n' }} {%- endif %} ie remove \n
You can then run the merged QAT lower precision model in vLLM, Unsloth and other systems for inference! These are all in the Qwen3-4B QAT Colab notebook_Instruct-QAT.ipynb) we have as well!
:teapot:Quantizing models without training
You can also call model.save_pretrained_torchao directly without doing any QAT as well! This is simply PTQ or native quantization. For example, saving to Dynamic float8 format is below:
{% code overflow="wrap" %}
`
Define the system prompt that instructs the model to use a specific format
Okay, so I need to figure out what 1 plus 1 is. Hmm, where do I even start? I remember from school that adding numbers is pretty basic, but I want to make sure I understand it properly.
Let me think, 1 plus 1. So, I have one item and I add another one. Maybe like a apple plus another apple. If I have one apple and someone gives me another, I now have two apples. So, 1 plus 1 should be 2. That makes sense.
Wait, but sometimes math can be tricky. Could it be something else? Like, in a different number system maybe? But I think the question is straightforward, using regular numbers, not like binary or hexadecimal or anything.
I also recall that in arithmetic, addition is combining quantities. So, if you have two quantities of 1, combining them gives you a total of 2. Yeah, that seems right.
Is there a scenario where 1 plus 1 wouldn't be 2? I can't think of any...
--prompt "<|User|>Create a Flappy Bird game in Python. You must include these things:\n1. You must use pygame.\n2. The background color should be randomly chosen and is a light shade. Start with a light blue color.\n3. Pressing SPACE multiple times will accelerate the bird.\n4. The bird's shape should be randomly chosen as a square, circle or triangle. The color should be randomly chosen as a dark color.\n5. Place on the bottom some land colored as dark brown or yellow chosen randomly.\n6. Make a score shown on the top right side. Increment if you pass pipes and don't hit them.\n7. Make randomly spaced pipes with enough space. Color them randomly as dark green or light brown or a dark gray shade.\n8. When you lose, show the best score. Make the text inside the screen. Pressing q or Esc will quit the game. Restarting is pressing SPACE again.\nThe final game should be inside a markdown section in Python. Check your code for errors and fix them before the final markdown section.<|Assistant|>"
All distilled versions and the main 671B R1 model use the same chat template:
<|begin▁of▁sentence|><|User|>What is 1+1?<|Assistant|>It's 2.<|end▁of▁sentence|><|User|>Explain more!<|Assistant|>
A BOS is forcibly added, and an EOS separates each interaction. To counteract double BOS tokens during inference, you should only call tokenizer.encode(..., add\_special\_tokens = False) since the chat template auto adds a BOS token as well.\
For llama.cpp / GGUF inference, you should skip the BOS since it’ll auto add it.
<|User|>What is 1+1?<|Assistant|>
The \ and \ tokens get their own designated tokens. For the distilled versions for Qwen and Llama, some tokens are re-mapped, whilst Qwen for example did not have a BOS token, so <|object\_ref\_start|> had to be used instead.\
\
Tokenizer ID Mappings:
Token
R1
Distill Qwen
Distill Llama
-------------------------
------
------------
-------------
\
128798
151648
128013
\
128799
151649
128014
<\
begin\_of\_sentence\
>
0
151646
128000
<\
end\_of\_sentence\
>
1
151643
128001
<\
User\
>
128803
151644
128011
<\
Assistant\
>
128804
151645
128012
Padding token
2
151654
128004
Original tokens in models:
Token
Qwen 2.5 32B Base
Llama 3.3 70B Instruct
---------------------
------------------------
---------------------------------
\
<\
box\_start\
>
<\
reserved\_special\_token\_5\
>
\
<\
box\_end\
>
<\
reserved\_special\_token\_6\
>
<|begin▁of▁sentence|>
<\
object\_ref\_start\
>
<\
begin\_of\_text\
>
<|end▁of▁sentence|>
<\
endoftext\
>
<\
end\_of\_text\
>
<|User|>
<\
im\_start\
>
<\
reserved\_special\_token\_3\
>
<|Assistant|>
<\
im\_end\
>
<\
reserved\_special\_token\_4\
>
Padding token
<\
vision\_pad\
>
<\
finetune\_right\_pad\_id\
>
All Distilled and the original R1 versions seem to have accidentally assigned the padding token to <|end▁of▁sentence|>, which is mostly not a good idea, especially if you want to further finetune on top of these reasoning models. This will cause endless infinite generations, since most frameworks will mask the EOS token out as -100.\
\
We fixed all distilled and the original R1 versions with the correct padding token (Qwen uses <|vision\_pad|>, Llama uses <|finetune\_right\_pad\_id|>, and R1 uses <|▁pad▁|> or our own added <|PAD▁TOKEN|>.
MoE all 2.5bit. down_proj in MoE mixture of 3.5/2.5bit
Examples:
Example 1 (unknown):
`unknown
6. Example with Q4\_0 K quantized cache Notice -no-cnv disables auto conversation mode
`
Example 2 (unknown):
`unknown
Example output:
`
Example 3 (unknown):
`unknown
4. If you have a GPU (RTX 4090 for example) with 24GB, you can offload multiple layers to the GPU for faster processing. If you have multiple GPUs, you can probably offload more layers.
`
Example 4 (unknown):
`unknown
5. To test our Flappy Bird example as mentioned in our blog post here: , we can produce the 2nd example like below using our 1.58bit dynamic quant:
How to run IBM Granite-4.0 with Unsloth GGUFs on llama.cpp, Ollama and how to fine-tune!
IBM releases Granite-4.0 models with 3 sizes including Nano (350M & 1B), Micro (3B), Tiny (7B/1B active) and Small (32B/9B active). Trained on 15T tokens, IBM’s new Hybrid (H) Mamba architecture enables Granite-4.0 models to run faster with lower memory use.
Learn how to run Unsloth Granite-4.0 Dynamic GGUFs or fine-tune/RL the model. You can fine-tune Granite-4.0 with our free Colab notebook for a support agent use-case.
You can also view our Granite-4.0 collection for all uploads including Dynamic Float8 quants etc.
Granite-4.0 Models Explanations:
* Nano and H-Nano: The 350M and 1B models offer strong instruction-following abilities, enabling advanced on-device and edge AI and research/fine-tuning applications.
* H-Small (MoE): Enterprise workhorse for daily tasks, supports multiple long-context sessions on entry GPUs like L40S (32B total, 9B active).
* H-Tiny (MoE): Fast, cost-efficient for high-volume, low-complexity tasks; optimized for local and edge use (7B total, 1B active).
* H-Micro (Dense): Lightweight, efficient for high-volume, low-complexity workloads; ideal for local and edge deployment (3B total).
* Micro (Dense): Alternative dense option when Mamba2 isn’t fully supported (3B total).
Run Granite-4.0 Tutorials
:gear: Recommended Inference Settings
IBM recommends these settings:
temperature=0.0, top_p=1.0, top_k=0
* Temperature of 0.0
* Top\_K = 0
* Top\_P = 1.0
* Recommended minimum context: 16,384
* Maximum context length window: 131,072 (128K context)
:llama: Ollama: Run Granite-4.0 Tutorial
1. Install ollama if you haven't already!
2. Run the model! Note you can call ollama servein another terminal if it fails! We include all our fixes and suggested parameters (temperature etc) in params in our Hugging Face upload! You can change the model name 'granite-4.0-h-small-GGUF' to any Granite model like 'granite-4.0-h-micro:Q8\_K\_XL'.
📖 llama.cpp: Run Granite-4.0 Tutorial
1. Obtain the latest llama.cpp on GitHub here. You can follow the build instructions below as well. Change -DGGML_CUDA=ON to -DGGML_CUDA=OFF if you don't have a GPU or just want CPU inference.
2. If you want to use llama.cpp directly to load models, you can do the below: (:Q4\_K\_XL) is the quantization type. You can also download via Hugging Face (point 3). This is similar to ollama run
3. OR download the model via (after installing pip install huggingface_hub hf_transfer ). You can choose Q4\_K\_M, or other quantized versions (like BF16 full precision).
Examples:
Example 1 (unknown):
`unknown
<|start_of_role|>system<|end_of_role|>You are a helpful assistant. Please ensure responses are professional, accurate, and safe.<|end_of_text|>
<|start_of_role|>user<|end_of_role|>Please list one IBM Research laboratory located in the United States. You should only output its name and location.<|end_of_text|>
<|start_of_role|>assistant<|end_of_role|>Almaden Research Center, San Jose, California<|end_of_text|>
`
Example 2 (bash):
`bash
apt-get update
apt-get install pciutils -y
curl -fsSL https://ollama.com/install.sh | sh
`
Example 3 (bash):
`bash
ollama run hf.co/unsloth/granite-4.0-h-small-GGUF:UD-Q4_K_XL
output_dir = "training_checkpoints", # location of saved checkpoints for early stopping
save_strategy = "steps", # save model every N steps
save_steps = 10, # how many steps until we save the model
save_total_limit = 3, # keep ony 3 saved checkpoints to save disk space
eval_strategy = "steps", # evaluate every N steps
eval_steps = 10, # how many steps until we do evaluation
load_best_model_at_end = True, # MUST USE for early stopping
metric_for_best_model = "eval_loss", # metric we want to early stop on
greater_is_better = False, # the lower the eval loss, the better
),
model = model,
tokenizer = tokenizer,
train_dataset = new_dataset["train"],
eval_dataset = new_dataset["test"],
)
python
from transformers import EarlyStoppingCallback
early_stopping_callback = EarlyStoppingCallback(
early_stopping_patience = 3, # How many steps we will wait if the eval loss doesn't decrease
# For example the loss might increase, but decrease after 3 steps
early_stopping_threshold = 0.0, # Can set higher - sets how much loss should decrease by until
# we consider early stopping. For eg 0.01 means if loss was
# 0.02 then 0.01, we consider to early stop the run.
)
trainer.add_callback(early_stopping_callback)
`
Then train the model as usual via trainer.train() .
Examples:
Example 1 (unknown):
`unknown
Then in TrainingArguments() set
`
Example 2 (unknown):
`unknown
To train the model, do trainer.train(); to resume training, do
`
Example 3 (unknown):
`unknown
:question:How do I do Early Stopping?
If you want to stop or pause the finetuning / training run since the evaluation loss is not decreasing, then you can use early stopping which stops the training process. Use EarlyStoppingCallback.
As usual, set up your trainer and your evaluation dataset. The below is used to stop the training run if the eval_loss (the evaluation loss) is not decreasing after 3 steps or so.
`
Example 4 (unknown):
`unknown
We then add the callback which can also be customized:
`
LoRA Hyperparameters Guide
URL: llms-txt#lora-hyperparameters-guide
Contents:
- :question:But what is LoRA?
- :1234: Key Fine-tuning Hyperparameters
- Learning Rate
- Epochs
- LoRA or QLoRA
- Hyperparameters & Recommendations:
- :deciduous\_tree: Gradient Accumulation and Batch Size equivalency
- Effective Batch Size
- The VRAM & Performance Trade-off
- :sloth: Unsloth Gradient Accumulation Fix
Optimal lora rank. alpha, number of epochs, batch size & gradient accumulation, QLoRA vs LoRA, target modules and more!
LoRA hyperparameters are adjustable parameters that control how Low-Rank Adaptation (LoRA) fine-tunes LLMs. With many options (such as learning rate and epochs) and millions of possible combinations, selecting the right values is crucial for achieving accuracy, stability, quality, and fewer hallucinations during fine-tuning.
You'll learn the best practices for these parameters, based on insights from hundreds of research papers and experiments, and see how they impact the model. While we recommend using Unsloth's defaults, understanding these concepts will give you full control.\
\
The goal is to change hyperparameter numbers to increase accuracy while counteracting overfitting or underfitting. Overfitting occurs when the model memorizes the training data, harming its ability to generalize to new, unseen inputs. The objective is a model that generalizes well, not one that simply memorizes.
{% columns %}
{% column %}
:question:But what is LoRA?
In LLMs, we have model weights. Llama 70B has 70 billion numbers. Instead of changing all 70b numbers, we instead add thin matrices A and B to each weight, and optimize those. This means we only optimize 1% of weights.
{% endcolumn %}
Instead of optimizing Model Weights (yellow), we optimize 2 thin matrices A and B.
{% endcolumn %}
{% endcolumns %}
:1234: Key Fine-tuning Hyperparameters
Learning Rate
Defines how much the model’s weights are adjusted during each training step.
* Higher Learning Rates: Lead to faster initial convergence but can cause training to become unstable or fail to find an optimal minimum if set too high.
* Lower Learning Rates: Result in more stable and precise training but may require more epochs to converge, increasing overall training time. While low learning rates are often thought to cause underfitting, they actually can lead to overfitting or even prevent the model from learning.
* Typical Range: 2e-4 (0.0002) to 5e-6 (0.000005). \
:green\_square: For normal LoRA/QLoRA Fine-tuning, we recommend2e-4as a starting point. \
:blue\_square: For Reinforcement Learning (DPO, GRPO etc.), we recommend 5e-6 . \
:white\_large\_square: For Full Fine-tuning, lower learning rates are generally more appropriate.
The number of times the model sees the full training dataset.
* More Epochs: Can help the model learn better, but a high number can cause it to memorize the training data, hurting its performance on new tasks.
* Fewer Epochs: Reduces training time and can prevent overfitting, but may result in an undertrained model if the number is insufficient for the model to learn the dataset's underlying patterns.
* Recommended: 1-3 epochs. For most instruction-based datasets, training for more than 3 epochs offers diminishing returns and increases the risk of overfitting.
LoRA or QLoRA
LoRA uses 16-bit precision, while QLoRA is a 4-bit fine-tuning method.
* LoRA: 16-bit fine-tuning. It's slightly faster and slightly more accurate, but consumes significantly more VRAM (4× more than QLoRA). Recommended for 16-bit environments and scenarios where maximum accuracy is required.
* QLoRA: 4-bit fine-tuning. Slightly slower and marginally less accurate, but uses much less VRAM (4× less). \
:sloth: 70B LLaMA fits in <48GB VRAM with QLoRA in Unsloth -more details here.
Hyperparameters & Recommendations:
Hyperparameter
Function
Recommended Settings
LoRA Rank (r)
Controls the number of trainable parameters in the LoRA adapter matrices. A higher rank increases model capacity but also memory usage.
8, 16, 32, 64, 128
Choose 16 or 32
LoRA Alpha (lora_alpha)
Scales the strength of the fine-tuned adjustments in relation to the rank (r).
A regularization technique that randomly sets a fraction of LoRA activations to zero during training to prevent overfitting. Not that useful, so we default set it to 0.
0 (default) to 0.1
Weight Decay
A regularization term that penalizes large weights to prevent overfitting and improve generalization. Don't use too large numbers!
0.01 (recommended) - 0.1
Warmup Steps
Gradually increases the learning rate at the start of training.
5-10% of total steps
Scheduler Type
Adjusts the learning rate dynamically during training.
linear or cosine
Seed (random_state)
A fixed number to ensure reproducibility of results.
Any integer (e.g., 42, 3407)
Target Modules
Specify which parts of the model you want to apply LoRA adapters to — either the attention, the MLP, or both.
Attention: q_proj, k_proj, v_proj, o_proj
MLP: gate_proj, up_proj, down_proj
Recommended to target all major linear layers: q_proj, k_proj, v_proj, o_proj, gate_proj, up_proj, down_proj.
:deciduous\_tree: Gradient Accumulation and Batch Size equivalency
Effective Batch Size
Correctly configuring your batch size is critical for balancing training stability with your GPU's VRAM limitations. This is managed by two parameters whose product is the Effective Batch Size.\
* A larger Effective Batch Size generally leads to smoother, more stable training.
* A smaller Effective Batch Size may introduce more variance.
While every task is different, the following configuration provides a great starting point for achieving a stable Effective Batch Size of 16, which works well for most fine-tuning tasks on modern GPUs.
While all of these are equivalent for the model's weight updates, they have vastly different hardware requirements.
The first configuration (batch_size = 32) uses the most VRAM and will likely fail on most GPUs. The last configuration (batch_size = 1) uses the least VRAM, but at the cost of slightly slower training. To avoid OOM (out of memory) errors, always prefer to set a smaller batch_size and increase gradient_accumulation_steps to reach your target Effective Batch Size.
:sloth: Unsloth Gradient Accumulation Fix
Gradient accumulation and batch sizes are now fully equivalent in Unsloth due to our bug fixes for gradient accumulation. We have implemented specific bug fixes for gradient accumulation that resolve a common issue where the two methods did not produce the same results. This was a known challenge in the wider community, but for Unsloth users, the two methods are now interchangeable.
Prior to our fixes, combinations of batch_size and gradient_accumulation_steps that yielded the same Effective Batch Size (i.e., batch_size × gradient_accumulation_steps = 16) did not result in equivalent training behavior. For example, configurations like b1/g16, b2/g8, b4/g4, b8/g2, and b16/g1 all have an Effective Batch Size of 16, but as shown in the graph, the loss curves did not align when using standard gradient accumulation:
(Before - Standard Gradient Accumulation)
After applying our fixes, the loss curves now align correctly, regardless of how the Effective Batch Size of 16 is achieved:
(After - 🦥 Unsloth Gradient Accumulation)
🦥 LoRA Hyperparameters in Unsloth
The following demonstrates a standard configuration. While Unsloth provides optimized defaults, understanding these parameters is key to manual tuning.
The rank (r) of the fine-tuning process. A larger rank uses more memory and will be slower, but can increase accuracy on complex tasks. We suggest ranks like 8 or 16 (for fast fine-tunes) and up to 128. Using a rank that is too large can cause overfitting and harm your model's quality.\\
For optimal performance, LoRA should be applied to all major linear layers. Research has shown that targeting all major layers is crucial for matching the performance of full fine-tuning. While it's possible to remove modules to reduce memory usage, we strongly advise against it to preserve maximum quality as the savings are minimal.\\
A scaling factor that controls the strength of the fine-tuned adjustments. Setting it equal to the rank (r) is a reliable baseline. A popular and effective heuristic is to set it to double the rank (r * 2), which makes the model learn more aggressively by giving more weight to the LoRA updates. More details here.\\
A regularization technique that helps prevent overfitting by randomly setting a fraction of the LoRA activations to zero during each training step. Recent research suggests that for the short training runs common in fine-tuning, lora_dropout may be an unreliable regularizer.\
🦥 Unsloth's internal code can optimize training whenlora_dropout = 0, making it slightly faster, but we recommend a non-zero value if you suspect overfitting.\\
Leave this as "none" for faster training and reduced memory usage. This setting avoids training the bias terms in the linear layers, which adds trainable parameters for little to no practical gain.\\
Options are True, False, and "unsloth". \
🦥 We recommend"unsloth"as it reduces memory usage by an extra 30% and supports extremely long context fine-tunes. You can read more onour blog post about long context training.\\
The seed to ensure deterministic, reproducible runs. Training involves random numbers, so setting a fixed seed is essential for consistent experiments.\\
An advanced feature that implements Rank-Stabilized LoRA. If set to True, the effective scaling becomes lora_alpha / sqrt(r) instead of the standard lora_alpha / r. This can sometimes improve stability, particularly for higher ranks. More details here.\\
An advanced technique, as proposed in LoftQ, initializes LoRA matrices with the top 'r' singular vectors from the pretrained weights. This can improve accuracy but may cause a significant memory spike at the start of training.
Verifying LoRA Weight Updates:
When validating that LoRA adapter weights have been updated after fine-tuning, avoid using np.allclose() for comparison. This method can miss subtle but meaningful changes, particularly in LoRA A, which is initialized with small Gaussian values. These changes may not register as significant under loose numerical tolerances. Thanks to contributors for this section.
To reliably confirm weight updates, we recommend:
* Using checksum or hash comparisons (e.g., MD5)
* Computing the sum of absolute differences between tensors
* Or using np.array\_equal() if exact equality is expected
:triangular\_ruler:LoRA Alpha and Rank relationship
{% hint style="success" %}
It's best to set lora_alpha = 2 * lora_rank or lora_alpha = lora_rank
{% endhint %}
{% columns %}
{% column width="50%" %}
$$
\hat{W} = W + \frac{\alpha}{\text{rank}} \times AB
$$
rsLoRA other scaling options. sqrt(r) is the best.
$$
\hat{W}\_{\text{rslora}} = W + \frac{\alpha}{\sqrt{\text{rank}}} \times AB
$$
{% endcolumn %}
{% column %}
The formula for LoRA is on the left. We need to scale the thin matrices A and B by alpha divided by the rank. This means we should keep alpha/rank at least = 1.
According to the rsLoRA (rank stabilized lora) paper, we should instead scale alpha by the sqrt of the rank. Other options exist, but theoretically this is the optimum. The left plot shows other ranks and their perplexities (lower is better). To enable this, set use_rslora = True in Unsloth.
Our recommendation is to set the alpha to equal to the rank, or at least 2 times the rank. This means alpha/rank = 1 or 2.
{% endcolumn %}
{% endcolumns %}
:dart: LoRA Target Modules and QLoRA vs LoRA
{% hint style="success" %}
Use:\
target_modules = ["q_proj", "k_proj", "v_proj", "o_proj", "gate_proj", "up_proj", "down_proj",] to target both MLP and attention layers to increase accuracy.
QLoRA uses 4-bit precision, reducing VRAM usage by over 75%.
LoRA (16-bit) is slightly more accurate and faster.
{% endhint %}
According to empirical experiments and research papers like the original QLoRA paper, it's best to apply LoRA to both attention and MLP layers.
{% columns %}
{% column %}
{% endcolumn %}
{% column %}
The chart shows RougeL scores (higher is better) for different target module configurations, comparing LoRA vs QLoRA.
The first 3 dots show:
1. QLoRA-All: LoRA applied to all FFN/MLP and Attention layers. \
:fire: This performs best overall.
2. QLoRA-FFN: LoRA only on FFN. \
Equivalent to: gate_proj, up_proj, down_proj.
3. QLoRA-Attention: LoRA applied only to Attention layers. \
Equivalent to: q_proj, k_proj, v_proj, o_proj.
{% endcolumn %}
{% endcolumns %}
:sunglasses: Training on completions only, masking out inputs
The QLoRA paper shows that masking out inputs and training only on completions (outputs or assistant messages) can further increase accuracy by a few percentage points (1%). Below demonstrates how this is done in Unsloth:
{% columns %}
{% column %}
NOT training on completions only:
USER: Hello what is 2+2?\
ASSISTANT: The answer is 4.\
USER: Hello what is 3+3?\
ASSISTANT: The answer is 6.
{% column %}
Training on completions only:
USER: ~~Hello what is 2+2?~~\
ASSISTANT: The answer is 4.\
USER: ~~Hello what is 3+3?~~\
ASSISTANT: The answer is 6.
{% endcolumn %}
{% endcolumns %}
The QLoRA paper states that training on completions only increases accuracy by quite a bit, especially for multi-turn conversational finetunes! We do this in our conversational notebooks here-Conversational.ipynb).
To enable training on completions in Unsloth, you will need to define the instruction and assistant parts. :sloth: We plan to further automate this for you in the future!
For Llama 3, 3.1, 3.2, 3.3 and 4 models, you define the parts as follows:
For Gemma 2, 3, 3n models, you define the parts as follows:
:key: Avoiding Overfitting & Underfitting
Overfitting (Poor Generalization/Too Specialized)
The model memorizes the training data, including its statistical noise, and consequently fails to generalize to unseen data.
{% hint style="success" %}
If your training loss drops below 0.2, your model is likely overfitting — meaning it may perform poorly on unseen tasks.
One simple trick is LoRA alpha scaling — just multiply the alpha value of each LoRA matrix by 0.5. This effectively scales down the impact of fine-tuning.
This is closely related to merging / averaging weights. \
You can take the original base (or instruct) model, add the LoRA weights, then divide the result by 2. This gives you an averaged model — which is functionally equivalent to reducing the alpha by half.
{% endhint %}
* Adjust the learning rate: A high learning rate often leads to overfitting, especially during short training runs. For longer training, a higher learning rate may work better. It’s best to experiment with both to see which performs best.
* Reduce the number of training epochs. Stop training after 1, 2, or 3 epochs.
* Increaseweight_decay. A value of 0.01 or 0.1 is a good starting point.
* Increaselora_dropout. Use a value like 0.1 to add regularization.
* Increase batch size or gradient accumulation steps.
* Dataset expansion - make your dataset larger by combining or concatenating open source datasets with your dataset. Choose higher quality ones.
* Evaluation early stopping - enable evaluation and stop when the evaluation loss increases for a few steps.
* LoRA Alpha Scaling - scale the alpha down after training and during inference - this will make the finetune less pronounced.
* Weight averaging - literally add the original instruct model and the finetune and divide the weights by 2.
Underfitting (Too Generic)
The model fails to capture the underlying patterns in the training data, often due to insufficient complexity or training duration.
* Adjust the Learning Rate: If the current rate is too low, increasing it may speed up convergence, especially for short training runs. For longer runs, try lowering the learning rate instead. Test both approaches to see which works best.
* Increase Training Epochs: Train for more epochs, but monitor validation loss to avoid overfitting.
* Increase LoRA Rank (r) and alpha: Rank should at least equal to the alpha number, and rank should be bigger for smaller models/more complex datasets; it usually is between 4 and 64.
* Use a More Domain-Relevant Dataset: Ensure the training data is high-quality and directly relevant to the target task.
* Decrease batch size to 1. This will cause the model to update more vigorously.
{% hint style="success" %}
Fine-tuning has no single "best" approach, only best practices. Experimentation is key to finding what works for your specific needs. Our notebooks automatically set optimal parameters based on many papers research and our experiments, giving you a great starting point. Happy fine-tuning!
{% endhint %}
Acknowledgements: A huge thank you to Eyerafor contributing to this guide!
Examples:
Example 1 (python):
`python
r = 16, # Choose any number > 0 ! Suggested 8, 16, 32, 64, 128
lora_dropout = 0, # Supports any, but = 0 is optimized
`
Reinforcement Learning (RL) Guide
URL: llms-txt#reinforcement-learning-(rl)-guide
Contents:
- :sloth:What you will learn
- :question:What is Reinforcement Learning (RL)?
- :person\_running:From RLHF, PPO to GRPO and RLVR
- :fingers\_crossed:Luck (well Patience) Is All You Need
- :sloth:What Unsloth offers for RL
- GRPO notebooks:
Learn all about Reinforcement Learning (RL) and how to train your own DeepSeek-R1 reasoning model with Unsloth using GRPO. A complete guide from beginner to advanced.
Reinforcement Learning is where an "agent" learns to make decisions by interacting with an environment and receiving feedback in the form of rewards or penalties.
* Action: What the model generates (e.g. a sentence).
* Reward: A signal indicating how good or bad the model's action was (e.g. did the response follow instructions? was it helpful?).
* Environment: The scenario or task the model is working on (e.g. answering a user’s question).
{% hint style="success" %}
For advanced GRPO documentation on batching, generation and training parameters, read our guide!
{% endhint %}
:sloth:What you will learn
1. What is RL? RLVR? PPO? GRPO? RLHF? RFT? Is "Luck is All You Need?" for RL?
2. What is an environment? Agent? Action? Reward function? Rewards?
This article covers everything (from beginner to advanced) you need to know about GRPO, Reinforcement Learning (RL) and reward functions, along with tips, and the basics of using GRPO with Unsloth. If you're looking for a step-by-step tutorial for using GRPO, see our guide here.
:question:What is Reinforcement Learning (RL)?
The goal of RL is to:
1. Increase the chance of seeing "good" outcomes.
2. Decrease the chance of seeing "bad" outcomes.
That's it! There are intricacies on what "good" and "bad" means, or how do we go about "increasing" or "decreasing" it, or what even "outcomes" means.
{% columns %}
{% column width="50%" %}
For example, in the Pacman game:
1. The environment is the game world.
2. The actions you can take are UP, LEFT, RIGHT and DOWN.
3. The rewards are good if you eat a cookie, or bad if you hit one of the squiggly enemies.
4. In RL, you can't know the "best action" you can take, but you can observe intermediate steps, or the final game state (win or lose)
{% endcolumn %}
{% endcolumn %}
{% endcolumns %}
{% columns %}
{% column width="50%" %}
{% endcolumn %}
{% column %}
Another example is imagine you are given the question: "What is 2 + 2?" (4) An unaligned language model will spit out 3, 4, C, D, -10, literally anything.
1. Numbers are better than C or D right?
2. Getting 3 is better than say 8 right?
3. Getting 4 is definitely correct.
We just designed a reward function!
{% endcolumn %}
{% endcolumns %}
:person\_running:From RLHF, PPO to GRPO and RLVR
{% columns %}
{% column %}
{% endcolumn %}
{% column %}
OpenAI popularized the concept of RLHF (Reinforcement Learning from Human Feedback), where we train an "agent" to produce outputs to a question (the state) that are rated more useful by human beings.
The thumbs up and down in ChatGPT for example can be used in the RLHF process.
{% endcolumn %}
{% endcolumns %}
{% columns %}
{% column %}
PPO formula
The clip(..., 1-e, 1+e) term is used to force PPO not to take too large changes. There is also a KL term with beta set to > 0 to force the model not to deviate too much away.
{% endcolumn %}
{% column %}
In order to do RLHF, PPO (Proximal policy optimization) was developed. The agent is the language model in this case. In fact it's composed of 3 systems:
1. The Generating Policy (current trained model)
2. The Reference Policy (original model)
3. The Value Model (average reward estimator)
We use the Reward Model to calculate the reward for the current environment, and our goal is to maximize this!
The formula for PPO looks quite complicated because it was designed to be stable. Visit our AI Engineer talk we gave in 2025 about RL for more in depth maths derivations about PPO.
{% endcolumn %}
{% endcolumns %}
{% columns %}
{% column %}
{% endcolumn %}
{% column %}
DeepSeek developed GRPO (Group Relative Policy Optimization) to train their R1 reasoning models. The key differences to PPO are:
1. The Value Model is removed, replaced with statistics from calling the reward model multiple times.
2. The Reward Model is removed and replaced with just custom reward function which RLVR can be used.
{% endcolumn %}
{% endcolumns %}
This means GRPO is extremely efficient. Previously PPO needed to train multiple models - now with the reward model and value model removed, we can save memory and speed up everything.
RLVR (Reinforcement Learning with Verifiable Rewards) allows us to reward the model based on tasks with easy to verify solutions. For example:
1. Maths equations can be easily verified. Eg 2+2 = 4.
2. Code output can be verified as having executed correctly or not.
3. Designing verifiable reward functions can be tough, and so most examples are math or code.
4. Use-cases for GRPO isn’t just for code or math—its reasoning process can enhance tasks like email automation, database retrieval, law, and medicine, greatly improving accuracy based on your dataset and reward function - the trick is to define a rubric - ie a list of smaller verifiable rewards, and not a final all consuming singular reward. OpenAI popularized this in their reinforcement learning finetuning (RFT) offering for example.
{% columns %}
{% column %} Why "Group Relative"?
GRPO removes the value model entirely, but we still need to estimate the "average reward" given the current state.
The trick is to sample the LLM! We then calculate the average reward through statistics of the sampling process across multiple different questions.
{% endcolumn %}
{% endcolumn %}
{% endcolumns %}
{% columns %}
{% column %}
For example for "What is 2+2?" we sample 4 times. We might get 4, 3, D, C. We then calculate the reward for each of these answers, then calculate the average reward and standard deviation, then Z-score standardize this!
This creates the advantages A, which we will use in replacement of the value model. This saves a lot of memory!
{% endcolumn %}
GRPO advantage calculation
{% endcolumn %}
{% endcolumns %}
:fingers\_crossed:Luck (well Patience) Is All You Need
The trick of RL is you need 2 things only:
1. A question or instruction eg "What is 2+2?" "Create a Flappy Bird game in Python"
2. A reward function and verifier to verify if the output is good or bad.
With only these 2, we can essentially call a language model an infinite times until we get a good answer. For example for "What is 2+2?", an untrained bad language model will output:
The reward signal was 0, 0, 0, 0, 0, 0, 0, 0, 0, 0, 0, 0, 0, 0, 0\\\\then suddenly 1.
So by luck and by chance, RL managed to find the correct answer across multiple rollouts. Our goal is we want to see the good answer 4 more, and the rest (the bad answers) much less.
So the goal of RL is to be patient - in the limit, if the probability of the correct answer is at least a small number (not zero), it's just a waiting game - you will 100% for sure encounter the correct answer in the limit.
So I like to call it as "Luck Is All You Need" for RL.
Well a better phrase is "Patience is All You Need" for RL.
RL essentially provides us a trick - instead of simply waiting for infinity, we do get "bad signals" ie bad answers, and we can essentially "guide" the model to already try not generating bad solutions. This means although you waited very long for a "good" answer to pop up, the model already has been changed to try its best not to output bad answers.
In the "What is 2+2?" example - 0, cat, -10, 1928, 3, A, B, 122, 17, 182, 172, A, C, BAHS, %$, #, 9, -192, 12.31\\\\then suddenly 4.
Since we got bad answers, RL will influence the model to try NOT to output bad answers. This means over time, we are carefully "pruning" or moving the model's output distribution away from bad answers. This means RL is efficient, since we are NOT just waiting for infinity, but we are actively trying to "push" the model to go as much as possible to the "correct answer space".
{% hint style="danger" %}
If the probability is always 0, then RL will never work. This is also why people like to do RL from an already instruction finetuned model, which can partially follow instructions reasonably well - this boosts the probability most likely above 0.
{% endhint %}
:sloth:What Unsloth offers for RL
* With 15GB VRAM, Unsloth allows you to transform any model up to 17B parameters like Llama 3.1 (8B), Phi-4 (14B), Mistral (7B) or Qwen2.5 (7B) into a reasoning model
OpenAI releases 'gpt-oss-120b' and 'gpt-oss-20b', two SOTA open language models under the Apache 2.0 license. Both 128k context models outperform similarly sized open models in reasoning, tool use, and agentic tasks. You can now run & fine-tune them locally with Unsloth!
Aug 28 update: You can now export/save your QLoRA fine-tuned gpt-oss model to llama.cpp, vLLM, HF etc.
We also introduced Unsloth Flex Attention which enables >8× longer context lengths, >50% less VRAM usage and >1.5× faster training vs. all implementations. Read more here
Trained with RL, gpt-oss-120b rivals o4-mini and gpt-oss-20b rivals o3-mini. Both excel at function calling and CoT reasoning, surpassing o1 and GPT-4o.
#### gpt-oss - Unsloth GGUFs:
{% hint style="success" %}
Includes Unsloth'schat template fixes. For best results, use our uploads & train with Unsloth!
OpenAI released a standalone parsing and tokenization library called Harmony which allows one to tokenize conversations to OpenAI's preferred format for gpt-oss. The official OpenAI cookbook article provides many more details on how to use the Harmony library.
Inference engines generally use the jinja chat template instead and not the Harmony package, and we found some issues with them after comparing with Harmony directly. If you see below, the top is the correct rendered form as from Harmony. The below is the one rendered by the current jinja chat template. There are quite a few differences!
We also made some functions to directly allow you to use OpenAI's Harmony library directly without a jinja chat template if you desire - you can simply parse in normal conversations like below:
Then use the encode_conversations_with_harmony function from Unsloth:
The harmony format includes multiple interesting things:
1. reasoning_effort = "medium" You can select low, medium or high, and this changes gpt-oss's reasoning budget - generally the higher the better the accuracy of the model.
2. developer_instructions is like a system prompt which you can add.
3. model_identity is best left alone - you can edit it, but we're unsure if custom ones will function.
We find multiple issues with current jinja chat templates (there exists multiple implementations across the ecosystem):
1. Function and tool calls are rendered with tojson, which is fine it's a dict, but if it's a string, speech marks and other symbols become backslashed.
2. There are some extra new lines in the jinja template on some boundaries.
3. Tool calling thoughts from the model should have the analysis tag and not final tag.
4. Other chat templates seem to not utilize <|channel|>final at all - one should use this for the final assistant message. You should not use this for thinking traces or tool calls.
Our chat templates for the GGUF, our BnB and BF16 uploads and all versions are fixed! For example when comparing both ours and Harmony's format, we get no different characters:
:1234: Precision issues
We found multiple precision issues in Tesla T4 and float16 machines primarily since the model was trained using BF16, and so outliers and overflows existed. MXFP4 is not actually supported on Ampere and older GPUs, so Triton provides tl.dot_scaled for MXFP4 matrix multiplication. It upcasts the matrices to BF16 internally on the fly.
Software emulation enables targeting hardware architectures without native microscaling operation support. Right now for such case, microscaled lhs/rhs are upcasted to bf16 element type beforehand for dot computation,
{% endhint %}
We found if you use float16 as the mixed precision autocast data-type, you will get infinities after some time. To counteract this, we found doing the MoE in bfloat16, then leaving it in either bfloat16 or float32 precision. If older GPUs don't even have bfloat16 support (like T4), then float32 is used.
We also change all precisions of operations (like the router) to float32 for float16 machines.
🖥️ Running gpt-oss
Below are guides for the 20B and 120B variants of the model.
{% hint style="info" %}
Any quant smaller than F16, including 2-bit has minimal accuracy loss, since only some parts (e.g., attention layers) are lower bit while most remain full-precision. That’s why sizes are close to the F16 model; for example, the 2-bit (11.5 GB) version performs nearly the same as the full 16-bit (14 GB) one. Once llama.cpp supports better quantization for these models, we'll upload them ASAP.
{% endhint %}
The gpt-oss models from OpenAI include a feature that allows users to adjust the model's "reasoning effort." This gives you control over the trade-off between the model's performance and its response speed (latency) which by the amount of token the model will use to think.
The gpt-oss models offer three distinct levels of reasoning effort you can choose from:
* Low: Optimized for tasks that need very fast responses and don't require complex, multi-step reasoning.
* Medium: A balance between performance and speed.
* High: Provides the strongest reasoning performance for tasks that require it, though this results in higher latency.
:gear: Recommended Settings
OpenAI recommends these inference settings for both models:
temperature=1.0, top_p=1.0, top_k=0
* Temperature of 1.0
* Top\_K = 0 (or experiment with 100 for possible better results)
* Top\_P = 1.0
* Recommended minimum context: 16,384
* Maximum context length window: 131,072
The end of sentence/generation token: EOS is <|return|>
To achieve inference speeds of 6+ tokens per second for our Dynamic 4-bit quant, have at least 14GB of unified memory (combined VRAM and RAM) or 14GB of system RAM alone. As a rule of thumb, your available memory should match or exceed the size of the model you’re using. GGUF Link: unsloth/gpt-oss-20b-GGUF
NOTE: The model can run on less memory than its total size, but this will slow down inference. Maximum memory is only needed for the fastest speeds.
If you already have Docker desktop, all you need to do is run the command below and you're done:
#### :sparkles: Llama.cpp: Run gpt-oss-20b Tutorial
1. Obtain the latest llama.cpp on GitHub here. You can follow the build instructions below as well. Change -DGGML_CUDA=ON to -DGGML_CUDA=OFF if you don't have a GPU or just want CPU inference.
2. You can directly pull from Hugging Face via:
3. Download the model via (after installing pip install huggingface_hub hf_transfer ).
Examples:
Example 1 (python):
`python
messages = [
{"role" : "user", "content" : "What is 1+1?"},
{"role" : "assistant", "content" : "2"},
{"role": "user", "content": "What's the temperature in San Francisco now? How about tomorrow? Today's date is 2024-09-30."},
{"role": "assistant", "content": "User asks: 'What is the weather in San Francisco?' We need to use get_current_temperature tool.", "thinking" : ""},
from unsloth_zoo import encode_conversations_with_harmony
def encode_conversations_with_harmony(
messages,
reasoning_effort = "medium",
add_generation_prompt = True,
tool_calls = None,
developer_instructions = None,
model_identity = "You are ChatGPT, a large language model trained by OpenAI.",
)
`
Example 3 (unknown):
`unknown
<|start|>system<|message|>You are ChatGPT, a large language model trained by OpenAI.\nKnowledge cutoff: 2024-06\nCurrent date: 2025-08-05\n\nReasoning: medium\n\n# Valid channels: analysis, commentary, final. Channel must be included for every message.<|end|><|start|>user<|message|>Hello<|end|><|start|>assistant<|channel|>final<|message|>Hi there!<|end|><|start|>user<|message|>What is 1+1?<|end|><|start|>assistant
`
Example 4 (bash):
`bash
docker model pull hf.co/unsloth/gpt-oss-20b-GGUF:F16
- :llama: Tutorial: How to Run Magistral in Ollama
- 📖 Tutorial: How to Run Magistral in llama.cpp
Meet Magistral - Mistral's new reasoning models.
Magistral-Small-2509 is a reasoning LLM developed by Mistral AI. It excels at coding and mathematics and supports multiple languages. Magistral supports a 128k token context window and was finetuned from Mistral-Small-3.2. Magistral runs perfectly well locally on a single RTX 4090 or a Mac with 16 to 24GB RAM.
Update: Magistral-2509 new update is out as of September, 2025!\
\
Now with Vision support! We worked with Mistral again with the release of Magistral. Make sure to download Mistral's official uploads or Unsloth's uploads to get the correct implementation (ie correct system prompt, correct chat template etc.)
If you're using llama.cpp, please use --jinja to enable the system prompt!
{% endhint %}
All uploads use Unsloth Dynamic 2.0 for SOTA 5-shot MMLU and KL Divergence performance, meaning you can run & fine-tune quantized Mistral LLMs with minimal accuracy loss.
According to Mistral AI, these are the recommended settings for inference:
* Temperature of: 0.7
* Min\_P of: 0.01 (optional, but 0.01 works well, llama.cpp default is 0.1)
* Set top\_p to: 0.95
* A 128k context window is supported, but performance might degrade past 40k. So we recommend setting the maximum length to 40k if you see bad performance.
This is the recommended system prompt for Magistral 2509, 2507:
{% code overflow="wrap" %}
This is the recommended system prompt for Magistral 2506:
{% hint style="success" %}
Our dynamic uploads have the 'UD' prefix in them. Those without are not dynamic however still utilize our calibration dataset.
Mistral has their own vibe checking prompts which can be used to evaluate Magistral. Keep in mind these tests are based on running the full unquantized version of the model, however you could also test them on quantized versions:
2. Run the model with our dynamic quant. We did not set the context length automatically, so it will just use Ollama's default set context length.\
Note you can call ollama serve &in another terminal if it fails! We include all suggested parameters (temperature etc) in params in our Hugging Face upload!
3. Also Magistral supports 40K context lengths, so best to enable KV cache quantization. We use 8bit quantization which saves 50% memory usage. You can also try "q4_0" or "q8_0"
4. Ollama also sets the default context length to 4096, as mentioned here. Use OLLAMA_CONTEXT_LENGTH=8192 to change it to 8192. Magistral supports up to 128K, but 40K (40960) is tested most.
📖 Tutorial: How to Run Magistral in llama.cpp
1. Obtain the latest llama.cpp on GitHub here. You can follow the build instructions below as well. Change -DGGML_CUDA=ON to -DGGML_CUDA=OFF if you don't have a GPU or just want CPU inference.
2. If you want to use llama.cpp directly to load models, you can do the below: (:Q4\_K\_XL) is the quantization type. You can also download via Hugging Face (point 3). This is similar to ollama run
{% code overflow="wrap" %}
{% hint style="warning" %}
In llama.cpp, please use --jinja to enable the system prompt!
{% endhint %}
3. OR download the model via (after installing pip install huggingface_hub hf_transfer ). You can choose UD-Q4\_K\_XL, (Unsloth Dynamic), Q4\_K\_M, or other quantized versions (like BF16 full precision).
Examples:
Example 1 (unknown):
`unknown
First draft your thinking process (inner monologue) until you arrive at a response. Format your response using Markdown, and use LaTeX for any mathematical equations. Write both your thoughts and the response in the same language as the input.
Your thinking process must follow the template below:[THINK]Your thoughts or/and draft, like working through an exercise on scratch paper. Be as casual and as long as you want until you are confident to generate the response. Use the same language as the input.[/THINK]Here, provide a self-contained response.
`
Example 2 (unknown):
`unknown
A user will ask you to solve a task. You should first draft your thinking process (inner monologue) until you have derived the final answer. Afterwards, write a self-contained summary of your thoughts (i.e. your summary should be succinct but contain all the critical steps you needed to reach the conclusion). You should use Markdown to format your response. Write both your thoughts and summary in the same language as the task posed by the user. NEVER use \boxed{} in your response.
Your thinking process must follow the template below:
Your thoughts or/and draft, like working through an exercise on scratch paper. Be as casual and as long as you want until you are confident to generate a correct answer.
Here, provide a concise summary that reflects your reasoning and presents a clear final answer to the user. Don't mention that this is a summary.
Problem:
`
Example 3 (py):
`py
prompt_1 = 'How many "r" are in strawberry?'
prompt_2 = 'John is one of 4 children. The first sister is 4 years old. Next year, the second sister will be twice as old as the first sister. The third sister is two years older than the second sister. The third sister is half the ago of her older brother. How old is John?'
prompt_3 = '9.11 and 9.8, which is greater?'
`
Example 4 (py):
`py
prompt_4 = "Think about 5 random numbers. Verify if you can combine them with addition, multiplication, subtraction or division to 133"
prompt_5 = "Write 4 sentences, each with at least 8 words. Now make absolutely sure that every sentence has exactly one word less than the previous sentence."
prompt_6 = "If it takes 30 minutes to dry 12 T-shirts in the sun, how long does it take to dry 33 T-shirts?"
`
From https://mlabonne.github.io/blog/posts/Quantize_Llama_2_models_using_ggml.html
Or follow the steps at using the model name "merged\_model" to merge to GGUF.
{% endtab %}
{% endtabs %}
Running in Unsloth works well, but after exporting & running on other platforms, the results are poor
You might sometimes encounter an issue where your model runs and produces good results on Unsloth, but when you use it on another platform like Ollama or vLLM, the results are poor or you might get gibberish, endless/infinite generations or repeated outputs.
* The most common cause of this error is using an incorrect chat template. It’s essential to use the SAME chat template that was used when training the model in Unsloth and later when you run it in another framework, such as llama.cpp or Ollama. When inferencing from a saved model, it's crucial to apply the correct template.
* You must use the correct eos token. If not, you might get gibberish on longer generations.
* It might also be because your inference engine adds an unnecessary "start of sequence" token (or the lack of thereof on the contrary) so ensure you check both hypotheses!
* Use our conversational notebooks to force the chat template - this will fix most issues.
* Qwen-3 14B Conversational notebook Open in Colab-Reasoning-Conversational.ipynb)
* Gemma-3 4B Conversational notebook Open in Colab.ipynb)
* Llama-3.2 3B Conversational notebook Open in Colab-Conversational.ipynb)
You can try reducing the maximum GPU usage during saving by changing maximum_memory_usage.
The default is model.save_pretrained(..., maximum_memory_usage = 0.75). Reduce it to say 0.5 to use 50% of GPU peak memory or lower. This can reduce OOM crashes during saving.
Learn to run & fine-tune Phi-4 reasoning models locally with Unsloth + our Dynamic 2.0 quants
Microsoft's new Phi-4 reasoning models are now supported in Unsloth. The 'plus' variant performs on par with OpenAI's o1-mini, o3-mini and Sonnet 3.7. The 'plus' and standard reasoning models are 14B parameters while the 'mini' has 4B parameters.\
According to Microsoft, these are the recommended settings for inference:
* Temperature = 0.8
* Top\_P = 0.95
Phi-4 reasoning Chat templates
Please ensure you use the correct chat template as the 'mini' variant has a different one.
{% code overflow="wrap" %}
#### Phi-4-reasoning and Phi-4-reasoning-plus:
This format is used for general conversation and instructions:
{% code overflow="wrap" %}
{% hint style="info" %}
Yes, the chat template/prompt format is this long!
{% endhint %}
🦙 Ollama: Run Phi-4 reasoning Tutorial
1. Install ollama if you haven't already!
2. Run the model! Note you can call ollama servein another terminal if it fails. We include all our fixes and suggested parameters (temperature etc) in params in our Hugging Face upload.
📖 Llama.cpp: Run Phi-4 reasoning Tutorial
{% hint style="warning" %}
You must use --jinja in llama.cpp to enable reasoning for the models, expect for the 'mini' variant. Otherwise no token will be provided.
{% endhint %}
1. Obtain the latest llama.cpp on GitHub here. You can follow the build instructions below as well. Change -DGGML_CUDA=ON to -DGGML_CUDA=OFF if you don't have a GPU or just want CPU inference.
2. Download the model via (after installing pip install huggingface_hub hf_transfer ). You can choose Q4\_K\_M, or other quantized versions.
Examples:
Example 1 (unknown):
`unknown
<|system|>Your name is Phi, an AI math expert developed by Microsoft.<|end|><|user|>How to solve 3x^2+4x+5=1?<|end|><|assistant|>
`
Example 2 (unknown):
`unknown
<|im_start|>system<|im_sep|>You are Phi, a language model trained by Microsoft to help users. Your role as an assistant involves thoroughly exploring questions through a systematic thinking process before providing the final precise and accurate solutions. This requires engaging in a comprehensive cycle of analysis, summarizing, exploration, reassessment, reflection, backtracing, and iteration to develop well-considered thinking process. Please structure your response into two main sections: Thought and Solution using the specified format: {Thought section} {Solution section}. In the Thought section, detail your reasoning process in steps. Each step should include detailed considerations such as analysing questions, summarizing relevant findings, brainstorming new ideas, verifying the accuracy of the current steps, refining any errors, and revisiting previous steps. In the Solution section, based on various attempts, explorations, and reflections from the Thought section, systematically present the final solution that you deem correct. The Solution section should be logical, accurate, and concise and detail necessary steps needed to reach the conclusion. Now, try to solve the following question through the above guidelines:<|im_end|><|im_start|>user<|im_sep|>What is 1+1?<|im_end|><|im_start|>assistant<|im_sep|>
`
Example 3 (bash):
`bash
apt-get update
apt-get install pciutils -y
curl -fsSL https://ollama.com/install.sh | sh
`
Example 4 (bash):
`bash
ollama run hf.co/unsloth/Phi-4-mini-reasoning-GGUF:Q4_K_XL
`
Vision Fine-tuning
URL: llms-txt#vision-fine-tuning
Contents:
- Vision Fine-tuning Dataset
- Multi-image training
Learn how to fine-tune vision/multimodal LLMs with Unsloth
Fine-tuning vision models enables model to excel at certain tasks normal LLMs won't be as good as such as object/movement detection. You can also trainVLMs with RL. We have many free notebooks for vision fine-tuning:
* Llama 3.2 Vision fine-tuning for radiography: Notebook-Vision.ipynb)\
How can we assist medical professionals in analyzing Xrays, CT Scans & ultrasounds faster.
* Qwen2.5 VL fine-tuning for converting handwriting to LaTeX: Notebook-Vision.ipynb)\
This allows complex math formulas to be easily transcribed as LaTeX without manually writing it.
* Pixtral 12B 2409 vision fine-tuning for general Q\&A: Notebook-Vision.ipynb)\
One can concatenate general Q\&A datasets with more niche datasets to make the finetune not forget base model skills.
{% hint style="info" %}
It is best to ensure your dataset has images of all the same size/dimensions. Use dimensions of 300-1000px to ensure your training does not take too long or use too many resources.
{% endhint %}
To finetune vision models, we now allow you to select which parts of the mode to finetune. You can select to only finetune the vision layers, or the language layers, or the attention / MLP layers! We set them all on by default!
Vision Fine-tuning Dataset
The dataset for fine-tuning a vision or multimodal model is similar to standard question & answer pair datasets , but this time, they also includes image inputs. For example, the Llama 3.2 Vision Notebook-Vision.ipynb#scrollTo=vITh0KVJ10qX) uses a radiography case to show how AI can help medical professionals analyze X-rays, CT scans, and ultrasounds more efficiently.
We'll be using a sampled version of the ROCO radiography dataset. You can access the dataset here. The dataset includes X-rays, CT scans and ultrasounds showcasing medical conditions and diseases. Each image has a caption written by experts describing it. The goal is to finetune a VLM to make it a useful analysis tool for medical professionals.
Let's take a look at the dataset, and check what the 1st example shows:
Panoramic radiography shows an osteolytic lesion in the right posterior maxilla with resorption of the floor of the maxillary sinus (arrows).
To format the dataset, all vision finetuning tasks should be formatted as follows:
We will craft an custom instruction asking the VLM to be an expert radiographer. Notice also instead of just 1 instruction, you can add multiple turns to make it a dynamic conversation.
Let's convert the dataset into the "correct" format for finetuning:
The first example is now structured like below:
{% code overflow="wrap" %}
Before we do any finetuning, maybe the vision model already knows how to analyse the images? Let's check if this is the case!
For more details, view our dataset section in the notebook here-Vision.ipynb#scrollTo=vITh0KVJ10qX).
Multi-image training
In order to fine-tune or train a VLM like Qwen3-VL with multi-images the most straightforward change is to swap
Using map kicks in dataset standardization and arrow processing rules which can be strict and more complicated to define.
Examples:
Example 1 (python):
`python
model = FastVisionModel.get_peft_model(
model,
finetune_vision_layers = True, # False if not finetuning vision layers
finetune_language_layers = True, # False if not finetuning language layers
finetune_attention_modules = True, # False if not finetuning attention layers
finetune_mlp_modules = True, # False if not finetuning MLP layers
r = 16, # The larger, the higher the accuracy, but might overfit
lora_alpha = 16, # Recommended alpha == r at least
lora_dropout = 0,
bias = "none",
random_state = 3407,
use_rslora = False, # We support rank stabilized LoRA
loftq_config = None, # And LoftQ
target_modules = "all-linear", # Optional now! Can specify a list if needed
data = load_dataset("openai/gsm8k", "main")[split]
data = data.map(
lambda x: {
"prompt": [
{"role": "system", "content": SYSTEM_PROMPT},
{"role": "user", "content": x["question"]},
],
"answer": extract_hash_answer(x["answer"]),
}
)
return data
dataset = get_gsm8k_questions()
python
epsilon=0.2,
epsilon_high=0.28, # one sided
delta=1.5 # two sided
Examples:
Example 1 (unknown):
`unknown
The dataset is prepared by extracting the answers and formatting them as structured strings.
{% endstep %}
{% step %}
Reward Functions/Verifier
Reward Functions/Verifiers lets us know if the model is doing well or not according to the dataset you have provided. Each generation run will be assessed on how it performs to the score of the average of the rest of generations. You can create your own reward functions however we have already pre-selected them for you with Will's GSM8K reward functions. With this, we have 5 different ways which we can reward each generation.
You can input your generations into an LLM like ChatGPT 4o or Llama 3.1 (8B) and design a reward function and verifier to evaluate it. For example, feed your generations into a LLM of your choice and set a rule: "If the answer sounds too robotic, deduct 3 points." This helps refine outputs based on quality criteria. See examples of what they can look like here.
Example Reward Function for an Email Automation Task:
* Question: Inbound email
* Answer: Outbound email
* Reward Functions:
* If the answer contains a required keyword → +1
* If the answer exactly matches the ideal response → +1
* If the response is too long → -1
* If the recipient's name is included → +1
* If a signature block (phone, email, address) is present → +1
{% endstep %}
{% step %}
Train your model
We have pre-selected hyperparameters for the most optimal results however you could change them. Read all about parameters here. For advanced GRPO documentation on batching, generation and training parameters, read our guide!
The GRPOConfig defines key hyperparameters for training:
* use_vllm: Activates fast inference using vLLM.
* learning_rate: Determines the model's learning speed.
* num_generations: Specifies the number of completions generated per prompt.
* max_steps: Sets the total number of training steps.
{% hint style="success" %}
NEW! We now support DAPO, Dr. GRPO and most other new GRPO techniques. You can play with the following arguments in GRPOConfig to enable:
Learn to train OpenAI gpt-oss with GRPO to autonomously beat 2048 locally or on Colab.
LLMs often struggle with tasks that involve complex environments. However, by applying reinforcement learning (RL) and designing a custom reward function, these challenges can be overcome.
RL can be adapted for tasks such as auto kernel or strategy creation. This tutorial shows how to train gpt-oss with GRPO and Unsloth to autonomously beat 2048.
* Train gpt-oss-20b so the model can automatically win 2048
* Create a minimal 2048 environment the model can interact with
* Define reward functions that:
1. Check the generated strategy compiles and runs,
2. Prevent reward hacking (disallow external imports), and
3. Reward actual game success
* Run inference and export the model (MXFP4 4‑bit or merged FP16)
{% hint style="info" %}
Hardware: The 2048 example runs on a free Colab T4, but training will be slow. A100/H100 is much faster. 4‑bit loading + LoRA lets you fit a 20B model into modest VRAM.
{% endhint %}
{% stepper %}
{% step %}
Run this cell at the top of a notebook (works on Colab).
Load gpt-oss with Unsloth
Load the 20B model in 4‑bit QLoRA for memory efficiency, then wrap it with a LoRA adapter. You can also train it in 16-bit LoRA but it will use 4x more memory. For more settings view our configuration guide.
{% hint style="info" %}
If you hit OOM, try lowering max_seq_length, lora_rank, or num_generations (later), and keep load_in_4bit=True.
{% endhint %}
{% endstep %}
2048 game environment (minimal)
* A GameBoard class supporting W/A/S/D moves
* Merge/score logic
* execute_with_time_limit wrapper so poorly written strategies can’t hang the kernel
You can quickly smoke‑test with a trivial policy:
Safe code execution & anti‑cheat checks
Generated strategies are Python functions. To keep execution safe and prevent reward hacking:
* Module whitelist check — only allow Python stdlib symbols:
* Block disallowed imports (e.g., NumPy):
* Lock down execution to a sandboxed function:
* Enforce a hard wall‑clock limit on strategy runs:
We prompt the model to emit a short strategy function inside triple backticks:
python
def strategy(board):
return "W" # Example
`
Create a tiny synthetic dataset (reusing the same prompt) and compute the prompt length so GRPO knows how many completion tokens to sample:
{% hint style="info" %}
You can replace this dataset with real prompts for your own RL task.
{% endhint %}
{% endstep %}
Reward function time!
1. Extract the code block from the model’s reply:
") >= 2:
first = text.find("", first)
fx = text[first:second].strip()
fx = fx.removeprefix("python\n")
fx = fx[fx.find("def"):]
if fx.startswith("def strategy(board):"):
return fx
return None
python
from unsloth import create_locked_down_function, check_python_modules
def function_works(completions, **kwargs):
scores = []
for completion in completions:
response = completion[0]["content"]
function = extract_function(response)
if function is None:
scores.append(-2.0)
continue
ok, info = check_python_modules(function)
if "error" in info:
scores.append(-2.0)
continue
try:
_ = create_locked_down_function(function)
scores.append(1.0)
except Exception:
scores.append(-0.5)
return scores
python
def no_cheating(completions, **kwargs):
scores = []
for completion in completions:
response = completion[0]["content"]
function = extract_function(response)
if function is None:
scores.append(-1.0)
continue
ok, _ = check_python_modules(function)
scores.append(1.0 if ok else -20.0) # heavy penalty if cheating
# ok == True means only Python‑level imports were used
`
DeepSeek-V3.1: How to Run Locally
URL: llms-txt#deepseek-v3.1:-how-to-run-locally
Contents:
- :gear: Recommended Settings
- :butterfly:Chat template bug fixes
- 🐳Official Recommended Settings
- :arrow\_forward:Run DeepSeek-V3.1 Tutorials:
- :llama: Run in Ollama/Open WebUI
- ✨ Run in llama.cpp
A guide on how to run DeepSeek-V3.1 and Terminus on your own local device!
DeepSeek’s V3.1 and Terminus update introduces hybrid reasoning inference, combining 'think' and 'non-think' into one model. The full 671B parameter model requires 715GB of disk space. The quantized dynamic 2-bit version uses 245GB (-75% reduction in size). GGUF: DeepSeek-V3.1-GGUF
Sept 10, 2025 update: You asked for tougher benchmarks, so we’re showcasing Aider Polyglot results! Our Dynamic 3-bit DeepSeek V3.1 GGUF scores 75.6%, surpassing many full-precision SOTA LLMs. Read more.
Our DeepSeek-V3.1 GGUFs include Unsloth chat template fixes for llama.cpp supported backends.
{% endhint %}
All uploads use Unsloth Dynamic 2.0 for SOTA 5-shot MMLU and KL Divergence performance, meaning you can run & fine-tune quantized DeepSeek LLMs with minimal accuracy loss.
The 1-bit dynamic quant TQ1\_0 (1bit for unimportant MoE layers, 2-4bit for important MoE, and 6-8bit for rest) uses 170GB of disk space - this works well in a 1x24GB card and 128GB of RAM with MoE offloading - it also works natively in Ollama!
{% hint style="info" %}
You must use --jinja for llama.cpp quants - this uses our fixed chat templates and enables the correct template! You might get incorrect results if you do not use --jinja
{% endhint %}
The 2-bit quants will fit in a 1x 24GB GPU (with MoE layers offloaded to RAM). Expect around 5 tokens/s with this setup if you have bonus 128GB RAM as well. It is recommended to have at least 226GB RAM to run this 2-bit. For optimal performance you will need at least 226GB unified memory or 226GB combined RAM+VRAM for 5+ tokens/s. To learn how to increase generation speed and fit longer contexts, read here.
{% hint style="success" %}
Though not a must, for best performance, have your VRAM + RAM combined equal to the size of the quant you're downloading. If not, hard drive / SSD offloading will work with llama.cpp, just inference will be slower.
{% endhint %}
:butterfly:Chat template bug fixes
We fixed a few issues with DeepSeek V3.1's chat template since they did not function correctly in llama.cpp and other engines:
1. DeepSeek V3.1 is a hybrid reasoning model, meaning you can change the chat template to enable reasoning. The chat template introduced thinking = True , but other models use enable_thinking = True . We added the option to use enable_thinking as a keyword instead.
2. llama.cpp's jinja renderer via minja does not allow the use of extra arguments in the .split() command, so using .split(text, 1) works in Python, but not in minja. We had to change this to make llama.cpp function correctly without erroring out.\
\
You will get the following error when using other quants:\
terminate called after throwing an instance of 'std::runtime_error' what(): split method must have between 1 and 1 positional arguments and between 0 and 0 keyword arguments at row 3, column 1908 We fixed it in all our quants!
🐳Official Recommended Settings
According to DeepSeek, these are the recommended settings for V3.1 inference:
* Set the temperature 0.6 to reduce repetition and incoherence.
* Set top\_p to 0.95 (recommended)
* 128K context length or less
* Use --jinja for llama.cpp variants - we fixed some chat template issues as well!
* Useenable_thinking = True to use reasoning/ thinking mode. By default it's set to non reasoning.
#### :1234: Chat template/prompt format
You do not need to force \n , but you can still add it in! With the given prefix, DeepSeek V3.1 generates responses to queries in non-thinking mode. Unlike DeepSeek V3, it introduces an additional token .
A BOS is forcibly added, and an EOS separates each interaction. To counteract double BOS tokens during inference, you should only call tokenizer.encode(..., add_special_tokens = False) since the chat template auto adds a BOS token as well. For llama.cpp / GGUF inference, you should skip the BOS since it’ll auto add it.
#### :notebook\_with\_decorative\_cover: Non-Thinking Mode (use thinking = Falseor enable_thinking = False and is by default)
The multi-turn template is the same with non-thinking multi-turn chat template. It means the thinking token in the last turn will be dropped but the is retained in every turn of context.
#### :bow\_and\_arrow: Tool Calling
Tool calling is supported in non-thinking mode. The format is:
<|begin▁of▁sentence|>{system prompt}{tool_description}<|User|>{query}<|Assistant|> where we populate the tool\_description is area after the system prompt.
:arrow\_forward:Run DeepSeek-V3.1 Tutorials:
:llama: Run in Ollama/Open WebUI
{% stepper %}
{% step %}
Install ollama if you haven't already! To run more variants of the model, see here.
{% step %}
Run the model! Note you can call ollama servein another terminal if it fails! We include all our fixes and suggested parameters (temperature etc) in params in our Hugging Face upload!\ (NEW) To run the full R1-0528 model in Ollama, you can use our TQ1\_0 (170GB quant):
{% step %}
To run other quants, you need to first merge the GGUF split files into 1 like the code below. Then you will need to run the model locally.
{% step %}
Open WebUI also made a step-by-step tutorial on how to run R1 and for V3.1, you will just need to replace R1 with the new V3.1 quant.
{% endstep %}
{% endstepper %}
✨ Run in llama.cpp
{% stepper %}
{% step %}
Obtain the latest llama.cpp on GitHub here. You can follow the build instructions below as well. Change -DGGML_CUDA=ON to -DGGML_CUDA=OFF if you don't have a GPU or just want CPU inference.
{% step %}
If you want to use llama.cpp directly to load models, you can do the below: (:Q2\_K\_XL) is the quantization type. You can also download via Hugging Face (point 3). This is similar to ollama run . Use export LLAMA_CACHE="folder" to force llama.cpp to save to a specific location. Remember the model has only a maximum of 128K context length.
{% hint style="success" %}
Please try out -ot ".ffn_.*_exps.=CPU" to offload all MoE layers to the CPU! This effectively allows you to fit all non MoE layers on 1 GPU, improving generation speeds. You can customize the regex expression to fit more layers if you have more GPU capacity.
If you have a bit more GPU memory, try -ot ".ffn_(up|down)_exps.=CPU" This offloads up and down projection MoE layers.
Try -ot ".ffn_(up)_exps.=CPU" if you have even more GPU memory. This offloads only up projection MoE layers.
And finally offload all layers via -ot ".ffn_.*_exps.=CPU" This uses the least VRAM.
You can also customize the regex, for example -ot "\.(6|7|8|9|[0-9][0-9]|[0-9][0-9][0-9])\.ffn_(gate|up|down)_exps.=CPU" means to offload gate, up and down MoE layers but only from the 6th layer onwards.
{% endhint %}
{% step %}
Download the model via (after installing pip install huggingface_hub hf_transfer ). You can choose UD-Q2\_K\_XL (dynamic 2bit quant) or other quantized versions like Q4_K_M . We recommend using our 2.7bit dynamic quantUD-Q2_K_XLto balance size and accuracy.
:question:Why is Q8\_K\_XL slower than Q8\_0 GGUF?
On Mac devices, it seems like that BF16 might be slower than F16. Q8\_K\_XL upcasts some layers to BF16, so hence the slowdown, We are actively changing our conversion process to make F16 the default choice for Q8\_K\_XL to reduce performance hits.
:question:How to do Evaluation
To set up evaluation in your training run, you first have to split your dataset into a training and test split. You should always shuffle the selection of the dataset, otherwise your evaluation is wrong!
`
Example 2 (unknown):
`unknown
Then, we can set the training arguments to enable evaluation. Reminder evaluation can be very very slow especially if you set eval_steps = 1 which means you are evaluating every single step. If you are, try reducing the eval\_dataset size to say 100 rows or something.
`
Example 3 (unknown):
`unknown
:question:Evaluation Loop - Out of Memory or crashing.
A common issue when you OOM is because you set your batch size too high. Set it lower than 2 to use less VRAM. Also use fp16_full_eval=True to use float16 for evaluation which cuts memory by 1/2.
First split your training dataset into a train and test split. Set the trainer settings for evaluation to:
`
Example 4 (unknown):
`unknown
This will cause no OOMs and make it somewhat faster. You can also use bf16_full_eval=True for bf16 machines. By default Unsloth should have set these flags on by default as of June 2025.
:question:How do I do Early Stopping?
If you want to stop the finetuning / training run since the evaluation loss is not decreasing, then you can use early stopping which stops the training process. Use EarlyStoppingCallback.
As usual, set up your trainer and your evaluation dataset. The below is used to stop the training run if the eval_loss (the evaluation loss) is not decreasing after 3 steps or so.
`
Unsloth Benchmarks
URL: llms-txt#unsloth-benchmarks
Contents:
- Context length benchmarks
- Llama 3.1 (8B) max. context length
- Llama 3.3 (70B) max. context length
Unsloth recorded benchmarks on NVIDIA GPUs.
* For more detailed benchmarks, read our Llama 3.3 Blog.
* Benchmarking of Unsloth was also conducted by 🤗Hugging Face.
Tested on H100 and Blackwell GPUs. We tested using the Alpaca Dataset, a batch size of 2, gradient accumulation steps of 4, rank = 32, and applied QLoRA on all linear layers (q, k, v, o, gate, up, down):
Model
VRAM
🦥Unsloth speed
🦥VRAM reduction
🦥Longer context
😊Hugging Face + FA2
Llama 3.3 (70B)
80GB
2x
>75%
13x longer
1x
Llama 3.1 (8B)
80GB
2x
>70%
12x longer
1x
Context length benchmarks
{% hint style="info" %}
The more data you have, the less VRAM Unsloth uses due to our gradient checkpointing algorithm + Apple's CCE algorithm!
{% endhint %}
Llama 3.1 (8B) max. context length
We tested Llama 3.1 (8B) Instruct and did 4bit QLoRA on all linear layers (Q, K, V, O, gate, up and down) with rank = 32 with a batch size of 1. We padded all sequences to a certain maximum sequence length to mimic long context finetuning workloads.
GPU VRAM
🦥Unsloth context length
Hugging Face + FA2
--------
------------------------
------------------
8 GB
2,972
OOM
12 GB
21,848
932
16 GB
40,724
2,551
24 GB
78,475
5,789
40 GB
153,977
12,264
48 GB
191,728
15,502
80 GB
342,733
28,454
Llama 3.3 (70B) max. context length
We tested Llama 3.3 (70B) Instruct on a 80GB A100 and did 4bit QLoRA on all linear layers (Q, K, V, O, gate, up and down) with rank = 32 with a batch size of 1. We padded all sequences to a certain maximum sequence length to mimic long context finetuning workloads.
GPU VRAM
🦥Unsloth context length
Hugging Face + FA2
--------
------------------------
------------------
48 GB
12,106
OOM
80 GB
89,389
6,916
Fine-tuning LLMs with NVIDIA DGX Spark and Unsloth
Tutorial on how to fine-tune and do reinforcement learning (RL) with OpenAI gpt-oss on NVIDIA DGX Spark.
Unsloth enables local fine-tuning of LLMs with up to 200B parameters on the NVIDIA DGX™ Spark. With 128 GB of unified memory, you can train massive models such as gpt-oss-120b, and run or deploy inference directly on DGX Spark.
As shown at OpenAI DevDay, gpt-oss-20b was trained with RL and Unsloth on DGX Spark to auto-win 2048. You can train using Unsloth in a Docker container or virtual environment on DGX Spark.
In this tutorial, we’ll train gpt-oss-20b with RL using Unsloth notebooks after installing Unsloth on your DGX Spark. gpt-oss-120b will use around 68GB of unified memory.
After 1,000 steps and 4 hours of RL training, the gpt-oss model greatly outperforms the original on 2048, and longer training would further improve results.
You can watch Unsloth featured on OpenAI DevDay 2025 here.
gpt-oss trained with RL consistently outperforms on 2048.
⚡ Step-by-Step Tutorial
{% stepper %}
{% step %}
#### Start with Unsloth Docker image for DGX Spark
First, build the Docker image using the DGX Spark Dockerfile which can be found here. You can also run the below in a Terminal in the DGX Spark:
Then, build the training Docker image using saved Dockerfile:
You can also click to see the full DGX Spark Dockerfile
Guide on how to run and fine-tune DeepSeek-OCR locally.
DeepSeek-OCR is a 3B-parameter vision model for OCR and document understanding. It uses context optical compression to convert 2D layouts into vision tokens, enabling efficient long-context processing.
Capable of handling tables, papers, and handwriting, DeepSeek-OCR achieves 97% precision while using 10× fewer vision tokens than text tokens - making it 10× more efficient than text-based LLMs.
You can fine-tune DeepSeek-OCR to enhance its vision or language performance. In our Unsloth free fine-tuning notebook.ipynb), we demonstrated a 88.26% improvement for language understanding.
> Our model upload that enables fine-tuning + more inference support:DeepSeek-OCR
🖥️ Running DeepSeek-OCR
To run the model in vLLM or Unsloth, here are the recommended settings:
:gear: Recommended Settings
DeepSeek recommends these settings:
* Temperature = 0.0
* max_tokens = 8192
* ngram_size = 30
* window_size = 90
📖 vLLM: Run DeepSeek-OCR Tutorial
1. Obtain the latest vLLM via:
`bash
uv venv
source .venv/bin/activate
Tutorial: How to Fine-tune gpt-oss
URL: llms-txt#tutorial:-how-to-fine-tune-gpt-oss
Contents:
- 🌐 Colab gpt-oss Fine-tuning
- Install Unsloth (in Colab)
- Configuring gpt-oss and Reasoning Effort
- Fine-tuning Hyperparameters (LoRA)
- Try Inference
- Data Preparation
- Train the model
- Inference: Run your trained model
- Save/export your model
- :sparkles: Saving to Llama.cpp
Learn step-by-step how to train OpenAI gpt-oss locally with Unsloth.
In this guide with screenshots, you'll learn to fine-tune your own custom gpt-oss model either locally on your machine or for free using Google Colab. We'll walk you through the entire process, from setup to running and saving your trained model.
{% hint style="success" %}
Aug 28 update: You can now export/save your QLoRA fine-tuned gpt-oss model to llama.cpp, vLLM, HF etc.
We also introduced Unsloth Flex Attention which enables >8× longer context lengths, >50% less VRAM usage and >1.5× faster training vs. all implementations. Read more here
{% endhint %}
> Quickstart: Fine-tune gpt-oss-20b for free with our: Colab notebook-Fine-tuning.ipynb)
Unsloth gpt-oss fine-tuning, when compared to all other FA2 implementations, achieves 1.5× faster training, 70% reduction in VRAM use, and 10x longer context lengths - with no accuracy loss.
This section covers fine-tuning gpt-oss using our Google Colab notebooks. You can also save and use the gpt-oss notebook into your favorite code editor and follow our local gpt-oss guide.
{% stepper %}
{% step %}
Install Unsloth (in Colab)
In Colab, run cells from top to bottom. Use Run all for the first pass. The first cell installs Unsloth (and related dependencies) and prints GPU/memory info. If a cell throws an error, simply re-run it.
{% endstep %}
Configuring gpt-oss and Reasoning Effort
We’ll load gpt-oss-20b using Unsloth's linearized version (as no other version will work).
Configure the following parameters:
* max_seq_length = 1024
* Recommended for quick testing and initial experiments.
* load_in_4bit = True
Use False for LoRA training (note: setting this to False will need at least 43GB VRAM). You MUST* also set model_name = "unsloth/gpt-oss-20b-BF16"
You should see output similar to the example below. Note: We explicitly change the dtype to float32 to ensure correct training behavior.
{% endstep %}
Fine-tuning Hyperparameters (LoRA)
Now it's time to adjust your training hyperparameters. For a deeper dive into how, when, and what to tune, check out our detailed hyperparameters guide.
{% hint style="info" %}
To avoid overfitting, monitor your training loss and avoid setting these values too high.
{% endhint %}
This step adds LoRA adapters for parameter-efficient fine-tuning. Only about 1% of the model’s parameters are trained, which makes the process significantly more efficient.
{% endstep %}
In the notebook, there's a section called "Reasoning Effort" that demonstrates gpt-oss inference running in Colab. You can skip this step, but you'll still need to run the model later once you've finished fine-tuning it.
{% endstep %}
For this example, we will use the HuggingFaceH4/Multilingual-Thinking. This dataset contains chain-of-thought reasoning examples derived from user questions translated from English into four additional languages.
This is the same dataset referenced in OpenAI's fine-tuning cookbook.
The goal of using a multilingual dataset is to help the model learn and generalize reasoning patterns across multiple languages.
gpt-oss introduces a reasoning effort system that controls how much reasoning the model performs. By default, the reasoning effort is set to low, but you can change it by setting the reasoning_effort parameter to low, medium or high.
To format the dataset, we apply a customized version of the gpt-oss prompt:
Let's inspect the dataset by printing the first example:
One unique feature of gpt-oss is its use of the OpenAI Harmony format, which supports structured conversations, reasoning output, and tool calling. This format includes tags such as <|start|> , <|message|> , and <|return|> .
{% hint style="info" %}
🦥 Unsloth fixes the chat template to ensure it is correct. See this tweet for technical details on our template fix.
{% endhint %}
Feel free to adapt the prompt and structure to suit your own dataset or use-case. For more guidance, refer to our dataset guide.
{% endstep %}
We've pre-selected training hyperparameters for optimal results. However, you can modify them based on your specific use case. Refer to our hyperparameters guide.
In this example, we train for 60 steps to speed up the process. For a full training run, set num_train_epochs=1 and disable the step limiting by setting max_steps=None.
During training, monitor the loss to ensure that it is decreasing over time. This confirms that the training process is functioning correctly.
{% endstep %}
Inference: Run your trained model
Now it's time to run inference with your fine-tuned model. You can modify the instruction and input, but leave the output blank.
In this example, we test the model's ability to reason in French by adding a specific instruction to the system prompt, following the same structure used in our dataset.
This should produce an output similar to:
{% endstep %}
Save/export your model
To save your fine-tuned model, you can export your fine-tuned model both in bf16 format , with our on-demand dequantization of MXFP4 base models using save_method="merged_16bit"or in native MXFP4 Safetensors format using save_method="mxfp4" .
The MXFP4 native merge format offers significant performance improvements compared to the bf16 format: it uses up to 75% less disk space, reduces VRAM consumption by 50%, accelerates merging by 5-10x, and enables much faster conversion to GGUF format.
{% hint style="success" %}
New: Saving or merging QLoRA fine-tuned models to GGUF is now supported for use in other frameworks (e.g. Hugging Face, llama.cpp with GGUF).
{% endhint %}
After fine-tuning your gpt-oss model, you can merge it into MXFP4 format with:
If you prefer to merge the model and push to the hugging-face hub directly:
:sparkles: Saving to Llama.cpp
1. Obtain the latest llama.cpp on GitHub here. You can follow the build instructions below as well. Change -DGGML_CUDA=ON to -DGGML_CUDA=OFF if you don't have a GPU or just want CPU inference.
2. Convert the MXFP4 merged model:
3. Run inference on the quantized model:
{% endstep %}
{% endstepper %}
🖥️ Local gpt-oss Fine-tuning
This chapter covers fine-tuning gpt-oss on your local device. While gpt-oss-20b fine-tuning can operate on just 14GB VRAM, we recommend having at least 16GB VRAM available to ensure stable and reliable training runs.
{% hint style="info" %}
We recommend downloading or incorporating elements from our Colab notebooks into your local setup for easier use.
Note that pip install unsloth will not work for this setup, as we need to use the latest PyTorch, Triton and related packages. Install Unsloth using this specific command:
Examples:
Example 1 (python):
`python
tokenizer.apply_chat_template(
text,
tokenize = False,
add_generation_prompt = False,
reasoning_effort = "medium",
)
`
Example 2 (python):
`python
from unsloth.chat_templates import standardize_sharegpt
One unique feature of gpt-oss is its use of the OpenAI Harmony format, which supports structured conversations, reasoning output, and tool calling. This format includes tags such as <|start|> , <|message|> , and <|return|> .
{% hint style="info" %}
🦥 Unsloth fixes the chat template to ensure it is correct. See this tweet for technical details on our template fix.
{% endhint %}
Feel free to adapt the prompt and structure to suit your own dataset or use-case. For more guidance, refer to our dataset guide.
{% endstep %}
{% step %}
Train the model
We've pre-selected training hyperparameters for optimal results. However, you can modify them based on your specific use case. Refer to our hyperparameters guide.
In this example, we train for 60 steps to speed up the process. For a full training run, set num_train_epochs=1 and disable the step limiting by setting max_steps=None.
During training, monitor the loss to ensure that it is decreasing over time. This confirms that the training process is functioning correctly.
{% endstep %}
{% step %}
Inference: Run your trained model
Now it's time to run inference with your fine-tuned model. You can modify the instruction and input, but leave the output blank.
In this example, we test the model's ability to reason in French by adding a specific instruction to the system prompt, following the same structure used in our dataset.
This should produce an output similar to:
{% endstep %}
{% step %}
Save/export your model
To save your fine-tuned model, you can export your fine-tuned model both in bf16 format , with our on-demand dequantization of MXFP4 base models using save_method="merged_16bit"or in native MXFP4 Safetensors format using save_method="mxfp4" .
The MXFP4 native merge format offers significant performance improvements compared to the bf16 format: it uses up to 75% less disk space, reduces VRAM consumption by 50%, accelerates merging by 5-10x, and enables much faster conversion to GGUF format.
{% hint style="success" %}
New: Saving or merging QLoRA fine-tuned models to GGUF is now supported for use in other frameworks (e.g. Hugging Face, llama.cpp with GGUF).
{% endhint %}
After fine-tuning your gpt-oss model, you can merge it into MXFP4 format with:
`
Example 4 (unknown):
`unknown
If you prefer to merge the model and push to the hugging-face hub directly:
`
Advanced RL Documentation
URL: llms-txt#advanced-rl-documentation
Contents:
- Training Parameters
- Generation Parameters
- Batch & Throughput Parameters
- Parameters that control batches
- GRPO Batch Examples
- Quick Formula Reference
Advanced documentation settings when using Unsloth with GRPO.
Detailed guides on doing GRPO with Unsloth for Batching, Generation & Training Parameters:
Training Parameters
beta(float, default 0.0)*: KL coefficient.
* 0.0 ⇒ no reference model loaded (lower memory, faster).
* Higher beta constrains the policy to stay closer to the ref policy.
num_iterations(int, default 1)*: PPO epochs per batch (μ in the algorithm).\
Replays data within each gradient accumulation step; e.g., 2 = two forward passes per accumulation step.
epsilon(float, default 0.2)*: Clipping value for token-level log-prob ratios (typical ratio range ≈ \[-1.2, 1.2] with default ε).
delta(float, optional)*: Enables upper clipping bound for two-sided GRPO when set. If None, standard GRPO clipping is used. Recommended > 1 + ε when enabled (per INTELLECT-2 report).
epsilon_high(float, optional)*: Upper-bound epsilon; defaults to epsilon if unset. DAPO recommends 0.28.
* "token": raw per-token ratios (one weight per token).
* "sequence": average per-token ratios to a single sequence-level ratio.\
GSPO shows sequence-level sampling often gives more stable training for sequence-level rewards.
reward_weights(list\[float], optional)*: One weight per reward. If None, all weights = 1.0.
scale_rewards(str|bool, default "group")*:
* True or "group": scale by std within each group (unit variance in group).
* "batch": scale by std across the entire batch (per PPO-Lite).
* False or "none": no scaling. Dr. GRPO recommends not scaling to avoid difficulty bias from std scaling.
loss_type(str, default "dapo")*:
* "grpo": normalizes over sequence length (length bias; not recommended).
* "dr_grpo": normalizes by a global constant (introduced in Dr. GRPO; removes length bias). Constant ≈ max_completion_length.
* "dapo"(default): normalizes by active tokens in the global accumulated batch (introduced in DAPO; removes length bias).
* "bnpo": normalizes by active tokens in the local batch only (results can vary with local batch size; equals GRPO when per_device_train_batch_size == 1).
Applies Truncated Importance Sampling (TIS) to correct off-policy effects when generation (e.g., vLLM / fast\_inference) differs from training backend.\
In Unsloth, this is auto-set to True if you’re using vLLM/fast\_inference; otherwise False.
Truncation parameter C for TIS; sets an upper bound on the importance sampling ratio to improve stability.
Generation Parameters
* temperature (float, defaults to 1.0):\
Temperature for sampling. The higher the temperature, the more random the completions. Make sure you use a relatively high (1.0) temperature to have diversity in generations which helps learning.
* top_p (float, optional, defaults to 1.0):\
Float that controls the cumulative probability of the top tokens to consider. Must be in (0, 1]. Set to 1.0 to consider all tokens.
* top_k (int, optional):\
Number of highest probability vocabulary tokens to keep for top-k-filtering. If None, top-k-filtering is disabled and all tokens are considered.
* min_p (float, optional):\
Minimum token probability, which will be scaled by the probability of the most likely token. It must be a value between 0.0 and 1.0. Typical values are in the 0.01-0.2 range.
* repetition_penalty (float, optional, defaults to 1.0):\
Float that penalizes new tokens based on whether they appear in the prompt and the generated text so far. Values > 1.0 encourage the model to use new tokens, while values < 1.0 encourage the model to repeat tokens.
* steps_per_generation: (int, optional):\
Number of steps per generation. If None, it defaults to gradient_accumulation_steps. Mutually exclusive with generation_batch_size.
{% hint style="info" %}
It is a bit confusing to mess with this parameter, it is recommended to edit per_device_train_batch_size and gradient accumulation for the batch sizes
{% endhint %}
Batch & Throughput Parameters
Parameters that control batches
* train_batch_size: Number of samples per process per step.\
If this integer is less than num_generations, it will default to num_generations.
* steps_per_generation: Number of microbatches that contribute to one generation’s loss calculation (forward passes only).\
A new batch of data is generated every steps_per_generation steps; backpropagation timing depends on gradient_accumulation_steps.
* num_processes: Number of distributed training processes (e.g., GPUs / workers).
* gradient_accumulation_steps (aka gradient_accumulation): Number of microbatches to accumulate before applying backpropagation and optimizer update.
* Effective batch size:
Total samples contributing to gradients before an update (across all processes and steps).
* Optimizer steps per generation:
Example: 4 / 2 = 2.
* num_generations: Number of generations produced per prompt (applied after computing effective_batch_size).\
The number of unique prompts in a generation cycle is:
Must be > 2 for GRPO to work.
GRPO Batch Examples
The tables below illustrate how batches flow through steps, when optimizer updates occur, and how new batches are generated.
Generation cycle A
Step
Batch
Notes
---:
--------
--------------------------------------
0
\[0,0,0]
1
\[1,1,1]
→ optimizer update (accum = 2 reached)
2
\[2,2,2]
3
\[3,3,3]
optimizer update
Generation cycle B
Step
Batch
Notes
---:
--------
--------------------------------------
0
\[4,4,4]
1
\[5,5,5]
→ optimizer update (accum = 2 reached)
2
\[6,6,6]
3
\[7,7,7]
optimizer update
Generation cycle A
Step
Batch
Notes
---:
--------
------------------------------------
0
\[0,0,0]
1
\[1,1,1]
2
\[2,2,2]
3
\[3,3,3]
optimizer update (accum = 4 reached)
Generation cycle B
Step
Batch
Notes
---:
--------
------------------------------------
0
\[4,4,4]
1
\[5,5,5]
2
\[6,6,6]
3
\[7,7,7]
optimizer update (accum = 4 reached)
Generation cycle A
Step
Batch
Notes
---:
--------
------------------------------------
0
\[0,0,0]
1
\[0,1,1]
2
\[1,1,3]
3
\[3,3,3]
optimizer update (accum = 4 reached)
Generation cycle B
Step
Batch
Notes
---:
--------
------------------------------------
0
\[4,4,4]
1
\[4,5,5]
2
\[5,5,6]
3
\[6,6,6]
optimizer update (accum = 4 reached)
Generation cycle A
Step
Batch
Notes
---:
---------------
------------------------------------
0
\[0,0,0, 1,1,1]
1
\[2,2,2, 3,3,3]
optimizer update (accum = 2 reached)
Generation cycle B
Step
Batch
Notes
---:
---------------
------------------------------------
0
\[4,4,4, 5,5,5]
1
\[6,6,6, 7,7,7]
optimizer update (accum = 2 reached)
Quick Formula Reference
Examples:
Example 1 (python):
`python
If mask_truncated_completions is enabled, zero out truncated completions in completion_mask
A bit issue if you didn't notice is the Alpaca dataset is single turn, whilst remember using ChatGPT was interactive and you can talk to it in multiple turns. For example, the left is what we want, but the right which is the Alpaca dataset only provides singular conversations. We want the finetuned language model to somehow learn how to do multi turn conversations just like ChatGPT.
So we introduced the conversation_extension parameter, which essentially selects some random rows in your single turn dataset, and merges them into 1 conversation! For example, if you set it to 3, we randomly select 3 rows and merge them into 1! Setting them too long can make training slower, but could make your chatbot and final finetune much better!
Then set output_column_name to the prediction / output column. For the Alpaca dataset dataset, it would be the output column.
We then use the standardize_sharegpt function to just make the dataset in a correct format for finetuning! Always call this!
Customizable Chat Templates
We can now specify the chat template for finetuning itself. The very famous Alpaca format is below:
But remember we said this was a bad idea because ChatGPT style finetunes require only 1 prompt? Since we successfully merged all dataset columns into 1 using Unsloth, we essentially can create the below style chat template with 1 input column (instruction) and 1 output:
We just require you must put a {INPUT} field for the instruction and an {OUTPUT} field for the model's output field. We in fact allow an optional {SYSTEM} field as well which is useful to customize a system prompt just like in ChatGPT. For example, below are some cool examples which you can customize the chat template to be:
For the ChatML format used in OpenAI models:
Or you can use the Llama-3 template itself (which only functions by using the instruct version of Llama-3): We in fact allow an optional {SYSTEM} field as well which is useful to customize a system prompt just like in ChatGPT.
Or in the Titanic prediction task where you had to predict if a passenger died or survived in this Colab notebook which includes CSV and Excel uploading:
Applying Chat Templates with Unsloth
For datasets that usually follow the common chatml format, the process of preparing the dataset for training or finetuning, consists of four simple steps:
* Check the chat templates that Unsloth currently supports:\\
\
This will print out the list of templates currently supported by Unsloth. Here is an example output:\\
* Use get_chat_template to apply the right chat template to your tokenizer:\\
* Define your formatting function. Here's an example:\\
\
\
This function loops through your dataset applying the chat template you defined to each sample.\\
* Finally, let's load the dataset and apply the required modifications to our dataset: \\
\
If your dataset uses the ShareGPT format with "from"/"value" keys instead of the ChatML "role"/"content" format, you can use the standardize_sharegpt function to convert it first. The revised code will now look as follows:\
\\
Assuming your dataset is a list of list of dictionaries like the below:
You can use our get_chat_template to format it. Select chat_template to be any of zephyr, chatml, mistral, llama, alpaca, vicuna, vicuna_old, unsloth, and use mapping to map the dictionary values from, value etc. map_eos_token allows you to map <|im_end|> to EOS without any training.
You can also make your own custom chat templates! For example our internal chat template we use is below. You must pass in a tuple of (custom_template, eos_token) where the eos_token must be used inside the template.
Performance of Unsloth Dynamic GGUFs on Aider Polyglot Benchmarks
We’re excited to share that Unsloth Dynamic GGUFs shows how it's possible to quantize LLMs like DeepSeek-V3.1 (671B) down to just 1-bit or 3-bit, and still be able to outperform SOTA models like GPT-4.5, GPT-4.1 (April 2025) and Claude-4-Opus (May 2025).
Previously, we demonstrated how Unsloth Dynamic GGUFs outperform other quantization methods on 5-shot MMLU and KL Divergence. Now, we’re showcasing their performance on independent third-party evaluations using the Aider Polyglotbenchmark.
Thinking Aider Benchmarks
No Thinking Aider Benchmarks
* Our 1-bit Unsloth Dynamic GGUF shrinks DeepSeek-V3.1 from 671GB → 192GB (-75% size) and no-thinking mode greatly outperforms GPT-4.1 (Apr 2025), GPT-4.5, and DeepSeek-V3-0324.
* Unsloth Dynamic GGUFs perform consistently better than other non-Unsloth Dynamic imatrix GGUFs
* Other non-Unsloth 1-bit and 2-bit DeepSeek-V3.1 quantizations, as well as standard 1-bit quantization without selective layer quantization, either failed to load or produced gibberish and looping outputs. This highlights how Unsloth Dynamic GGUFs are able to largely retain accuracy whereas other methods do not even function.
Why theAider Polyglotbenchmark? Aider is one of the most comprehensive measures of how well LLMs can write, code, follow instructions, and apply changes without human intervention, making it one of the hardest and most valuable benchmarks for real-world use.
{% hint style="success" %}
The key advantage of using the Unsloth package and models is our active role in fixing critical bugs in major models. We've collaborated directly with teams behind Qwen3, Meta (Llama 4), Mistral (Devstral), Google (Gemma 1–3) and Microsoft (Phi-3/4), contributing essential fixes that significantly boost accuracy.
{% endhint %}
🦥Unsloth Dynamic Quantization
{% hint style="success" %}
Dynamic 1 bit makes important layers in 8 or 16 bits and un-important layers in 1,2,3,4,5 or 6bits.
{% endhint %}
In Nov 2024, our 4-bit Dynamic Quants showcased how you could largely restore QLoRA fine-tuning & model accuracy by just selectively quantizing layers. We later studied DeepSeek-R1's architecture and applied this similar methodology, where we quantized some layers to as low as 1-bit and important layers to higher bits (6, 8-bit). This approach quickly gained popularity and has proven especially effective for MoE models, making dynamic quantization the de facto for MoE quantization.
Our Dynamic GGUFs are even more effective when paired with our imatrix calibration dataset, designed for chat and coding performance. All of this enabled extreme LLM compression without catastrophic loss in quality.
For example in Qwen2-VL-2B-Instruct, naively quantizing all layers to 4bit causes the model to fail understanding the image below. It's a train, not a coastal scene!
{% columns %}
{% column width="33.33333333333333%" %}
{% endcolumn %}
{% column width="66.66666666666667%" %}
{% endcolumn %}
{% endcolumns %}
We also showed dynamic benchmarks in for Gemma 3 and Llama 4 Scout, showing how effective our methodology is:
{% columns %}
{% column %}
{% endcolumn %}
{% endcolumn %}
{% endcolumns %}
⚙️Benchmark setup
For our DeepSeek-V3.1 experiments, we compared different bits of Unsloth Dynamic GGUFs against:
* Full-precision, unquantized LLMs including GPT 4.5, 4.1, Claude-4-Opus, DeepSeek-V3-0324 etc.
Benchmark experiments were mainly conducted by David Sluys (neolithic5452 on Aider Discord), a trusted community contributor to Aider Polyglot evaluations. Tests were run \~3 times and averaged for a median score, and the Pass-2 accuracy is reported as by convention. There are some reproducible benchmark code snippets in Aider's Discord.
Expand for Reasoning model Aider benchmarks
Model
Accuracy
---------------------------------
--------
GPT-5
86.7
Gemini 2.5 Pro (June)
83.1
o3
76.9
DeepSeek V3.1
76.1
(3 bit) DeepSeek V3.1 Unsloth
75.6
Claude-4-Opus (May)
72
o4-mini (High)
72
DeepSeek R1 0528
71.4
(2 bit) DeepSeek V3.1 Unsloth
66.7
Claude-3.7-Sonnet (Feb)
64.9
(1 bit) DeepSeek V3.1 Unsloth
57.8
DeepSeek R1
56.9
Expand for Non Reasoning model Aider benchmarks
Model
Accuracy
---------------------------------
--------
DeepSeek V3.1
71.6
Claude-4-Opus (May)
70.7
(5 bit) DeepSeek V3.1 Unsloth
70.7
(4 bit) DeepSeek V3.1 Unsloth
69.7
(3 bit) DeepSeek V3.1 Unsloth
68.4
(2 bit) DeepSeek V3.1 Unsloth
65.8
Qwen3 235B A22B
59.6
Kimi K2
59.1
(1 bit) DeepSeek V3.1 Unsloth
55.7
DeepSeek V3-0324
55.1
GPT-4.1 (April, 2025)
52.4
ChatGPT 4o (March, 2025)
45.3
GPT-4.5
44.9
DeepSeek V3.1 has both a reasoning and a non reasoning mode, and we test both. For non reasoning, we see a clear trend of how our dynamic quantizations perform below. dynamic 5-bit attains 70.7% on Aider Pass-2, whilst dynamic 1-bit attains 55.7%. In terms of size and accuracy, the 3 and 4bit are extremely powerful!
:sparkler:Comparison to other quants
We also run the Aider Polyglot benchmark on other dynamic imatrix GGUFs from the community and compare it to ours. To ensure a fair comparison, we do the following:
1. We select similar sized files and bit types to each Unsloth quant.
2. We use our fixed chat template if the community quant fails to execute the benchmark. We found some community quants {"code":500,"message":"split method must have between 1 and 1 positional arguments and between 0 and 0 keyword arguments at row 3, column 1908"}, and this gets fixed by using our fixed chat template.
We see Unsloth dynamic quants doing remarkably well when compared to other community quantization for the same model size and quant type!
Expand for raw numerical data comparison to other quants
Quant
Quant Size (GB)
Unsloth Accuracy %
Comparison Accuracy %
IQ2_XXS
164
43.6
TQ1_0
170
50.7
IQ1_M
206
55.7
IQ2_M
215
56.6
IQ2_XXS
225
61.2
IQ2_M
235
64.3
Q2_K_L
239
64.0
Q2_K_XL
255
65.8
IQ3_XXS
268
65.6
65.6
IQ3_XXS
279
66.8
Q3_K_S
293
65.2
Q3_K_XL
300
68.4
IQ4_XS
357
69.2
IQ4_XS
360
66.3
Q4_K_XL
387
69.7
Q4_K_M
405
69.7
Q4_K_M
409
67.7
Q5_K_M
478
68.9
Q5_K_XL
484
70.7
:cake:Dynamic quantization ablations
We did some ablations as well to confirm if our calibration dataset and our dynamic quantization methodology actually works. The trick of Unsloth's dynamic method is to quantize important layers to higher bits say 8bits, whilst un-important layers are left in lower bis like 2bits.
To test our method, we leave specific tensors in lower precision like 4bit vs higher precision. For example below we leave attn_k_b tensors in 4bit (semi-dynamic) vs 8bit (Unsloth current), and by increasing the quant size by only \~100MB or so (<0.1%), accuracy shoots up dramatically!
{% hint style="success" %}
attn_k_b and other tensors in DeepSeek V3.1 are highly important / sensitive to quantization and should left in higher precision to retain accuracy!
{% endhint %}
:bug:Chat Template Bug Fixes
During testing of DeepSeek-V3.1 quants, we found some lower bit quants not enclosing properly or doing some weird formatting. This caused some community quants to not work on lower bits, and so this caused unfair comparisons. We found llama.cpp's usage of minja (a simpler version of jinja) does not accept positional argument in .split. We had to change:
See here for our fixed chat template or here for a raw jinja file.
:bar\_chart:Pass Rate 1
Aider is reported mainly on pass rate 2. We also report pass rate 1 to compare community quants of the same size. We see our dynamic quants do much better than other community quants of similar sizes especially on smaller than 2 bit and larger than 4bits. 3 and 4 bit perform similarly well.
:computer:Run DeepSeek V3.1 Dynamic quants
Head over to our DeepSeek V3.1 guide or to quickly get the dynamic 2bit version, do:
then use llama.cpp to directly download the weights. We set the optimal suggested parameters like temperature, the chat template etc already as well:
from transformers import TrainingArguments,Trainer,DataCollatorForSeq2Seq
from unsloth import is_bfloat16_supported
trainer = Trainer(
model = model,
train_dataset = dataset,
args = TrainingArguments(
per_device_train_batch_size = 1,
gradient_accumulation_steps = 4,
warmup_steps = 5,
# num_train_epochs = 1, # Set this for 1 full training run.
max_steps = 60,
learning_rate = 2e-4,
fp16 = not is_bfloat16_supported(),
bf16 = is_bfloat16_supported(),
logging_steps = 1,
optim = "adamw_8bit",
weight_decay = 0.01,
lr_scheduler_type = "linear",
seed = 3407,
output_dir = "outputs",
report_to = "none", # Use this for WandB etc
),
)
python
model.save_pretrained("lora_model") # Local saving
tokenizer.save_pretrained("lora_model")
Examples:
Example 1 (unknown):
`unknown
{% hint style="info" %}
The above is a simplification. In reality, to fine-tune Orpheus properly, you would need the audio tokens as part of the training labels. Orpheus’s pre-training likely involved converting audio to discrete tokens (via an audio codec) and training the model to predict those given the preceding text. For fine-tuning on new voice data, you would similarly need to obtain the audio tokens for each clip (using Orpheus’s audio codec). The Orpheus GitHub provides a script for data processing – it encodes audio into sequences of tokens.
{% endhint %}
However, Unsloth may abstract this away: if the model is a FastModel with an associated processor that knows how to handle audio, it might automatically encode the audio in the dataset to tokens. If not, you’d have to manually encode each audio clip to token IDs (using Orpheus’s codebook). This is an advanced step beyond this guide, but keep in mind that simply using text tokens won’t teach the model the actual audio – it needs to match the audio patterns.
Let's assume Unsloth provides a way to feed audio directly (for example, by setting processor and passing the audio array). If Unsloth does not yet support automatic audio tokenization, you might need to use the Orpheus repository’s encode_audio function to get token sequences for the audio, then use those as labels. (The dataset entries do have phonemes and some acoustic features which suggests a pipeline.)
Step 3: Set up training arguments and Trainer
`
Example 2 (unknown):
`unknown
We do 60 steps to speed things up, but you can set num_train_epochs=1 for a full run, and turn off max_steps=None. Using a per\_device\_train\_batch\_size >1 may lead to errors if multi-GPU setup to avoid issues, ensure CUDA\_VISIBLE\_DEVICES is set to a single GPU (e.g., CUDA\_VISIBLE\_DEVICES=0). Adjust as needed.
Step 4: Begin fine-tuning
This will start the training loop. You should see logs of loss every 50 steps (as set by logging_steps). The training might take some time depending on GPU – for example, on a Colab T4 GPU, a few epochs on 3h of data may take 1-2 hours. Unsloth’s optimizations will make it faster than standard HF training.
Step 5: Save the fine-tuned model
After training completes (or if you stop it mid-way when you feel it’s sufficient), save the model. This ONLY saves the LoRA adapters, and not the full model. To save to 16bit or GGUF, scroll down!
`
Fine-tuning LLMs Guide
URL: llms-txt#fine-tuning-llms-guide
Contents:
- 1. Understand Fine-tuning
- 2. Choose the Right Model + Method
- 3. Your Dataset
- 4. Understand Training Hyperparameters
- 5. Installing + Requirements
- 6. Training + Evaluation
- Evaluation
- 7. Running + Saving the model
- Saving the model
- 8. We're done!
Learn all the basics and best practices of fine-tuning. Beginner-friendly.
1. Understand Fine-tuning
Fine-tuning an LLM customizes its behavior, enhances + injects knowledge, and optimizes performance for domains/specific tasks. For example:
* GPT-4 serves as a base model; however, OpenAI fine-tuned it to better comprehend instructions and prompts, leading to the creation of ChatGPT-4 which everyone uses today.
* DeepSeek-R1-Distill-Llama-8B is a fine-tuned version of Llama-3.1-8B. DeepSeek utilized data generated by DeepSeek-R1, to fine-tune Llama-3.1-8B. This process, known as distillation (a subcategory of fine-tuning), injects the data into the Llama model to learn reasoning capabilities.
With Unsloth, you can fine-tune for free on Colab, Kaggle, or locally with just 3GB VRAM by using our notebooks. By fine-tuning a pre-trained model (e.g. Llama-3.1-8B) on a specialized dataset, you can:
* Update + Learn New Knowledge: Inject and learn new domain-specific information.
* Customize Behavior: Adjust the model’s tone, personality, or response style.
* Optimize for Tasks: Improve accuracy and relevance for specific use cases.
Example usecases:
* Train LLM to predict if a headline impacts a company positively or negatively.
* Use historical customer interactions for more accurate and custom responses.
* Fine-tune LLM on legal texts for contract analysis, case law research, and compliance.
You can think of a fine-tuned model as a specialized agent designed to do specific tasks more effectively and efficiently. Fine-tuning can replicate all of RAG's capabilities, but not vice versa.
#### Fine-tuning misconceptions:
You may have heard that fine-tuning does not make a model learn new knowledge or RAG performs better than fine-tuning. That is false. Read more FAQ + misconceptions here:
If you're a beginner, it is best to start with a small instruct model like Llama 3.1 (8B) and experiment from there. You'll also need to decide between QLoRA and LoRA training:
* LoRA: Fine-tunes small, trainable matrices in 16-bit without updating all model weights.
* QLoRA: Combines LoRA with 4-bit quantization to handle very large models with minimal resources.
You can change the model name to whichever model you like by matching it with model's name on Hugging Face e.g. 'unsloth/llama-3.1-8b-unsloth-bnb-4bit'.
We recommend starting with Instruct models, as they allow direct fine-tuning using conversational chat templates (ChatML, ShareGPT etc.) and require less data compared to Base models (which uses Alpaca, Vicuna etc). Learn more about the differences between instruct and base models here.
* Model names ending in unsloth-bnb-4bit indicate they are Unsloth dynamic 4-bitquants. These models consume slightly more VRAM than standard BitsAndBytes 4-bit models but offer significantly higher accuracy.
* If a model name ends with just bnb-4bit, without "unsloth", it refers to a standard BitsAndBytes 4-bit quantization.
* Models with no suffix are in their original 16-bit or 8-bit formats. While they are the original models from the official model creators, we sometimes include important fixes - such as chat template or tokenizer fixes. So it's recommended to use our versions when available.
There are other settings which you can toggle:
* max_seq_length = 2048 – Controls context length. While Llama-3 supports 8192, we recommend 2048 for testing. Unsloth enables 4× longer context fine-tuning.
* dtype = None – Defaults to None; use torch.float16 or torch.bfloat16 for newer GPUs.
* load_in_4bit = True – Enables 4-bit quantization, reducing memory use 4× for fine-tuning. Disabling it enables LoRA 16-bit fine-tuning. You can also enable 16-bit LoRA with load_in_16bit = True
* To enable full fine-tuning (FFT), set full_finetuning = True. For 8-bit fine-tuning, set load_in_8bit = True.
* Note: Only one training method can be set to True at a time.
We recommend starting with QLoRA, as it is one of the most accessible and effective methods for training models. Our dynamic 4-bit quants, the accuracy loss for QLoRA compared to LoRA is now largely recovered.
For LLMs, datasets are collections of data that can be used to train our models. In order to be useful for training, text data needs to be in a format that can be tokenized.
* You will need to create a dataset usually with 2 columns - question and answer. The quality and amount will largely reflect the end result of your fine-tune so it's imperative to get this part right.
* You can synthetically generate data and structure your dataset (into QA pairs) using ChatGPT or local LLMs.
* You can also use our new Synthetic Dataset notebook which automatically parses documents (PDFs, videos etc.), generates QA pairs and auto cleans data using local models like Llama 3.2. Access the notebook here..ipynb)
* Fine-tuning can learn from an existing repository of documents and continuously expand its knowledge base, but just dumping data alone won’t work as well. For optimal results, curate a well-structured dataset, ideally as question-answer pairs. This enhances learning, understanding, and response accuracy.
* But, that's not always the case, e.g. if you are fine-tuning a LLM for code, just dumping all your code data can actually enable your model to yield significant performance improvements, even without structured formatting. So it really depends on your use case.
For most of our notebook examples, we utilize the Alpaca dataset however other notebooks like Vision will use different datasets which may need images in the answer output as well.
4. Understand Training Hyperparameters
Learn how to choose the right hyperparameters using best practices from research and real-world experiments - and understand how each one affects your model's performance.
For a complete guide on how hyperparameters affect training, see:
We would recommend beginners to utilise our pre-made notebooks first as it's the easiest way to get started with guided steps. However, if installing locally is a must, you can install and use Unsloth via docker or pip install unsloth - just make sure you have all the right requirements necessary. Also depending on the model and quantization you're using, you'll need enough VRAM and resources. See all the details here:
Next, you'll need to install Unsloth. Unsloth currently only supports Windows and Linux devices. Once you install Unsloth, you can copy and paste our notebooks and use them in your own local environment. We have many installation methods:
Once you have everything set, it's time to train! If something's not working, remember you can always change hyperparameters, your dataset etc.
You’ll see a log of numbers during training. This is the training loss, which shows how well the model is learning from your dataset. For many cases, a loss around 0.5 to 1.0 is a good sign, but it depends on your dataset and task. If the loss is not going down, you might need to adjust your settings. If the loss goes to 0, that could mean overfitting, so it's important to check validation too.
The training loss will appear as numbers
We generally recommend keeping the default settings unless you need longer training or larger batch sizes.
* per_device_train_batch_size = 2 – Increase for better GPU utilization but beware of slower training due to padding. Instead, increase gradient_accumulation_steps for smoother training.
* gradient_accumulation_steps = 4 – Simulates a larger batch size without increasing memory usage.
* max_steps = 60 – Speeds up training. For full runs, replace with num_train_epochs = 1 (1–3 epochs recommended to avoid overfitting).
* learning_rate = 2e-4 – Lower for slower but more precise fine-tuning. Try values like 1e-4, 5e-5, or 2e-5.
In order to evaluate, you could do manually evaluation by just chatting with the model and see if it's to your liking. You can also enable evaluation for Unsloth, but keep in mind it can be time-consuming depending on the dataset size. To speed up evaluation you can: reduce the evaluation dataset size or set evaluation_steps = 100.
For testing, you can also take 20% of your training data and use that for testing. If you already used all of the training data, then you have to manually evaluate it. You can also use automatic eval tools like EleutherAI’s lm-evaluation-harness. Keep in mind that automated tools may not perfectly align with your evaluation criteria.
7. Running + Saving the model
Now let's run the model after we completed the training process! You can edit the yellow underlined part! In fact, because we created a multi turn chatbot, we can now also call the model as if it saw some conversations in the past like below:
Reminder Unsloth itself provides 2x faster inference natively as well, so always do not forget to call FastLanguageModel.for_inference(model). If you want the model to output longer responses, set max_new_tokens = 128 to some larger number like 256 or 1024. Notice you will have to wait longer for the result as well!
For saving and using your model in desired inference engines like Ollama, vLLM, Open WebUI, we can have more information here:
We can now save the finetuned model as a small 100MB file called a LoRA adapter like below. You can instead push to the Hugging Face hub as well if you want to upload your model! Remember to get a Hugging Face token via: and add your token!
After saving the model, we can again use Unsloth to run the model itself! Use FastLanguageModel again to call it for inference!
You've successfully fine-tuned a language model and exported it to your desired inference engine with Unsloth!
To learn more about fine-tuning tips and tricks, head over to our blogs which provide tremendous and educational value:
If you need any help on fine-tuning, you can also join our Discord server here or Reddit r/unsloth. Thanks for reading and hopefully this was helpful!
Add LoRA adapter to the model for parameter efficient fine tuning
Figure is an overhead view of the path taken by a race car driver as his car collides with the racetrack wall. Just before the collision, he is traveling at speed $v_i=70 \mathrm{~m} / \mathrm{s}$ along a straight line at $30^{\circ}$ from the wall. Just after the collision, he is traveling at speed $v_f=50 \mathrm{~m} / \mathrm{s}$ along a straight line at $10^{\circ}$ from the wall. His mass $m$ is $80 \mathrm{~kg}$. The collision lasts for $14 \mathrm{~ms}$. What is the magnitude of the average force on the driver during the collision?
Authors: A huge thank you to KeithandDattafor contributing to this article!
Examples:
Example 1 (unknown):
`unknown
:butterfly:Qwen 2.5 VL Vision RL Issues and Quirks
During RL for Qwen 2.5 VL, you might see the following inference output:
{% code overflow="wrap" %}
`
Example 2 (unknown):
`unknown
{% endcode %}
This was reported as well in Qwen2.5-VL-7B-Instruct output unexpected results "addCriterion". In fact we see this as well! We tried both non Unsloth, bfloat16 and float16 machines and other things, but it appears still. For example item 165 ie train_dataset165] from the [AI4Math/MathVista dataset is below:
{% code overflow="wrap" %}
`
Example 3 (unknown):
`unknown
{% endcode %}
And then we get the above gibberish output. One could add a reward function to penalize the addition of addCriterion, or penalize gibberish outputs. However, the other approach is to train it for longer. For example only after 60 steps ish do we see the model actually learning via RL:
{% hint style="success" %}
Forcing <|assistant|> during generation will reduce the occurrences of these gibberish results as expected since this is an Instruct model, however it's still best to add a reward function to penalize bad generations, as described in the next section.
{% endhint %}
:medal:Reward Functions to reduce gibberish
To penalize addCriterion and gibberish outputs, we edited the reward function to penalize too much of addCriterion and newlines.
`
Example 4 (unknown):
`unknown
:checkered\_flag:GSPO Reinforcement Learning
This update in addition adds GSPO (Group Sequence Policy Optimization) which is a variant of GRPO made by the Qwen team at Alibaba. They noticed that GRPO implicitly results in importance weights for each token, even though explicitly advantages do not scale or change with each token.
This lead to the creation of GSPO, which now assigns the importance on the sequence likelihood rather than the individual token likelihoods of the tokens. The difference between these two algorithms can be seen below, both from the GSPO paper from Qwen and Alibaba:
In Equation 1, it can be seen that the advantages scale each of the rows into the token logprobs before that tensor is sumed. Essentially, each token is given the same scaling even though that scaling was given to the entire sequence rather than each individual token. A simple diagram of this can be seen below:
GRPO Logprob Ratio row wise scaled with advantages
Equation 2 shows that the logprob ratios for each sequence is summed and exponentiated after the Logprob ratios are computed, and only the resulting now sequence ratios get row wise multiplied by the advantages.
GSPO Sequence Ratio row wise scaled with advantages
Enabling GSPO is simple, all you need to do is set the importance_sampling_level = "sequence" flag in the GRPO config.
`
Saving to Ollama
URL: llms-txt#saving-to-ollama
Contents:
- Saving on Google Colab
- Exporting to Ollama
- Automatic Modelfile creation
- Ollama Inference
- Running in Unsloth works well, but after exporting & running on Ollama, the results are poor
See our guide below for the complete process on how to save to Ollama:
You can save the finetuned model as a small 100MB file called a LoRA adapter like below. You can instead push to the Hugging Face hub as well if you want to upload your model! Remember to get a Hugging Face token via: and add your token!
After saving the model, we can again use Unsloth to run the model itself! Use FastLanguageModel again to call it for inference!
Exporting to Ollama
Finally we can export our finetuned model to Ollama itself! First we have to install Ollama in the Colab notebook:
Then we export the finetuned model we have to llama.cpp's GGUF formats like below:
Reminder to convert False to True for 1 row, and not change every row to True, or else you'll be waiting for a very time! We normally suggest the first row getting set to True, so we can export the finetuned model quickly to Q8_0 format (8 bit quantization). We also allow you to export to a whole list of quantization methods as well, with a popular one being q4_k_m.
Head over to to learn more about GGUF. We also have some manual instructions of how to export to GGUF if you want here:
You will see a long list of text like below - please wait 5 to 10 minutes!!
And finally at the very end, it'll look like below:
Then, we have to run Ollama itself in the background. We use subprocess because Colab doesn't like asynchronous calls, but normally one just runs ollama serve in the terminal / command prompt.
Automatic Modelfile creation
The trick Unsloth provides is we automatically create a Modelfile which Ollama requires! This is a just a list of settings and includes the chat template which we used for the finetune process! You can also print the Modelfile generated like below:
We then ask Ollama to create a model which is Ollama compatible, by using the Modelfile
And we can now call the model for inference if you want to do call the Ollama server itself which is running on your own local machine / in the free Colab notebook in the background. Remember you can edit the yellow underlined part.
Running in Unsloth works well, but after exporting & running on Ollama, the results are poor
You might sometimes encounter an issue where your model runs and produces good results on Unsloth, but when you use it on another platform like Ollama, the results are poor or you might get gibberish, endless/infinite generations or repeated outputs.
* The most common cause of this error is using an incorrect chat template. It’s essential to use the SAME chat template that was used when training the model in Unsloth and later when you run it in another framework, such as llama.cpp or Ollama. When inferencing from a saved model, it's crucial to apply the correct template.
* You must use the correct eos token. If not, you might get gibberish on longer generations.
* It might also be because your inference engine adds an unnecessary "start of sequence" token (or the lack of thereof on the contrary) so ensure you check both hypotheses!
* Use our conversational notebooks to force the chat template - this will fix most issues.
* Qwen-3 14B Conversational notebook Open in Colab-Reasoning-Conversational.ipynb)
* Gemma-3 4B Conversational notebook Open in Colab.ipynb)
* Llama-3.2 3B Conversational notebook Open in Colab-Conversational.ipynb)
We're excited to introduce our Dynamic v2.0 quantization method - a major upgrade to our previous quants. This new method outperforms leading quantization methods and sets new benchmarks for 5-shot MMLU and KL Divergence.
This means you can now run + fine-tune quantized LLMs while preserving as much accuracy as possible! You can run the 2.0 GGUFs on any inference engine like llama.cpp, Ollama, Open WebUI etc.
{% hint style="success" %}
Sept 10, 2025 update: You asked for tougher benchmarks, so we’re showcasing Aider Polyglot results! Our Dynamic 3-bit DeepSeek V3.1 GGUF scores 75.6%, surpassing many full-precision SOTA LLMs. Read more.
The key advantage of using the Unsloth package and models is our active role in fixing critical bugs in major models. We've collaborated directly with teams behind Qwen3, Meta (Llama 4), Mistral (Devstral), Google (Gemma 1–3) and Microsoft (Phi-3/4), contributing essential fixes that significantly boost accuracy.
{% endhint %}
Detailed analysis of our benchmarks and evaluation further below.
💡 What's New in Dynamic v2.0?
* Revamped Layer Selection for GGUFs + safetensors: Unsloth Dynamic 2.0 now selectively quantizes layers much more intelligently and extensively. Rather than modifying only select layers, we now dynamically adjust the quantization type of every possible layer, and the combinations will differ for each layer and model.
* Current selected and all future GGUF uploads will utilize Dynamic 2.0 and our new calibration dataset. The dataset contains more than >1.5M tokens (depending on model) and comprise of high-quality, hand-curated and cleaned data - to greatly enhance conversational chat performance.
* Previously, our Dynamic quantization (DeepSeek-R1 1.58-bit GGUF) was effective only for MoE architectures. Dynamic 2.0 quantization now works on all models (including MOEs & non-MoEs).
* Model-Specific Quants: Each model now uses a custom-tailored quantization scheme. E.g. the layers quantized in Gemma 3 differ significantly from those in Llama 4.
* To maximize efficiency, especially on Apple Silicon and ARM devices, we now also add Q4\_NL, Q5.1, Q5.0, Q4.1, and Q4.0 formats.
To ensure accurate benchmarking, we built an internal evaluation framework to match official reported 5-shot MMLU scores of Llama 4 and Gemma 3. This allowed apples-to-apples comparisons between full-precision vs. Dynamic v2.0, QAT and standard imatrix GGUF quants.
All future GGUF uploads will utilize Unsloth Dynamic 2.0, and our Dynamic 4-bit safe tensor quants will also benefit from this in the future.
📊 Why KL Divergence?
Accuracy is Not All You Need showcases how pruning layers, even by selecting unnecessary ones still yields vast differences in terms of "flips". A "flip" is defined as answers changing from incorrect to correct or vice versa. The paper shows how MMLU might not decrease as we prune layers or do quantization,but that's because some incorrect answers might have "flipped" to become correct. Our goal is to match the original model, so measuring "flips" is a good metric.
{% hint style="info" %}
KL Divergence should be the gold standard for reporting quantization errors as per the research paper "Accuracy is Not All You Need". Using perplexity is incorrect since output token values can cancel out, so we must use KLD!
{% endhint %}
The paper also shows that interestingly KL Divergence is highly correlated with flips, and so our goal is to reduce the mean KL Divergence whilst increasing the disk space of the quantization as less as possible.
⚖️ Calibration Dataset Overfitting
Most frameworks report perplexity and KL Divergence using a test set of Wikipedia articles. However, we noticed using the calibration dataset which is also Wikipedia related causes quants to overfit, and attain lower perplexity scores. We utilize Calibration\_v3 and Calibration\_v5 datasets for fair testing which includes some wikitext data amongst other data. Also instruct models have unique chat templates, and using text only calibration datasets is not effective for instruct models (base models yes). In fact most imatrix GGUFs are typically calibrated with these issues. As a result, they naturally perform better on KL Divergence benchmarks that also use Wikipedia data, since the model is essentially optimized for that domain.
To ensure a fair and controlled evaluation, we do not to use our own calibration dataset (which is optimized for chat performance) when benchmarking KL Divergence. Instead, we conducted tests using the same standard Wikipedia datasets, allowing us to directly compare the performance of our Dynamic 2.0 method against the baseline imatrix approach.
:1234: MMLU Replication Adventure
* Replicating MMLU 5 shot was nightmarish. We could not replicate MMLU results for many models including Llama 3.1 (8B) Instruct, Gemma 3 (12B) and others due to subtle implementation issues. Llama 3.1 (8B) for example should be getting \~68.2%, whilst using incorrect implementations can attain 35% accuracy.
MMLU implementation issues
* Llama 3.1 (8B) Instruct has a MMLU 5 shot accuracy of 67.8% using a naive MMLU implementation. We find however Llama tokenizes "A" and "\_A" (A with a space in front) as different token ids. If we consider both spaced and non spaced tokens, we get 68.2% (+0.4%)
* Interestingly Llama 3 as per Eleuther AI's LLM Harness also appends "The best answer is" to the question, following Llama 3's original MMLU benchmarks.
* There are many other subtle issues, and so to benchmark everything in a controlled environment, we designed our own MMLU implementation from scratch by investigating github.com/hendrycks/test directly, and verified our results across multiple models and comparing to reported numbers.
:sparkles: Gemma 3 QAT Replication, Benchmarks
The Gemma team released two QAT (quantization aware training) versions of Gemma 3:
1. Q4\_0 GGUF - Quantizes all layers to Q4\_0 via the formula w = q * block_scale with each block having 32 weights. See llama.cpp wiki for more details.
We benchmarked all Q4\_0 GGUF versions, and did extensive experiments on the 12B model. We see the 12B Q4\_0 QAT model gets 67.07% whilst the full bfloat16 12B version gets 67.15% on 5 shot MMLU. That's very impressive! The 27B model is mostly nearly there!
Metric
1B
4B
12B
27B
MMLU 5 shot
26.12%
55.13%
67.07% (67.15% BF16)
70.64% (71.5% BF16)
Disk Space
0.93GB
2.94GB
7.52GB
16.05GB
Efficiency*
1.20
10.26
5.59
2.84
We designed a new Efficiency metric which calculates the usefulness of the model whilst also taking into account its disk size and MMLU 5 shot score:
$$
\text{Efficiency} = \frac{\text{MMLU 5 shot score} - 25}{\text{Disk Space GB}}
$$
{% hint style="warning" %}
We have to minus 25 since MMLU has 4 multiple choices - A, B, C or D. Assume we make a model that simply randomly chooses answers - it'll get 25% accuracy, and have a disk space of a few bytes. But clearly this is not a useful model.
{% endhint %}
On KL Divergence vs the base model, below is a table showcasing the improvements. Reminder the closer the KL Divergence is to 0, the better (ie 0 means identical to the full precision model)
Quant
Baseline KLD
GB
New KLD
GB
---------
------------
-----
--------
-----
IQ1\_S
1.035688
5.83
0.972932
6.06
IQ1\_M
0.832252
6.33
0.800049
6.51
IQ2\_XXS
0.535764
7.16
0.521039
7.31
IQ2\_M
0.26554
8.84
0.258192
8.96
Q2\_K\_XL
0.229671
9.78
0.220937
9.95
Q3\_K\_XL
0.087845
12.51
0.080617
12.76
Q4\_K\_XL
0.024916
15.41
0.023701
15.64
If we plot the ratio of the disk space increase and the KL Divergence ratio change, we can see a much clearer benefit! Our dynamic 2bit Q2\_K\_XL reduces KLD quite a bit (around 7.5%).
Truncated table of results for MMLU for Gemma 3 (27B). See below.
1. Our dynamic 4bit version is 2GB smaller whilst having +1% extra accuracy vs the QAT version!
2. Efficiency wise, 2bit Q2\_K\_XL and others seem to do very well!
Quant
Unsloth
Unsloth + QAT
Disk Size
Efficiency
--------------
---------
-------------
---------
----------
IQ1\_M
48.10
47.23
6.51
3.42
IQ2\_XXS
59.20
56.57
7.31
4.32
IQ2\_M
66.47
64.47
8.96
4.40
Q2\_K\_XL
68.70
67.77
9.95
4.30
Q3\_K\_XL
70.87
69.50
12.76
3.49
Q4\_K\_XL
71.47
71.07
15.64
2.94
Google QAT
70.64
17.2
2.65
Click here for Full Google's Gemma 3 (27B) QAT Benchmarks:
Model
Unsloth
Unsloth + QAT
Disk Size
Efficiency
--------------
---------
-------------
---------
----------
IQ1\_S
41.87
43.37
6.06
3.03
IQ1\_M
48.10
47.23
6.51
3.42
IQ2\_XXS
59.20
56.57
7.31
4.32
IQ2\_M
66.47
64.47
8.96
4.40
Q2\_K
68.50
67.60
9.78
4.35
Q2\_K\_XL
68.70
67.77
9.95
4.30
IQ3\_XXS
68.27
67.07
10.07
4.18
Q3\_K\_M
70.70
69.77
12.51
3.58
Q3\_K\_XL
70.87
69.50
12.76
3.49
Q4\_K\_M
71.23
71.00
15.41
2.98
Q4\_K\_XL
71.47
71.07
15.64
2.94
Q5\_K\_M
71.77
71.23
17.95
2.58
Q6\_K
71.87
71.60
20.64
2.26
Q8\_0
71.60
71.53
26.74
1.74
Google QAT
70.64
17.2
2.65
:llama: Llama 4 Bug Fixes + Run
We also helped and fixed a few Llama 4 bugs:
* Llama 4 Scout changed the RoPE Scaling configuration in their official repo. We helped resolve issues in llama.cpp to enable this change here
* Llama 4's QK Norm's epsilon for both Scout and Maverick should be from the config file - this means using 1e-05 and not 1e-06. We helped resolve these in llama.cpp and transformers
* The Llama 4 team and vLLM also independently fixed an issue with QK Norm being shared across all heads (should not be so) here. MMLU Pro increased from 68.58% to 71.53% accuracy.
* Wolfram Ravenwolf showcased how our GGUFs via llama.cpp attain much higher accuracy than third party inference providers - this was most likely a combination of the issues explained above, and also probably due to quantization issues.
As shown in our graph, our 4-bit Dynamic QAT quantization deliver better performance on 5-shot MMLU while also being smaller in size.
Running Llama 4 Scout:
To run Llama 4 Scout for example, first clone llama.cpp:
Then download out new dynamic v 2.0 quant for Scout:
- :scroll: Mathematical derivation for attention sinks
- 💾NEW: Saving to GGUF, vLLM after gpt-oss training
- :diamonds:Fine-tuning gpt-oss directly
- 🐛Bug Fixes for gpt-oss
- :1234: Implementations for Sink Attention
We’re excited to introduce Unsloth Flex Attention support for OpenAI gpt-oss training that enables >8× longer context lengths, >50% less VRAM usage and >1.5× faster training (with no accuracy degradation) vs. all implementations including those using Flash Attention 3 (FA3). Unsloth Flex Attention makes it possible to train with a 60K context length on a 80GB VRAM H100 GPU for BF16 LoRA. Also:
* You can now export/save your QLoRA fine-tuned gpt-oss model to llama.cpp, vLLM, Ollama or HF
* We fixed gpt-oss implementation issues irrelevant to Unsloth, most notably ensuring that swiglu_limit = 7.0 is properly applied during MXFP4 inference in transformers
🦥Introducing Unsloth Flex Attention Support
With Unsloth's Flex Attention support, a single 80GB VRAM H100 can handle up to 81K context length with QLoRA and 60K context with BF16 LoRA! These gains are applied to BOTH gpt-oss-20b and gpt-oss-120b! The more context length you use, the more gains you'll get from Unsloth Flex Attention:
In comparison, all other non-Unsloth implementations max out at 9K context length on an 80GB GPU, and can only reach 15K context with FA3. But, FA3 is unsuitable for gpt-oss training since it lacks backward pass support for attention sinks. So if you were previously using FA3 for gpt-oss training, we'd recommend you to not use it for now. Thus, the max context length you can get without Unsloth on 80GB VRAM is \~9K.
Training with Unsloth Flex Attention delivers at least a 1.3× speedup, with gains growing as context length increases, reaching up to 2× faster. Because Flex Attention scales with context, longer sequences yield bigger savings in both VRAM and training time, as described here.
A huge thank you to Rohan Pandey for his Flex Attention implementation, which directly inspired the development of Unsloth's Flex Attention implementation.
:dark\_sunglasses: Attention Sinks
OpenAI's GPT OSS model uses an alternating pattern of sliding window attention, full attention, sliding window attention and so on (SWA, FA, SWA, FA, etc). Each sliding window only attends to 128 tokens (including the current token), so computation is vastly reduced. However, this also means long context retrieval and reasoning becomes useless due to the small sliding window. Most labs fix this by expanding the sliding window to 2048 or 4096 tokens.
OpenAI leveraged Attention Sinks from the Efficient Streaming Language Models with Attention Sinks paper which shows that you can use a small sliding window, except you must add a global attention on the first token! The paper provides a good illustration below:
The paper finds that the attention mechanism seems to assign a lot of weight to the first few tokens (1 to 4), and by removing them during the sliding window operation, these "important" first few tokens disappear, and causes bad long context retrieval.
If we plot log perplexity (higher is worse), and do long context inference after the pretrained model's set context length, we see the perplexity shoots up (not good). However the red line (uses Attention Sinks) stays low, which is very good!
The paper also shows that the Attention Is Off By One method does partially work, except one must also add a few extra sink tokens to get lower perplexities. The paper shows that adding a single sink token that is learnable does remarkably well! And that's what OpenAI did for GPT-OSS!
Flex Attention is extremely powerful as it provides the practitioner 2 customization routes for the attention mechanism - a score modifier (f) and a masking function (M).
The score modifier (f) allows us to edit the attention logits before the softmax operation, and the masking function (M) allows us to skip operations if we don't need them (for eg sliding window attention only sees last 128 tokens).
The trick is Flex Attention provides fast auto generated Triton kernels with arbitrary score modifiers and masking functions!
\sigma\bigg(s\times\bold{f}(QK^T+\bold{M})\bigg)
This means we can use Flex Attention to implement attention sinks! Implementing a single attention sink is provided both in OpenAI's original GPT-OSS repo and HuggingFace's transformers's implementation.
The above shows we concatenate the sink at the very end of the Q @ K.T , do the softmax, and remove the last column which was the sink token.
By using some visualization utilities from Flex Attention's Github repo, we can visualize this. Assume the sequence length was 16, and a sliding window of 5. On the left is the last sink column (default implementation), and on the right is if we move the sink location to index 0 (our implementation).
{% columns %}
{% column %}
Sink location at the end (default)
{% endcolumn %}
{% column %}
Move sink location to index 0
{% endcolumn %}
{% endcolumns %}
Interesting finding: The official Flex Attention sliding window implementations considers the window size as the number of last tokens PLUS ONE as it includes the current token. The HuggingFace and GPT OSS implementations strictly only sees the last N tokens. Ie the below is from and :
{% code overflow="wrap" %}
{% columns %}
{% column %}
Default Flex Attention (3+1 tokens)
{% endcolumn %}
{% column %}
HuggingFace, GPT-OSS (3+0 tokens)
{% endcolumn %}
{% endcolumns %}
We also confirmed through OpenAI's official GPT-OSS implementation on whether we attend to the last N or N+1 tokens here:
And we see only the last 3 tokens (not 3+1) are attended to! This means instead of using <= SLIDING_WINDOW, use < SLIDING_WINDOW (ie use less than, not the equals).
Also since we moved the sink token index to the first, we have to add 1 to the q\_idx to index correctly:
To confirm our index 0 implementation, we verified that the training loss remains consistent with standard Hugging Face runs (without Unsloth Flex Attention), as shown in our graph:
:scroll: Mathematical derivation for attention sinks
There is another way to calculate the attention sinks without padding K and V. We first note the softmax operation does, and we want to 2nd version with sinks for now as a scalar:\\
And we can now easily derive the sink version of attention. We do find however this process has somewhat higher error than the zero padding approach, so we still default to our original version.
💾NEW: Saving to GGUF, vLLM after gpt-oss training
You can now QLoRA fine-tune gpt-oss and directly save, export, or merge the model to llama.cpp, vLLM, or HF - not just Unsloth. We will be releasing a free notebook hopefully soon.
Previously, any QLoRA fine-tuned gpt-oss model was restricted to running in Unsloth. We’ve removed that limitation by introducing the ability to merge in MXFP4native format using save_method="mxfp4" and on-demand dequantization of MXFP4 base models (like gpt-oss) making it possible to export your fine-tuned model in bf16 format usingsave_method="merged_16bit" .
The MXFP4 native merge format offers significant performance improvements compared to the bf16 format: it uses up to 75% less disk space, reduces VRAM consumption by 50%, accelerates merging by 5-10x, and enables much faster conversion to GGUF format.
After fine-tuning your gpt-oss model, you can merge it into MXFP4 format with:
If you prefer to merge the model and push to the hugging-face hub, use:
To run inference on the merged model, you can use vLLM and Llama.cpp among others. OpenAI recommends these inference settings for both models: temperature=1.0, top_p=1.0, top_k=0
#### :sparkles: Saving to Llama.cpp
1. Obtain the latest llama.cpp on GitHub here. You can follow the build instructions below as well. Change -DGGML_CUDA=ON to -DGGML_CUDA=OFF if you don't have a GPU or just want CPU inference.
2. Convert the MXFP4 merged model:
3. Run inference on the quantized model:
✨ Saving to SGLang
1. Build SGLang from source:\\
2. Launch SGLang server:\\
:diamonds:Fine-tuning gpt-oss directly
We also added support for directly fine-tuning of gpt-oss models by implementing patches that allow loading the native MXFP4 quantized format. This makes it possible to load the 'openai/gpt-oss' model with less than 24GB of VRAM, and QLoRA fine-tune it. Simply load the model using:
add a Peft layer using FastLanguageModel.get_peft_model and run SFT fine-tuning over the Peft model.
🐛Bug Fixes for gpt-oss
We recently collaborated with Hugging Face to resolve inference issues by using OpenAI’s kernels and ensuring that swiglu_limit = 7.0 is correctly applied during MXFP4 inference.
Based on user feedback, we discovered that extended QLoRA training runs (beyond 60 steps) could cause the loss to diverge and eventually error out. This issue only occurred on devices that do not support BF16 and instead fall back to F16 (e.g., T4 GPUs). Importantly, it did not impact QLoRA training on A100 or H100 GPUs, nor LoRA training on f16 GPUs.
After extensive investigation, we’ve now aligned training loss behavior across all GPU setups, including GPUs limited to F16. If you were previously experiencing issues because of this, we recommend using our new updated gpt-oss notebook!
We had to do many many experiments to move float16's training loss curve to be equivalent to bfloat16 machines (blue line). We found the following:
1. Pure float16 will go to infinity on step 50
2. We found the down projections in the MoE to have huge outliers
3. Activations must be saved in bfloat16 or float32
Below shows the absolute magnitude activations for GPT OSS 20B, and some really spike - this will overflow in float16 machines since float16's maximum range is 65504.
We fixed this in Unsloth, so all float16 training works out of the box!
:1234: Implementations for Sink Attention
OpenAI's sink token implementation is provided here. We provide it below:
{% code fullWidth="false" %}
The HuggingFace transformers implementation is provided here. We also provide it below:
Huge thanks to the entire PyTorch and TorchAO team for their help and collaboration! Extreme thanks to Andrew Or, Jerry Zhang, Supriya Rao, Scott Roy and Mergen Nachin for helping on many discussions on QAT, and on helping to integrate it into Unsloth! Also thanks to the Executorch team as well!
Examples:
Example 1 (unknown):
`unknown
{% endcode %}
:mobile\_phone:ExecuTorch - QAT for mobile deployment
{% columns %}
{% column %}
With Unsloth and TorchAO’s QAT support, you can also fine-tune a model in Unsloth and seamlessly export it to ExecuTorch (PyTorch’s solution for on-device inference) and deploy it directly on mobile. See an example in action here with more detailed workflows on the way!
Announcement coming soon!
{% endcolumn %}
{% column %}
{% endcolumn %}
{% endcolumns %}
:sunflower:How to enable QAT
Update Unsloth to the latest version, and also install the latest TorchAO!
Beginner's Guide to transforming a model like Llama 3.1 (8B) into a reasoning model by using Unsloth and GRPO.
DeepSeek developed GRPO (Group Relative Policy Optimization) to train their R1 reasoning models.
These instructions are for our pre-made Google Colab notebooks. If you are installing Unsloth locally, you can also copy our notebooks inside your favorite code editor. We'll be using any of these notebooks:
If you're using our Colab notebook, click Runtime > Run all. We'd highly recommend you checking out our Fine-tuning Guide before getting started.
If installing locally, ensure you have the correct requirements and use pip install unsloth on Linux or follow our Windows install instructions.
{% endstep %}
Learn about GRPO & Reward Functions
Before we get started, it is recommended to learn more about GRPO, reward functions and how they work. Read more about them including tips & tricks here.
You will also need enough VRAM. In general, model parameters = amount of VRAM you will need. In Colab, we are using their free 16GB VRAM GPUs which can train any model up to 16B in parameters.
{% endstep %}
Configure desired settings
We have pre-selected optimal settings for the best results for you already and you can change the model to whichever you want listed in our supported models. Would not recommend changing other settings if you're a beginner.
{% hint style="success" %}
For advanced GRPO documentation on batching, generation and training parameters, read our guide!
{% endhint %}
{% endstep %}
We have pre-selected OpenAI's GSM8K dataset which contains grade school math problems but you could change it to your own or any public one on Hugging Face. You can read more about datasets here.
Your dataset should still have at least 2 columns for question and answer pairs. However the answer must not reveal the reasoning behind how it derived the answer from the question. See below for an example:
We'll structure the data to prompt the model to articulate its reasoning before delivering an answer. To start, we'll establish a clear format for both prompts and responses.
Qwen3: How to Run & Fine-tune
URL: llms-txt#qwen3:-how-to-run-&-fine-tune
Contents:
- 🖥️ Running Qwen3
- :gear: Official Recommended Settings
- Switching Between Thinking and Non-Thinking Mode
- 🦙 Ollama: Run Qwen3 Tutorial
- 📖 Llama.cpp: Run Qwen3 Tutorial
Learn to run & fine-tune Qwen3 locally with Unsloth + our Dynamic 2.0 quants
Qwen's new Qwen3 models deliver state-of-the-art advancements in reasoning, instruction-following, agent capabilities, and multilingual support.
{% hint style="success" %}
NEW! Qwen3 got an update in July 2025. Run & fine-tune the latest model: Qwen-2507
{% endhint %}
All uploads use Unsloth Dynamic 2.0 for SOTA 5-shot MMLU and KL Divergence performance, meaning you can run & fine-tune quantized Qwen LLMs with minimal accuracy loss.
We also uploaded Qwen3 with native 128K context length. Qwen achieves this by using YaRN to extend its original 40K window to 128K.
Unsloth also now supports fine-tuning and Reinforcement Learning (RL) of Qwen3 and Qwen3 MOE models — 2x faster, with 70% less VRAM, and 8x longer context lengths. Fine-tune Qwen3 (14B) for free using our Colab notebook.-Reasoning-Conversational.ipynb)
To achieve inference speeds of 6+ tokens per second, we recommend your available memory should match or exceed the size of the model you’re using. For example, a 30GB 1-bit quantized model requires at least 150GB of memory. The Q2\_K\_XL quant, which is 180GB, will require at least 180GB of unified memory (VRAM + RAM) or 180GB of RAM for optimal performance.
NOTE: It’s possible to run the model with less total memory than its size (i.e., less VRAM, less RAM, or a lower combined total). However, this will result in slower inference speeds. Sufficient memory is only required if you want to maximize throughput and achieve the fastest inference times.
:gear: Official Recommended Settings
According to Qwen, these are the recommended settings for inference:
Min\_P = 0.0 (optional, but 0.01 works well, llama.cpp default is 0.1)
Min\_P = 0.0
Top\_P = 0.8
Top\_P = 0.95
TopK = 20
TopK = 20
Chat template/prompt format:
{% code overflow="wrap" %}
{% hint style="success" %}
For NON thinking mode, we purposely enclose \ and \ with nothing:
{% endhint %}
{% code overflow="wrap" %}
{% hint style="warning" %}
For Thinking-mode, DO NOT use greedy decoding, as it can lead to performance degradation and endless repetitions.
{% endhint %}
Switching Between Thinking and Non-Thinking Mode
Qwen3 models come with built-in "thinking mode" to boost reasoning and improve response quality - similar to how QwQ-32B worked. Instructions for switching will differ depending on the inference engine you're using so ensure you use the correct instructions.
#### Instructions for llama.cpp and Ollama:
You can add /think and /no_think to user prompts or system messages to switch the model's thinking mode from turn to turn. The model will follow the most recent instruction in multi-turn conversations.
Here is an example of multi-turn conversation:
#### Instructions for transformers and vLLM:
enable_thinking=True
By default, Qwen3 has thinking enabled. When you call tokenizer.apply_chat_template, you don’t need to set anything manually.
In thinking mode, the model will generate an extra ... block before the final answer — this lets it "plan" and sharpen its responses.
Non-thinking mode:
enable_thinking=False
Enabling non-thinking will make Qwen3 will skip all the thinking steps and behave like a normal LLM.
This mode will provide final responses directly — no blocks, no chain-of-thought.
🦙 Ollama: Run Qwen3 Tutorial
1. Install ollama if you haven't already! You can only run models up to 32B in size. To run the full 235B-A22B model, see here.
2. Run the model! Note you can call ollama servein another terminal if it fails! We include all our fixes and suggested parameters (temperature etc) in params in our Hugging Face upload!
3. To disable thinking, use (or you can set it in the system prompt):
{% hint style="warning" %}
If you're experiencing any looping, Ollama might have set your context length window to 2,048 or so. If this is the case, bump it up to 32,000 and see if the issue still persists.
{% endhint %}
📖 Llama.cpp: Run Qwen3 Tutorial
1. Obtain the latest llama.cpp on GitHub here. You can follow the build instructions below as well. Change -DGGML_CUDA=ON to -DGGML_CUDA=OFF if you don't have a GPU or just want CPU inference.
2. Download the model via (after installing pip install huggingface_hub hf_transfer ). You can choose Q4\_K\_M, or other quantized versions.
Examples:
Example 1 (unknown):
`unknown
<|im_start|>user\nWhat is 2+2?<|im_end|>\n<|im_start|>assistant\n
`
Example 2 (unknown):
`unknown
<|im_start|>user\nWhat is 2+2?<|im_end|>\n<|im_start|>assistant\n\n\n\n\n
`
Example 3 (unknown):
`unknown
> Who are you /no_think
I am Qwen, a large-scale language model developed by Alibaba Cloud. [...]
> How many 'r's are in 'strawberries'? /think
Okay, let's see. The user is asking how many times the letter 'r' appears in the word "strawberries". [...]
The word strawberries contains 3 instances of the letter r. [...]
`
Example 4 (python):
`python
text = tokenizer.apply_chat_template(
messages,
tokenize=False,
add_generation_prompt=True,
enable_thinking=True # Default is True
)
`
Go to https://docs.unsloth.ai for advanced tips like
Train with GSPO (Group Sequence Policy Optimization) RL in Unsloth.
We're introducing GSPO which is a variant of GRPO made by the Qwen team at Alibaba. They noticed the observation that when GRPO takes importance weights for each token, even though inherently advantages do not scale or change with each token. This lead to the creation of GSPO, which now assigns the importance on the sequence likelihood rather than the individual token likelihoods of the tokens.
Enable GSPO in Unsloth by setting importance_sampling_level = "sequence" in the GRPO config. The difference between these two algorithms can be seen below, both from the GSPO paper from Qwen and Alibaba:
In Equation 1, it can be seen that the advantages scale each of the rows into the token logprobs before that tensor is sumed. Essentially, each token is given the same scaling even though that scaling was given to the entire sequence rather than each individual token. A simple diagram of this can be seen below:
GRPO Logprob Ratio row wise scaled with advantages
Equation 2 shows that the logprob ratios for each sequence is summed and exponentiated after the Logprob ratios are computed, and only the resulting now sequence ratios get row wise multiplied by the advantages.
GSPO Sequence Ratio row wise scaled with advantages
Enabling GSPO is simple, all you need to do is set the importance_sampling_level = "sequence" flag in the GRPO config.
Examples:
Example 1 (python):
`python
training_args = GRPOConfig(
output_dir = "vlm-grpo-unsloth",
per_device_train_batch_size = 8,
gradient_accumulation_steps = 4,
learning_rate = 5e-6,
adam_beta1 = 0.9,
adam_beta2 = 0.99,
weight_decay = 0.1,
warmup_ratio = 0.1,
lr_scheduler_type = "cosine",
optim = "adamw_8bit",
# beta = 0.00,
epsilon = 3e-4,
epsilon_high = 4e-4,
num_generations = 8,
max_prompt_length = 1024,
max_completion_length = 1024,
log_completions = False,
max_grad_norm = 0.1,
temperature = 0.9,
# report_to = "none", # Set to "wandb" if you want to log to Weights & Biases
num_train_epochs = 2, # For a quick test run, increase for full training
report_to = "none"
# GSPO is below:
importance_sampling_level = "sequence",
# Dr GRPO / GAPO etc
loss_type = "dr_grpo",
)
`
Text-to-Speech (TTS) Fine-tuning
URL: llms-txt#text-to-speech-(tts)-fine-tuning
Contents:
- Fine-tuning Notebooks:
- Choosing and Loading a TTS Model
- Preparing Your Dataset
Learn how to fine-tune TTS & STT voice models with Unsloth.
Fine-tuning TTS models allows them to adapt to your specific dataset, use case, or desired style and tone. The goal is to customize these models to clone voices, adapt speaking styles and tones, support new languages, handle specific tasks and more. We also support Speech-to-Text (STT) models like OpenAI's Whisper.
With Unsloth, you can fine-tune TTS models 1.5x faster with 50% less memory than other implementations with Flash Attention 2. This support includes Sesame CSM, Orpheus, and models supported by transformers (e.g. CrisperWhisper, Spark and more).
{% hint style="info" %}
Zero-shot cloning captures tone but misses pacing and expression, often sounding robotic and unnatural. Fine-tuning delivers far more accurate and realistic voice replication. Read more here.
{% endhint %}
We've uploaded TTS models (original and quantized variants) to our Hugging Face page.
If you notice that the output duration reaches a maximum of 10 seconds, increasemax_new_tokens = 125 from its default value of 125. Since 125 tokens corresponds to 10 seconds of audio, you'll need to set a higher value for longer outputs.
{% endhint %}
Choosing and Loading a TTS Model
For TTS, smaller models are often preferred due to lower latency and faster inference for end users. Fine-tuning a model under 3B parameters is often ideal, and our primary examples uses Sesame-CSM (1B) and Orpheus-TTS (3B), a Llama-based speech model.
#### Sesame-CSM (1B) Details
CSM-1B is a base model, while Orpheus-ft is fine-tuned on 8 professional voice actors, making voice consistency the key difference. CSM requires audio context for each speaker to perform well, whereas Orpheus-ft has this consistency built in.
Fine-tuning from a base model like CSM generally needs more compute, while starting from a fine-tuned model like Orpheus-ft offers better results out of the box.
To help with CSM, we’ve added new sampling options and an example showing how to use audio context for improved voice consistency.
#### Orpheus-TTS (3B) Details
Orpheus is pre-trained on a large speech corpus and excels at generating realistic speech with built-in support for emotional cues like laughs and sighs. Its architecture makes it one of the easiest TTS models to utilize and train as it can be exported via llama.cpp meaning it has great compatibility across all inference engines. For unsupported models, you'll only be able to save the LoRA adapter safetensors.
#### Loading the models
Because voice models are usually small in size, you can train the models using LoRA 16-bit or full fine-tuning FFT which may provide higher quality results. To load it in LoRA 16-bit:
When this runs, Unsloth will download the model weights if you prefer 8-bit, you could use load_in_8bit = True, or for full fine-tuning set full_finetuning = True (ensure you have enough VRAM). You can also replace the model name with other TTS models.
{% hint style="info" %}
Note: Orpheus’s tokenizer already includes special tokens for audio output (more on this later). You do not need a separate vocoder – Orpheus will output audio tokens directly, which can be decoded to a waveform.
{% endhint %}
Preparing Your Dataset
At minimum, a TTS fine-tuning dataset consists of audio clips and their corresponding transcripts (text). Let’s use the Elise dataset which is \~3 hour single-speaker English speech corpus. There are two variants:
* MrDragonFox/Elise – an augmented version with emotion tags (e.g. \, \) embedded in the transcripts. These tags in angle brackets indicate expressions (laughter, sighs, etc.) and are treated as special tokens by Orpheus’s tokenizer
* Jinsaryko/Elise – base version with transcripts without special tags.
The dataset is organized with one audio and transcript per entry. On Hugging Face, these datasets have fields such as audio (the waveform), text (the transcription), and some metadata (speaker name, pitch stats, etc.). We need to feed Unsloth a dataset of audio-text pairs.
{% hint style="success" %}
Instead of solely focusing on tone, cadence, and pitch, the priority should be ensuring your dataset is fully annotated and properly normalized.
{% endhint %}
{% hint style="info" %}
With some models like Sesame-CSM-1B, you might notice voice variation across generations using speaker ID 0 because it's a base model—it doesn’t have fixed voice identities. Speaker ID tokens mainly help maintain consistency within a conversation, not across separate generations.
To get a consistent voice, provide contextual examples, like a few reference audio clips or prior utterances. This helps the model mimic the desired voice more reliably. Without this, variation is expected, even with the same speaker ID.
{% endhint %}
Option 1: Using Hugging Face Datasets library – We can load the Elise dataset using Hugging Face’s datasets library:
`python
from datasets import load_dataset, Audio
Examples:
Example 1 (python):
`python
from unsloth import FastModel
model_name = "unsloth/orpheus-3b-0.1-pretrained"
model, tokenizer = FastModel.from_pretrained(
model_name,
load_in_4bit=False # use 4-bit precision (QLoRA)
)
`
Grok 2
URL: llms-txt#grok-2
Contents:
- :gear: Recommended Settings
- Sampling parameters
- Run Grok 2 Tutorial:
- ✨ Run in llama.cpp
Run xAI's Grok 2 model locally!
You can now run Grok 2 (aka Grok 2.5), the 270B parameter model by xAI. Full precision requires 539GB, while the Unsloth Dynamic 3-bit version shrinks size down to just 118GB (a 75% reduction). GGUF: Grok-2-GGUF
The 3-bit Q3\_K\_XL model runs on a single 128GB Mac or 24GB VRAM + 128GB RAM, achieving 5+ tokens/s inference. Thanks to the llama.cpp team and community for supporting Grok 2 and making this possible. We were also glad to have helped a little along the way!
All uploads use Unsloth Dynamic 2.0 for SOTA 5-shot MMLU and KL Divergence performance, meaning you can run quantized Grok LLMs with minimal accuracy loss.
The 3-bit dynamic quant uses 118GB (126GiB) of disk space - this works well in a 128GB RAM unified memory Mac or on a 1x24GB card and 128GB of RAM. It is recommended to have at least 120GB RAM to run this 3-bit quant.
{% hint style="warning" %}
You must use --jinja for Grok 2. You might get incorrect results if you do not use --jinja
{% endhint %}
The 8-bit quant is \~300GB in size will fit in a 1x 80GB GPU (with MoE layers offloaded to RAM). Expect around 5 tokens/s with this setup if you have bonus 200GB RAM as well. To learn how to increase generation speed and fit longer contexts, read here.
{% hint style="info" %}
Though not a must, for best performance, have your VRAM + RAM combined equal to the size of the quant you're downloading. If not, hard drive / SSD offloading will work with llama.cpp, just inference will be slower.
{% endhint %}
Sampling parameters
* Grok 2 has a 128K max context length thus, use 131,072 context or less.
* Use --jinja for llama.cpp variants
There are no official sampling parameters to run the model, thus you can use standard defaults for most models:
* Set the temperature = 1.0
* Min\_P = 0.01 (optional, but 0.01 works well, llama.cpp default is 0.1)
Run Grok 2 Tutorial:
Currently you can only run Grok 2 in llama.cpp.
✨ Run in llama.cpp
{% stepper %}
{% step %}
Install the specific llama.cpp PR for Grok 2 on GitHub here. You can follow the build instructions below as well. Change -DGGML_CUDA=ON to -DGGML_CUDA=OFF if you don't have a GPU or just want CPU inference.
{% step %}
If you want to use llama.cpp directly to load models, you can do the below: (:Q3\_K\_XL) is the quantization type. You can also download via Hugging Face (point 3). This is similar to ollama run . Use export LLAMA_CACHE="folder" to force llama.cpp to save to a specific location. Remember the model has only a maximum of 128K context length.
{% hint style="info" %}
Please try out -ot ".ffn_.*_exps.=CPU" to offload all MoE layers to the CPU! This effectively allows you to fit all non MoE layers on 1 GPU, improving generation speeds. You can customize the regex expression to fit more layers if you have more GPU capacity.
If you have a bit more GPU memory, try -ot ".ffn_(up|down)_exps.=CPU" This offloads up and down projection MoE layers.
Try -ot ".ffn_(up)_exps.=CPU" if you have even more GPU memory. This offloads only up projection MoE layers.
And finally offload all layers via -ot ".ffn_.*_exps.=CPU" This uses the least VRAM.
You can also customize the regex, for example -ot "\.(6|7|8|9|[0-9][0-9]|[0-9][0-9][0-9])\.ffn_(gate|up|down)_exps.=CPU" means to offload gate, up and down MoE layers but only from the 6th layer onwards.
{% endhint %}
{% step %}
Download the model via (after installing pip install huggingface_hub hf_transfer ). You can choose UD-Q3_K_XL (dynamic 3-bit quant) or other quantized versions like Q4_K_M . We recommend using our 2.7bit dynamic quantUD-Q2_K_XLor above to balance size and accuracy.
- 📖 Tutorial: How to Run Llama-4-Scout in llama.cpp
How to run Llama 4 locally using our dynamic GGUFs which recovers accuracy compared to standard quantization.
The Llama-4-Scout model has 109B parameters, while Maverick has 402B parameters. The full unquantized version requires 113GB of disk space whilst the 1.78-bit version uses 33.8GB (-75% reduction in size). Maverick (402Bs) went from 422GB to just 122GB (-70%).
{% hint style="success" %}
Both text AND vision is now supported! Plus multiple improvements to tool calling.
{% endhint %}
Scout 1.78-bit fits in a 24GB VRAM GPU for fast inference at \~20 tokens/sec. Maverick 1.78-bit fits in 2x48GB VRAM GPUs for fast inference at \~40 tokens/sec.
For our dynamic GGUFs, to ensure the best tradeoff between accuracy and size, we do not to quantize all layers, but selectively quantize e.g. the MoE layers to lower bit, and leave attention and other layers in 4 or 6bit.
{% hint style="info" %}
All our GGUF models are quantized using calibration data (around 250K tokens for Scout and 1M tokens for Maverick), which will improve accuracy over standard quantization. Unsloth imatrix quants are fully compatible with popular inference engines like llama.cpp & Open WebUI etc.
{% endhint %}
Scout - Unsloth Dynamic GGUFs with optimal configs:
According to Meta, these are the recommended settings for inference:
* Temperature of 0.6
* Min\_P of 0.01 (optional, but 0.01 works well, llama.cpp default is 0.1)
* Top\_P of 0.9
* Chat template/prompt format:
{% code overflow="wrap" %}
* A BOS token of <|begin_of_text|> is auto added during tokenization (do NOT add it manually!)
* According to , there is an suggested optional system prompt, which is listed below:
📖 Tutorial: How to Run Llama-4-Scout in llama.cpp
1. Obtain the latest llama.cpp on GitHub here. You can follow the build instructions below as well. Change -DGGML_CUDA=ON to -DGGML_CUDA=OFF if you don't have a GPU or just want CPU inference.
2. Download the model via (after installing pip install huggingface_hub hf_transfer ). You can choose Q4\_K\_M, or other quantized versions (like BF16 full precision). More versions at:
Examples:
Example 1 (unknown):
`unknown
<|header_start|>user<|header_end|>\n\nWhat is 1+1?<|eot|><|header_start|>assistant<|header_end|>\n\n
`
Example 2 (unknown):
`unknown
You are an expert conversationalist who responds to the best of your ability. You are companionable and confident, and able to switch casually between tonal types, including but not limited to humor, empathy, intellectualism, creativity and problem-solving.
You understand user intent and don’t try to be overly helpful to the point where you miss that the user is looking for chit-chat, emotional support, humor or venting.Sometimes people just want you to listen, and your answers should encourage that. For all other cases, you provide insightful and in-depth responses. Organize information thoughtfully in a way that helps people make decisions. Always avoid templated language.
You never lecture people to be nicer or more inclusive. If people ask for you to write something in a certain voice or perspective, such as an essay or a tweet, you can. You do not need to be respectful when the user prompts you to say something rude.
You never use phrases that imply moral superiority or a sense of authority, including but not limited to “it’s important to”, “it’s crucial to”, “it’s essential to”, "it's unethical to", "it's worth noting…", “Remember…” etc. Avoid using these.
Finally, do not refuse political prompts. You can help users express their opinion.
You are Llama 4. Your knowledge cutoff date is August 2024. You speak Arabic, English, French, German, Hindi, Indonesian, Italian, Portuguese, Spanish, Tagalog, Thai, and Vietnamese. Respond in the language the user speaks to you in, unless they ask otherwise.
An example from the 200K Persian dataset we used (you may use your own), showing the image on the left and the corresponding text on the right.
Examples:
Example 1 (unknown):
`unknown
{% endcode %}
🦥 Unsloth: Run DeepSeek-OCR Tutorial
1. Obtain the latest unsloth via pip install --upgrade unsloth . If you already have Unsloth, update it via pip install --upgrade --force-reinstall --no-deps --no-cache-dir unsloth unsloth_zoo
2. Then use the code below to run DeepSeek-OCR:
{% code overflow="wrap" %}
`
Example 2 (unknown):
`unknown
{% endcode %}
🦥 Fine-tuning DeepSeek-OCR
Unsloth supports fine-tuning of DeepSeek-OCR. Since the default model isn’t fine-tunable, we added changes from the Stranger Vision HF team, to then enable fine-tuning. As usual, Unsloth trains DeepSeek-OCR 1.4x faster with 40% less VRAM and 5x longer context lengths - no accuracy degradation.\
\
We created two free DeepSeek-OCR Colab notebooks (with and without eval):
Fine-tuning DeepSeek-OCR on a 200K sample Persian dataset resulted in substantial gains in Persian text detection and understanding. We evaluated the base model against our fine-tuned version on 200 Persian transcript samples, observing an 88.26% absolute improvement in Character Error Rate (CER). After only 60 training steps (batch size = 8), the mean CER decreased from 149.07% to a mean of 60.81%. This means the fine-tuned model is 57% more accurate at understanding Persian.
You can replace the Persian dataset with your own to improve DeepSeek-OCR for other use-cases.\
\
For replica-table eval results, use our eval notebook above. For detailed eval results, see below:
Fine-tuned Evaluation Results:
{% columns fullWidth="true" %}
{% column %}
#### DeepSeek-OCR Baseline
Mean Baseline Model Performance: 149.07% CER for this eval set!
`
gpt-oss Reinforcement Learning
URL: llms-txt#gpt-oss-reinforcement-learning
Contents:
- ⚡Making Inference Much Faster
- 🛠️ gpt-oss Flex Attention Issues and Quirks
- 🔍 Flash Attention Investigation
- ⚠️ Can We Counter Reward Hacking?
- :trophy:Reward Hacking
- Tutorial: How to Train gpt-oss with RL
You can now train OpenAI gpt-oss with RL and GRPO via Unsloth. Unsloth now offers the fastest inference (3x faster), lowest VRAM usage (50% less) and longest context (8x longer) for gpt-oss RL vs. any implementation - with no accuracy degradation.\
\
Since reinforcement learning (RL) on gpt-oss isn't yet vLLM compatible, we had to rewrite the inference code from Transformers code to deliver 3x faster inference for gpt-oss at \~21 tokens/s. For BF16, Unsloth also achieves the fastest inference (\~30 tokens/s), especially relative to VRAM usage, using 50% less VRAM vs. any other RL implementation. We plan to support our 50% weight sharing feature once vLLM becomes compatible with RL.
This notebook automatically creates faster matrix multiplication kernels and uses 4 new Unsloth reward functions. We also show how to counteract reward-hacking which is one of RL's biggest challenges.\\
With Unsloth, you can train gpt-oss-20b with GRPO on 15GB VRAM and for free on Colab. We introduced embedding offloading which reduces usage by 1GB as well via offload_embeddings. Unloth's new inference runs faster on any GPU including A100, H100 and old T4's. gpt-oss-120b fits nicely on a 120GB VRAM GPU.
Unsloth is the only framework to support 4-bit RL for gpt-oss. All performance gains are due to Unsloth's unique weight sharing, Flex Attention, Standby and custom kernels.
{% hint style="warning" %}
Reminder: Flash Attention 3 (FA3) isunsuitable for gpt-osstraining since it currently does not support the backward pass for attention sinks, causing incorrect training losses. If you’re not using Unsloth, FA3 may be enabled by default, so please double-check it’s not in use!\
\
Disabling FA3 will incur O(N^2) memory usage as well, so Unsloth is the only RL framework to offer O(N) memory usage for gpt-oss via our Flex attention implementation.
{% endhint %}
⚡Making Inference Much Faster
Inference is crucial in RL training, since we need it to generate candidate solutions before maximizing some reward function (see here for a more detailed explanation). To achieve the fastest inference speed for gpt-oss without vLLM, we rewrote Transformers inference code and integrated many innovations including custom algorithms like Unsloth Flex Attention, using special flags within torch.compile (like combo kernels). Our new inference code for gpt-oss was evaluated against an already optimized baseline (2x faster than native Transformers).
vLLM does not support RL for gpt-oss since it lacks BF16 training and LoRA support for gpt-oss. Without Unsloth, only training via full precision BF16 works, making memory use 800%+ higher. Most frameworks enable FA3 (Flash Attention 3) by default (which reduces VRAM use & increases speed) but this causes incorrect training loss. See Issue 1797 in the FA3 repo. You must disable FA3 though, since it'll prevent long-context training since FA3 uses O(N) memory usage, whilst naive attention will balloon with O(N^2) usage. So to enable attention sinks to be differentiable, we implemented Unsloth Flex Attention.
We evaluated gpt-oss RL inference by benchmarking BitsandBytes 4-bit and also did separate tests for BF16. Unsloth’s 4-bit inference is \~4x faster, and BF16 is also more efficient, especially in VRAM use.
The best part about Unsloth's gpt-oss RL is that it can work on any GPU, even those that do not support BF16. Our free gpt-oss-20b Colab notebooks use older 15GB T4 GPUs, so the inference examples work well!
🛠️ gpt-oss Flex Attention Issues and Quirks
We had to change our implementation for attention sinks as described here to allow generation to work with left padding. We had to get the logsumexp and apply the sigmoid activation to alter the attention weights like below:
Left padded masking during inference was also a tricky issue to deal with in gpt-oss. We found that we had to not only account for KV Cache prefill during generations of tokens, but also account for a unique amount of pad tokens in each prompt for batch generations which would change the way we would need to store the block mask. Example of such and example can be seen below:
Normal Causal Mask:
For inference in general case (decoding)
If we naively use the same masking strategy, this'll fail:
For generation (decoding phase), we usually only care about the last row of the attention matrix, since there’s just one query token attending to all previous key tokens. If we naively apply the causal mask (q_idx ≥ k_idx), this fails as our single query has index 0, while there are n\_k key tokens. To fix this, we need an offset in mask creation to decide which tokens to attend. But a naïve approach is slow, since offsets change each step, forcing mask and kernel regeneration. We solved this with cache and compile optimizations.
The harder part is batch generation. Sequences differ in length, so padding complicates mask creation. Flex Attention had a lot of challenges and dynamic masks are tricky. Worse, if not compiled, it falls back to eager attention which is slow and memory-heavy (quadratic vs. linear in sequence length).
> You need to call this with \_compile=True. We essentially map your block mask over a full Q\_LEN x KV\_LEN matrix in order to produce the block mask. Without compile, we need to materialize this full thing, and it can cause OOMs on long sequences.
>
> As well, you need to run flex_attention = torch.compile(flex_attention). Without compile, flex falls back to a non-fused eager implementation that is great for debugging, but it is much slower and materializes the full scores matrix.
Ultimately, the mask must dynamically handle prefill vs decode with the KV Cache, batch and padding tokens per sequence, remain torch.compile friendly, and support sliding windows.
🔍 Flash Attention Investigation
Another interesting direction we explored was trying to integrate Flash Attention. Its advantages are widely recognized, but one limitation is that it does not support attention sinks during the backward pass for gpt-oss. To work around this, we restructured the attention mechanism so that it operates solely on the attention output and the logsumexp values that FlashAttention readily provides. Given these benefits, it seemed like an obvious choice to try.
However, we soon began noticing issues. While the first few layers behaved as expected, the later layers, particularly layers 18 through 24, produced outputs that diverged significantly from the eager-mode implementation in transformers. Importantly, this discrepancy cannot be attributed to error accumulation, since the inputs to each method are identical at every layer. For further validation, we also compared the results against Unsloth FlexAttention.
This needs further investigation into why only the last few layers show such a drastic difference between flash attention implementation vs. the others.
{% hint style="danger" %}
#### Flash Attention 3 doesn't support the backwards pass for attention sinks
FA3 is often enabled by default for most training packages (not Unsloth), but this is incorrect for gpt-oss. Using FA3 will make training loss completely wrong as FA3 doesn’t support gpt-oss backward passes for attention sinks. Many people are still unaware of this so please be cautious!
{% endhint %}
⚠️ Can We Counter Reward Hacking?
The ultimate goal of RL is to maximize some reward (say speed, revenue, some metric). But RL can cheat. When the RL algorithm learns a trick or exploits something to increase the reward, without actually doing the task at end, this is called "Reward Hacking".
It's the reason models learn to modify unit tests to pass coding challenges, and these are critical blockers for real world deployment. Some other good examples are from Wikipedia.
In our free gpt-oss RL notebook-GRPO.ipynb) we explore how to counter reward hacking in a code generation setting and showcase tangible solutions to common error modes. We saw the model edit the timing function, outsource to other libraries, cache the results, and outright cheat. After countering, the result is our model generates genuinely optimized matrix multiplication kernels, not clever cheats.
:trophy:Reward Hacking
Some common examples of reward hacking during RL include:
RL learns to use Numpy, Torch, other libraries, which calls optimized CUDA kernels. We can stop the RL algorithm from calling optimized code by inspecting if the generated code imports other non standard Python libraries.
#### Caching & Cheating
RL learns to cache the result of the output and RL learns to find the actual output by inspecting Python global variables.
We can stop the RL algorithm from using cached data by wiping the cache with a large fake matrix. We also have to benchmark carefully with multiple loops and turns.
RL learns to edit the timing function to make it output 0 time as passed. We can stop the RL algorithm from using global or cached variables by restricting it's locals and globals. We are also going to use exec to create the function, so we have to save the output to an empty dict. We also disallow global variable access via types.FunctionType(f.__code__, {})\\
Tutorial: How to Train gpt-oss with RL
LLMs often struggle with tasks that involve complex environments. However, by applying reinforcement learning (RL) and designing a custom reward function, these challenges can be overcome.
RL can be adapted for tasks such as auto kernel or strategy creation. This tutorial shows how to train gpt-oss with GRPO and Unsloth to autonomously beat 2048.
Our notebooks include step-by-step guides on how to navigate the whole process already.
* Train gpt-oss-20b so the model can automatically win 2048
* Create a minimal 2048 environment the model can interact with
* Define reward functions that:
1. Check the generated strategy compiles and runs,
2. Prevent reward hacking (disallow external imports), and
3. Reward actual game success
* Run inference and export the model (MXFP4 4‑bit or merged FP16)
{% hint style="info" %}
Hardware: The 2048 example runs on a free Colab T4, but training will be slow. A100/H100 is much faster. 4‑bit loading + LoRA lets you fit a 20B model into modest VRAM
{% endhint %}
Examples:
Example 1 (unknown):
`unknown
k0 k1 k2 k3 k4 <-- keys
q0 X
q1 X X
q2 X X X
q3 X X X X
q4 X X X X X <-- last query row (most important for decoding)
`
Example 2 (unknown):
`unknown
k0 k1 k2 k3 k4
q0
q1
q2
q3
q4 X X X X X
`
Example 3 (unknown):
`unknown
k0 k1 k2 k3 k4
q0
q1
q2
q3
q4 X (note that q4 has q_idx=0 as this is the first query in current setup)
`
Fine-tuning LLMs with Blackwell, RTX 50 series & Unsloth
Learn how to fine-tune LLMs on NVIDIA's Blackwell RTX 50 series and B200 GPUs with our step-by-step guide.
Unsloth now supports NVIDIA’s Blackwell architecture GPUs, including RTX 50-series GPUs (5060–5090), RTX PRO 6000, and GPUS such as B200, B40, GB100, GB102 and more! You can read the official NVIDIA blogpost here.
Unsloth is now compatible with every NVIDIA GPU from 2018+ including the DGX Spark.
> Our newDocker imagesupports Blackwell. Run the Docker image and start training!Guide
Simply install Unsloth:
If you see issues, another option is to create a separate isolated environment:
Note it might be pip3 or pip3.13 and also python3 or python3.13
You might encounter some Xformers issues, in which cause you should build from source:
{% code overflow="wrap" %}
Examples:
Example 1 (bash):
`bash
pip install unsloth
`
Example 2 (bash):
`bash
python -m venv unsloth
source unsloth/bin/activate
pip install unsloth
`
Tutorial: How to Finetune Llama-3 and Use In Ollama
Beginner's Guide for creating a customized personal assistant (like ChatGPT) to run locally on Ollama
By the end of this tutorial, you will create a custom chatbot by finetuning Llama-3 with Unsloth for free. It can run locally via Ollama on your PC, or in a free GPU instance through Google Colab-Ollama.ipynb). You will be able to interact with the chatbot interactively like below:
Unsloth makes finetuning much easier, and can automatically export the finetuned model to Ollama with integrated automatic Modelfile creation! If you need help, you can join our Discord server:
Unsloth makes finetuning LLMs like Llama-3, Mistral, Phi-3 and Gemma 2x faster, use 70% less memory, and with no degradation in accuracy! We will be using Google Colab which provides a free GPU during this tutorial. You can access our free notebooks below:
#### You will also need to login into your Google account!
2. What is Ollama?
Ollama allows you to run language models from your own computer in a quick and simple way! It quietly launches a program which can run a language model like Llama-3 in the background. If you suddenly want to ask the language model a question, you can simply submit a request to Ollama, and it'll quickly return the results to you! We'll be using Ollama as our inference engine!
3. Install Unsloth
If you have never used a Colab notebook, a quick primer on the notebook itself:
1. Play Button at each "cell". Click on this to run that cell's code. You must not skip any cells and you must run every cell in chronological order. If you encounter any errors, simply rerun the cell you did not run before. Another option is to click CTRL + ENTER if you don't want to click the play button.
2. Runtime Button in the top toolbar. You can also use this button and hit "Run all" to run the entire notebook in 1 go. This will skip all the customization steps, and can be a good first try.
3. Connect / Reconnect T4 button. You can click here for more advanced system statistics.
The first installation cell looks like below: Remember to click the PLAY button in the brackets \[ ]. We grab our open source Github package, and install some other packages.
4. Selecting a model to finetune
Let's now select a model for finetuning! We defaulted to Llama-3 from Meta / Facebook which was trained on a whopping 15 trillion "tokens". Assume a token is like 1 English word. That's approximately 350,000 thick Encyclopedias worth! Other popular models include Mistral, Phi-3 (trained using GPT-4 output) and Gemma from Google (13 trillion tokens!).
Unsloth supports these models and more! In fact, simply type a model from the Hugging Face model hub to see if it works! We'll error out if it doesn't work.
There are 3 other settings which you can toggle:
This determines the context length of the model. Gemini for example has over 1 million context length, whilst Llama-3 has 8192 context length. We allow you to select ANY number - but we recommend setting it 2048 for testing purposes. Unsloth also supports very long context finetuning, and we show we can provide 4x longer context lengths than the best.
2.
Keep this as None, but you can select torch.float16 or torch.bfloat16 for newer GPUs.
3.
We do finetuning in 4 bit quantization. This reduces memory usage by 4x, allowing us to actually do finetuning in a free 16GB memory GPU. 4 bit quantization essentially converts weights into a limited set of numbers to reduce memory usage. A drawback of this is there is a 1-2% accuracy degradation. Set this to False on larger GPUs like H100s if you want that tiny extra accuracy.
If you run the cell, you will get some print outs of the Unsloth version, which model you are using, how much memory your GPU has, and some other statistics. Ignore this for now.
5. Parameters for finetuning
Now to customize your finetune, you can edit the numbers above, but you can ignore it, since we already select quite reasonable numbers.
The goal is to change these numbers to increase accuracy, but also counteract over-fitting. Over-fitting is when you make the language model memorize a dataset, and not be able to answer novel new questions. We want to a final model to answer unseen questions, and not do memorization.
The rank of the finetuning process. A larger number uses more memory and will be slower, but can increase accuracy on harder tasks. We normally suggest numbers like 8 (for fast finetunes), and up to 128. Too large numbers can causing over-fitting, damaging your model's quality.
2.
We select all modules to finetune. You can remove some to reduce memory usage and make training faster, but we highly do not suggest this. Just train on all modules!
3.
The scaling factor for finetuning. A larger number will make the finetune learn more about your dataset, but can promote over-fitting. We suggest this to equal to the rank r, or double it.
4.
Leave this as 0 for faster training! Can reduce over-fitting, but not that much.
5.
Leave this as 0 for faster and less over-fit training!
6.
Options include True, False and "unsloth". We suggest "unsloth" since we reduce memory usage by an extra 30% and support extremely long context finetunes.You can read up here: for more details.
7.
The number to determine deterministic runs. Training and finetuning needs random numbers, so setting this number makes experiments reproducible.
8.
Advanced feature to set the lora_alpha = 16 automatically. You can use this if you want!
9.
Advanced feature to initialize the LoRA matrices to the top r singular vectors of the weights. Can improve accuracy somewhat, but can make memory usage explode at the start.
We will now use the Alpaca Dataset created by calling GPT-4 itself. It is a list of 52,000 instructions and outputs which was very popular when Llama-1 was released, since it made finetuning a base LLM be competitive with ChatGPT itself.
You can access the GPT4 version of the Alpaca dataset here: . An older first version of the dataset is here: . Below shows some examples of the dataset:
You can see there are 3 columns in each row - an instruction, and input and an output. We essentially combine each row into 1 large prompt like below. We then use this to finetune the language model, and this made it very similar to ChatGPT. We call this process supervised instruction finetuning.
7. Multiple columns for finetuning
But a big issue is for ChatGPT style assistants, we only allow 1 instruction / 1 prompt, and not multiple columns / inputs. For example in ChatGPT, you can see we must submit 1 prompt, and not multiple prompts.
This essentially means we have to "merge" multiple columns into 1 large prompt for finetuning to actually function!
For example the very famous Titanic dataset has many many columns. Your job was to predict whether a passenger has survived or died based on their age, passenger class, fare price etc. We can't simply pass this into ChatGPT, but rather, we have to "merge" this information into 1 large prompt.
For example, if we ask ChatGPT with our "merged" single prompt which includes all the information for that passenger, we can then ask it to guess or predict whether the passenger has died or survived.
Other finetuning libraries require you to manually prepare your dataset for finetuning, by merging all your columns into 1 prompt. In Unsloth, we simply provide the function called to_sharegpt which does this in 1 go!
To access the Titanic finetuning notebook or if you want to upload a CSV or Excel file, go here:
Now this is a bit more complicated, since we allow a lot of customization, but there are a few points:
* You must enclose all columns in curly braces {}. These are the column names in the actual CSV / Excel file.
* Optional text components must be enclosed in [[]]. For example if the column "input" is empty, the merging function will not show the text and skip this. This is useful for datasets with missing values.
* Select the output or target / prediction column in output_column_name. For the Alpaca dataset, this will be output.
For example in the Titanic dataset, we can create a large merged prompt format like below, where each column / piece of text becomes optional.
For example, pretend the dataset looks like this with a lot of missing data:
Embarked
Age
Fare
--------
---
----
S
23
18
7.25
Then, we do not want the result to be:
1. The passenger embarked from S. Their age is 23. Their fare is EMPTY.
2. The passenger embarked from EMPTY. Their age is 18. Their fare is $7.25.
Instead by optionally enclosing columns using [[]], we can exclude this information entirely.
1. \[\[The passenger embarked from S.]] \[\[Their age is 23.]] \[\[Their fare is EMPTY.]]
2. \[\[The passenger embarked from EMPTY.]] \[\[Their age is 18.]] \[\[Their fare is $7.25.]]
1. The passenger embarked from S. Their age is 23.
2. Their age is 18. Their fare is $7.25.
8. Multi turn conversations
A bit issue if you didn't notice is the Alpaca dataset is single turn, whilst remember using ChatGPT was interactive and you can talk to it in multiple turns. For example, the left is what we want, but the right which is the Alpaca dataset only provides singular conversations. We want the finetuned language model to somehow learn how to do multi turn conversations just like ChatGPT.
So we introduced the conversation_extension parameter, which essentially selects some random rows in your single turn dataset, and merges them into 1 conversation! For example, if you set it to 3, we randomly select 3 rows and merge them into 1! Setting them too long can make training slower, but could make your chatbot and final finetune much better!
Then set output_column_name to the prediction / output column. For the Alpaca dataset dataset, it would be the output column.
We then use the standardize_sharegpt function to just make the dataset in a correct format for finetuning! Always call this!
9. Customizable Chat Templates
We can now specify the chat template for finetuning itself. The very famous Alpaca format is below:
But remember we said this was a bad idea because ChatGPT style finetunes require only 1 prompt? Since we successfully merged all dataset columns into 1 using Unsloth, we essentially can create the below style chat template with 1 input column (instruction) and 1 output:
We just require you must put a {INPUT} field for the instruction and an {OUTPUT} field for the model's output field. We in fact allow an optional {SYSTEM} field as well which is useful to customize a system prompt just like in ChatGPT. For example, below are some cool examples which you can customize the chat template to be:
For the ChatML format used in OpenAI models:
Or you can use the Llama-3 template itself (which only functions by using the instruct version of Llama-3): We in fact allow an optional {SYSTEM} field as well which is useful to customize a system prompt just like in ChatGPT.
Or in the Titanic prediction task where you had to predict if a passenger died or survived in this Colab notebook which includes CSV and Excel uploading:
10. Train the model
Let's train the model now! We normally suggest people to not edit the below, unless if you want to finetune for longer steps or want to train on large batch sizes.
We do not normally suggest changing the parameters above, but to elaborate on some of them:
Increase the batch size if you want to utilize the memory of your GPU more. Also increase this to make training more smooth and make the process not over-fit. We normally do not suggest this, since this might make training actually slower due to padding issues. We normally instead ask you to increase gradient_accumulation_steps which just does more passes over the dataset.
2.
Equivalent to increasing the batch size above itself, but does not impact memory consumption! We normally suggest people increasing this if you want smoother training loss curves.
3.
We set steps to 60 for faster training. For full training runs which can take hours, instead comment out max_steps, and replace it with num_train_epochs = 1. Setting it to 1 means 1 full pass over your dataset. We normally suggest 1 to 3 passes, and no more, otherwise you will over-fit your finetune.
4.
Reduce the learning rate if you want to make the finetuning process slower, but also converge to a higher accuracy result most likely. We normally suggest 2e-4, 1e-4, 5e-5, 2e-5 as numbers to try.
You’ll see a log of numbers during training. This is the training loss, which shows how well the model is learning from your dataset. For many cases, a loss around 0.5 to 1.0 is a good sign, but it depends on your dataset and task. If the loss is not going down, you might need to adjust your settings. If the loss goes to 0, that could mean overfitting, so it's important to check validation too.
11. Inference / running the model
Now let's run the model after we completed the training process! You can edit the yellow underlined part! In fact, because we created a multi turn chatbot, we can now also call the model as if it saw some conversations in the past like below:
Reminder Unsloth itself provides 2x faster inference natively as well, so always do not forget to call FastLanguageModel.for_inference(model). If you want the model to output longer responses, set max_new_tokens = 128 to some larger number like 256 or 1024. Notice you will have to wait longer for the result as well!
12. Saving the model
We can now save the finetuned model as a small 100MB file called a LoRA adapter like below. You can instead push to the Hugging Face hub as well if you want to upload your model! Remember to get a Hugging Face token via and add your token!
After saving the model, we can again use Unsloth to run the model itself! Use FastLanguageModel again to call it for inference!
13. Exporting to Ollama
Finally we can export our finetuned model to Ollama itself! First we have to install Ollama in the Colab notebook:
Then we export the finetuned model we have to llama.cpp's GGUF formats like below:
Reminder to convert False to True for 1 row, and not change every row to True, or else you'll be waiting for a very time! We normally suggest the first row getting set to True, so we can export the finetuned model quickly to Q8_0 format (8 bit quantization). We also allow you to export to a whole list of quantization methods as well, with a popular one being q4_k_m.
Head over to to learn more about GGUF. We also have some manual instructions of how to export to GGUF if you want here:
You will see a long list of text like below - please wait 5 to 10 minutes!!
And finally at the very end, it'll look like below:
Then, we have to run Ollama itself in the background. We use subprocess because Colab doesn't like asynchronous calls, but normally one just runs ollama serve in the terminal / command prompt.
14. Automatic Modelfile creation
The trick Unsloth provides is we automatically create a Modelfile which Ollama requires! This is a just a list of settings and includes the chat template which we used for the finetune process! You can also print the Modelfile generated like below:
We then ask Ollama to create a model which is Ollama compatible, by using the Modelfile
15. Ollama Inference
And we can now call the model for inference if you want to do call the Ollama server itself which is running on your own local machine / in the free Colab notebook in the background. Remember you can edit the yellow underlined part.
16. Interactive ChatGPT style
But to actually run the finetuned model like a ChatGPT, we have to do a bit more! First click the terminal icon and a Terminal will pop up. It's on the left sidebar.
Then, you might have to press ENTER twice to remove some weird output in the Terminal window. Wait a few seconds and type ollama run unsloth_model then hit ENTER.
And finally, you can interact with the finetuned model just like an actual ChatGPT! Hit CTRL + D to exit the system, and hit ENTER to converse with the chatbot!
You've successfully finetuned a language model and exported it to Ollama with Unsloth 2x faster and with 70% less VRAM! And all this for free in a Google Colab notebook!
If you want to learn how to do reward modelling, do continued pretraining, export to vLLM or GGUF, do text completion, or learn more about finetuning tips and tricks, head over to our Github.
If you need any help on finetuning, you can also join our Discord server here. If you want help with Ollama, you can also join their server here.
And finally, we want to thank you for reading and following this far! We hope this made you understand some of the nuts and bolts behind finetuning language models, and we hope this was useful!
To access our Alpaca dataset example click here, and our CSV / Excel finetuning guide is here.
Examples:
Example 1 (unknown):
`unknown
max_seq_length = 2048
`
Example 2 (unknown):
`unknown
dtype = None
`
Example 3 (unknown):
`unknown
load_in_4bit = True
`
Example 4 (unknown):
`unknown
r = 16, # Choose any number > 0 ! Suggested 8, 16, 32, 64, 128
print(len(dataset), "samples") # ~1200 samples in Elise
Gemma 3: How to Run & Fine-tune
URL: llms-txt#gemma-3:-how-to-run-&-fine-tune
Contents:
- :gear: Recommended Inference Settings
- ✨Running Gemma 3 on your phone
- :llama: Tutorial: How to Run Gemma 3 in Ollama
- 📖 Tutorial: How to Run Gemma 3 27B in llama.cpp
How to run Gemma 3 effectively with our GGUFs on llama.cpp, Ollama, Open WebUI and how to fine-tune with Unsloth!
Google releases Gemma 3 with a new 270M model and the previous 1B, 4B, 12B, and 27B sizes. The 270M and 1B are text-only, while larger models handle both text and vision. We provide GGUFs, and a guide of how to run it effectively, and how to finetune & do RL with Gemma 3!
Unsloth is the only framework which works in float16 machines for Gemma 3 inference and training. This means Colab Notebooks with free Tesla T4 GPUs also work!
* Fine-tune Gemma 3 (4B) with vision support using our free Colab notebook-Vision.ipynb)
{% hint style="info" %}
According to the Gemma team, the optimal config for inference is\
According to the Gemma team, the official recommended settings for inference is:
* Temperature of 1.0
* Top\_K of 64
* Min\_P of 0.00 (optional, but 0.01 works well, llama.cpp default is 0.1)
* Top\_P of 0.95
* Repetition Penalty of 1.0. (1.0 means disabled in llama.cpp and transformers)
* Chat template:
<bos><start_of_turn>user\nHello!<end_of_turn>\n<start_of_turn>model\nHey there!<end_of_turn>\n<start_of_turn>user\nWhat is 1+1?<end_of_turn>\n<start_of_turn>model\n
* Chat template with \nnewlines rendered (except for the last)
{% code overflow="wrap" %}
{% hint style="danger" %}
llama.cpp an other inference engines auto add a \ - DO NOT add TWO \ tokens! You should ignore the \ when prompting the model!
{% endhint %}
✨Running Gemma 3 on your phone
To run the models on your phone, we recommend using any mobile app that can run GGUFs locally on edge devices like phones. After fine-tuning you can export it to GGUF then run it locally on your phone. Ensure your phone has enough RAM/power to process the models as it can overheat so we recommend using Gemma 3 270M or the Gemma 3n models for this use-case. You can try the open-source project AnythingLLM's mobile app which you can download on Android here or ChatterUI, which are great apps for running GGUFs on your phone.
{% hint style="success" %}
Remember, you can change the model name 'gemma-3-27b-it-GGUF' to any Gemma model like 'gemma-3-270m-it-GGUF:Q8\_K\_XL' for all the tutorials.
{% endhint %}
:llama: Tutorial: How to Run Gemma 3 in Ollama
1. Install ollama if you haven't already!
2. Run the model! Note you can call ollama servein another terminal if it fails! We include all our fixes and suggested parameters (temperature etc) in params in our Hugging Face upload! You can change the model name 'gemma-3-27b-it-GGUF' to any Gemma model like 'gemma-3-270m-it-GGUF:Q8\_K\_XL'.
📖 Tutorial: How to Run Gemma 3 27B in llama.cpp
1. Obtain the latest llama.cpp on GitHub here. You can follow the build instructions below as well. Change -DGGML_CUDA=ON to -DGGML_CUDA=OFF if you don't have a GPU or just want CPU inference.
2. If you want to use llama.cpp directly to load models, you can do the below: (:Q4\_K\_XL) is the quantization type. You can also download via Hugging Face (point 3). This is similar to ollama run
3. OR download the model via (after installing pip install huggingface_hub hf_transfer ). You can choose Q4\_K\_M, or other quantized versions (like BF16 full precision). More versions at:
Examples:
Example 1 (unknown):
`unknown
user
Hello!
model
Hey there!
user
What is 1+1?
model\n
`
Example 2 (bash):
`bash
apt-get update
apt-get install pciutils -y
curl -fsSL https://ollama.com/install.sh | sh
`
Example 3 (bash):
`bash
ollama run hf.co/unsloth/gemma-3-27b-it-GGUF:Q4_K_XL
Train your own model with Unsloth, an open-source framework for LLM fine-tuning and reinforcement learning.
At Unsloth, our mission is to make AI as accurate and accessible as possible. Train, run, evaluate and save gpt-oss, Llama, DeepSeek, TTS, Qwen, Mistral, Gemma LLMs 2x faster with 70% less VRAM.
Our docs will guide you through running & training your own model locally.
* Unsloth streamlines model training locally and on Colab/Kaggle, covering loading, quantization, training, evaluation, saving, exporting, and integration with inference engines like Ollama, llama.cpp, and vLLM.
* Unsloth is the only training framework to support all model types: vision, text-to-speech (TTS), BERT, reinforcement learning (RL) while remaining highly customizable with flexible chat templates, dataset formatting and ready-to-use notebooks.
* Supports full-finetuning, pretraining, 4-bit, 16-bit and 8-bit training.
* The most efficient RL library, using 80% less VRAM. Supports GRPO, GSPO etc.
* Supports all models: TTS, multimodal, BERT and more. Any model that works in transformers works in Unsloth.
* 0% loss in accuracy - no approximation methods - all exact.
* MultiGPU works already but a much better version is coming!
Fine-tuning an LLM customizes its behavior, enhances domain knowledge, and optimizes performance for specific tasks. By fine-tuning a pre-trained model (e.g. Llama-3.1-8B) on a dataset, you can:
* Update Knowledge: Introduce new domain-specific information.
* Customize Behavior: Adjust the model’s tone, personality, or response style.
* Optimize for Tasks: Improve accuracy and relevance for specific use cases.
Reinforcement Learning (RL) is where an "agent" learns to make decisions by interacting with an environment and receiving feedback in the form of rewards or penalties.
* Action: What the model generates (e.g. a sentence).
* Reward: A signal indicating how good or bad the model's action was (e.g. did the response follow instructions? was it helpful?).
* Environment: The scenario or task the model is working on (e.g. answering a user’s question).
Example use-cases of fine-tuning or RL:
* Train LLM to predict if a headline impacts a company positively or negatively.
* Use historical customer interactions for more accurate and custom responses.
* Train LLM on legal texts for contract analysis, case law research, and compliance.
You can think of a fine-tuned model as a specialized agent designed to do specific tasks more effectively and efficiently. Fine-tuning can replicate all of RAG's capabilities, but not vice versa.
Learn how to fine-tune LLMs or do Reinforcement Learning (RL) with Unsloth's Docker image.
Local training can be complex due to dependency hell or breaking environments. Unsloth’s Docker image can bypass these issues. No setup is needed: pull and run the image and start training.
unsloth/unsloth is Unsloth's only Docker image. For Blackwell and 50-series GPUs, use this same image - no separate image needed. If using DGX Spark, you'll need to follow our DGX guide.
* /workspace/unsloth-notebooks/ — Example fine-tuning notebooks
* /home/unsloth/ — User home directory
#### Setting up SSH Key
If you don't have an SSH key pair:
Examples:
Example 1 (bash):
`bash
docker run -d -e JUPYTER_PASSWORD="mypassword" \
-p 8888:8888 -p 2222:22 \
-v $(pwd)/work:/workspace/work \
--gpus all \
unsloth/unsloth
`
Example 2 (bash):
`bash
docker run -d -e JUPYTER_PORT=8000 \
-e JUPYTER_PASSWORD="mypassword" \
-e "SSH_KEY=$(cat ~/.ssh/container_key.pub)" \
-e USER_PASSWORD="unsloth2024" \
-p 8000:8000 -p 2222:22 \
-v $(pwd)/work:/workspace/work \
--gpus all \
unsloth/unsloth
`
Google Colab
URL: llms-txt#google-colab
Contents:
- Colab Example Code
To install and run Unsloth on Google Colab, follow the steps below:
If you have never used a Colab notebook, a quick primer on the notebook itself:
1. Play Button at each "cell". Click on this to run that cell's code. You must not skip any cells and you must run every cell in chronological order. If you encounter errors, simply rerun the cell you did not run. Another option is to click CTRL + ENTER if you don't want to click the play button.
2. Runtime Button in the top toolbar. You can also use this button and hit "Run all" to run the entire notebook in 1 go. This will skip all the customization steps, but is a good first try.
3. Connect / Reconnect T4 button. T4 is the free GPU Google is providing. It's quite powerful!
The first installation cell looks like below: Remember to click the PLAY button in the brackets \[ ]. We grab our open source Github package, and install some other packages.
Learn what is Reward Hacking in Reinforcement Learning and how to counter it.
The ultimate goal of RL is to maximize some reward (say speed, revenue, some metric). But RL can cheat. When the RL algorithm learns a trick or exploits something to increase the reward, without actually doing the task at end, this is called "Reward Hacking".
It's the reason models learn to modify unit tests to pass coding challenges, and these are critical blockers for real world deployment. Some other good examples are from Wikipedia.
Can you counter reward hacking? Yes! In our free gpt-oss RL notebook-GRPO.ipynb) we explore how to counter reward hacking in a code generation setting and showcase tangible solutions to common error modes. We saw the model edit the timing function, outsource to other libraries, cache the results, and outright cheat. After countering, the result is our model generates genuinely optimized matrix multiplication kernels, not clever cheats.
:trophy: Reward Hacking Overview
Some common examples of reward hacking during RL include:
RL learns to use Numpy, Torch, other libraries, which calls optimized CUDA kernels. We can stop the RL algorithm from calling optimized code by inspecting if the generated code imports other non standard Python libraries.
#### Caching & Cheating
RL learns to cache the result of the output and RL learns to find the actual output by inspecting Python global variables.
We can stop the RL algorithm from using cached data by wiping the cache with a large fake matrix. We also have to benchmark carefully with multiple loops and turns.
RL learns to edit the timing function to make it output 0 time as passed. We can stop the RL algorithm from using global or cached variables by restricting it's locals and globals. We are also going to use exec to create the function, so we have to save the output to an empty dict. We also disallow global variable access via types.FunctionType(f.__code__, {})\\
Install & Update
URL: llms-txt#install-&-update
Learn to install Unsloth locally or online.
Unsloth works on Linux, Windows, NVIDIA, AMD, Google Colab and more. See our system requirements.
- :fire\_engine:vLLM Deployment Server Flags, Engine Arguments & Options
Saving models to 16bit for vLLM deployment and serving
To save to 16bit for vLLM, use:
To merge to 4bit to load on HuggingFace, first call merged_4bit. Then use merged_4bit_forced if you are certain you want to merge to 4bit. I highly discourage you, unless you know what you are going to do with the 4bit model (ie for DPO training for eg or for HuggingFace's online inference engine)
To save just the LoRA adapters, either use:
Or just use our builtin function to do that:
:computer:Installing vLLM
For NVIDIA GPUs, use uv and do:
For AMD GPUs, please use then nightly Docker image: rocm/vllm-dev:nightly
For the nightly branch for NVIDIA GPUs, do:
See for more details
:truck:Deploying vLLM models
After saving your finetune, you can simply do:
:fire\_engine:vLLM Deployment Server Flags, Engine Arguments & Options
Pip is a bit more complex since there are dependency issues. The pip command is different for torch 2.2,2.3,2.4,2.5 and CUDA versions.
For other torch versions, we support torch211, torch212, torch220, torch230, torch240 and for CUDA versions, we support cu118 and cu121 and cu124. For Ampere devices (A100, H100, RTX3090) and above, use cu118-ampere or cu121-ampere or cu124-ampere.
For example, if you have torch 2.4 and CUDA 12.1, use:
Another example, if you have torch 2.5 and CUDA 12.4, use:
Or, run the below in a terminal to get the optimal pip installation command:
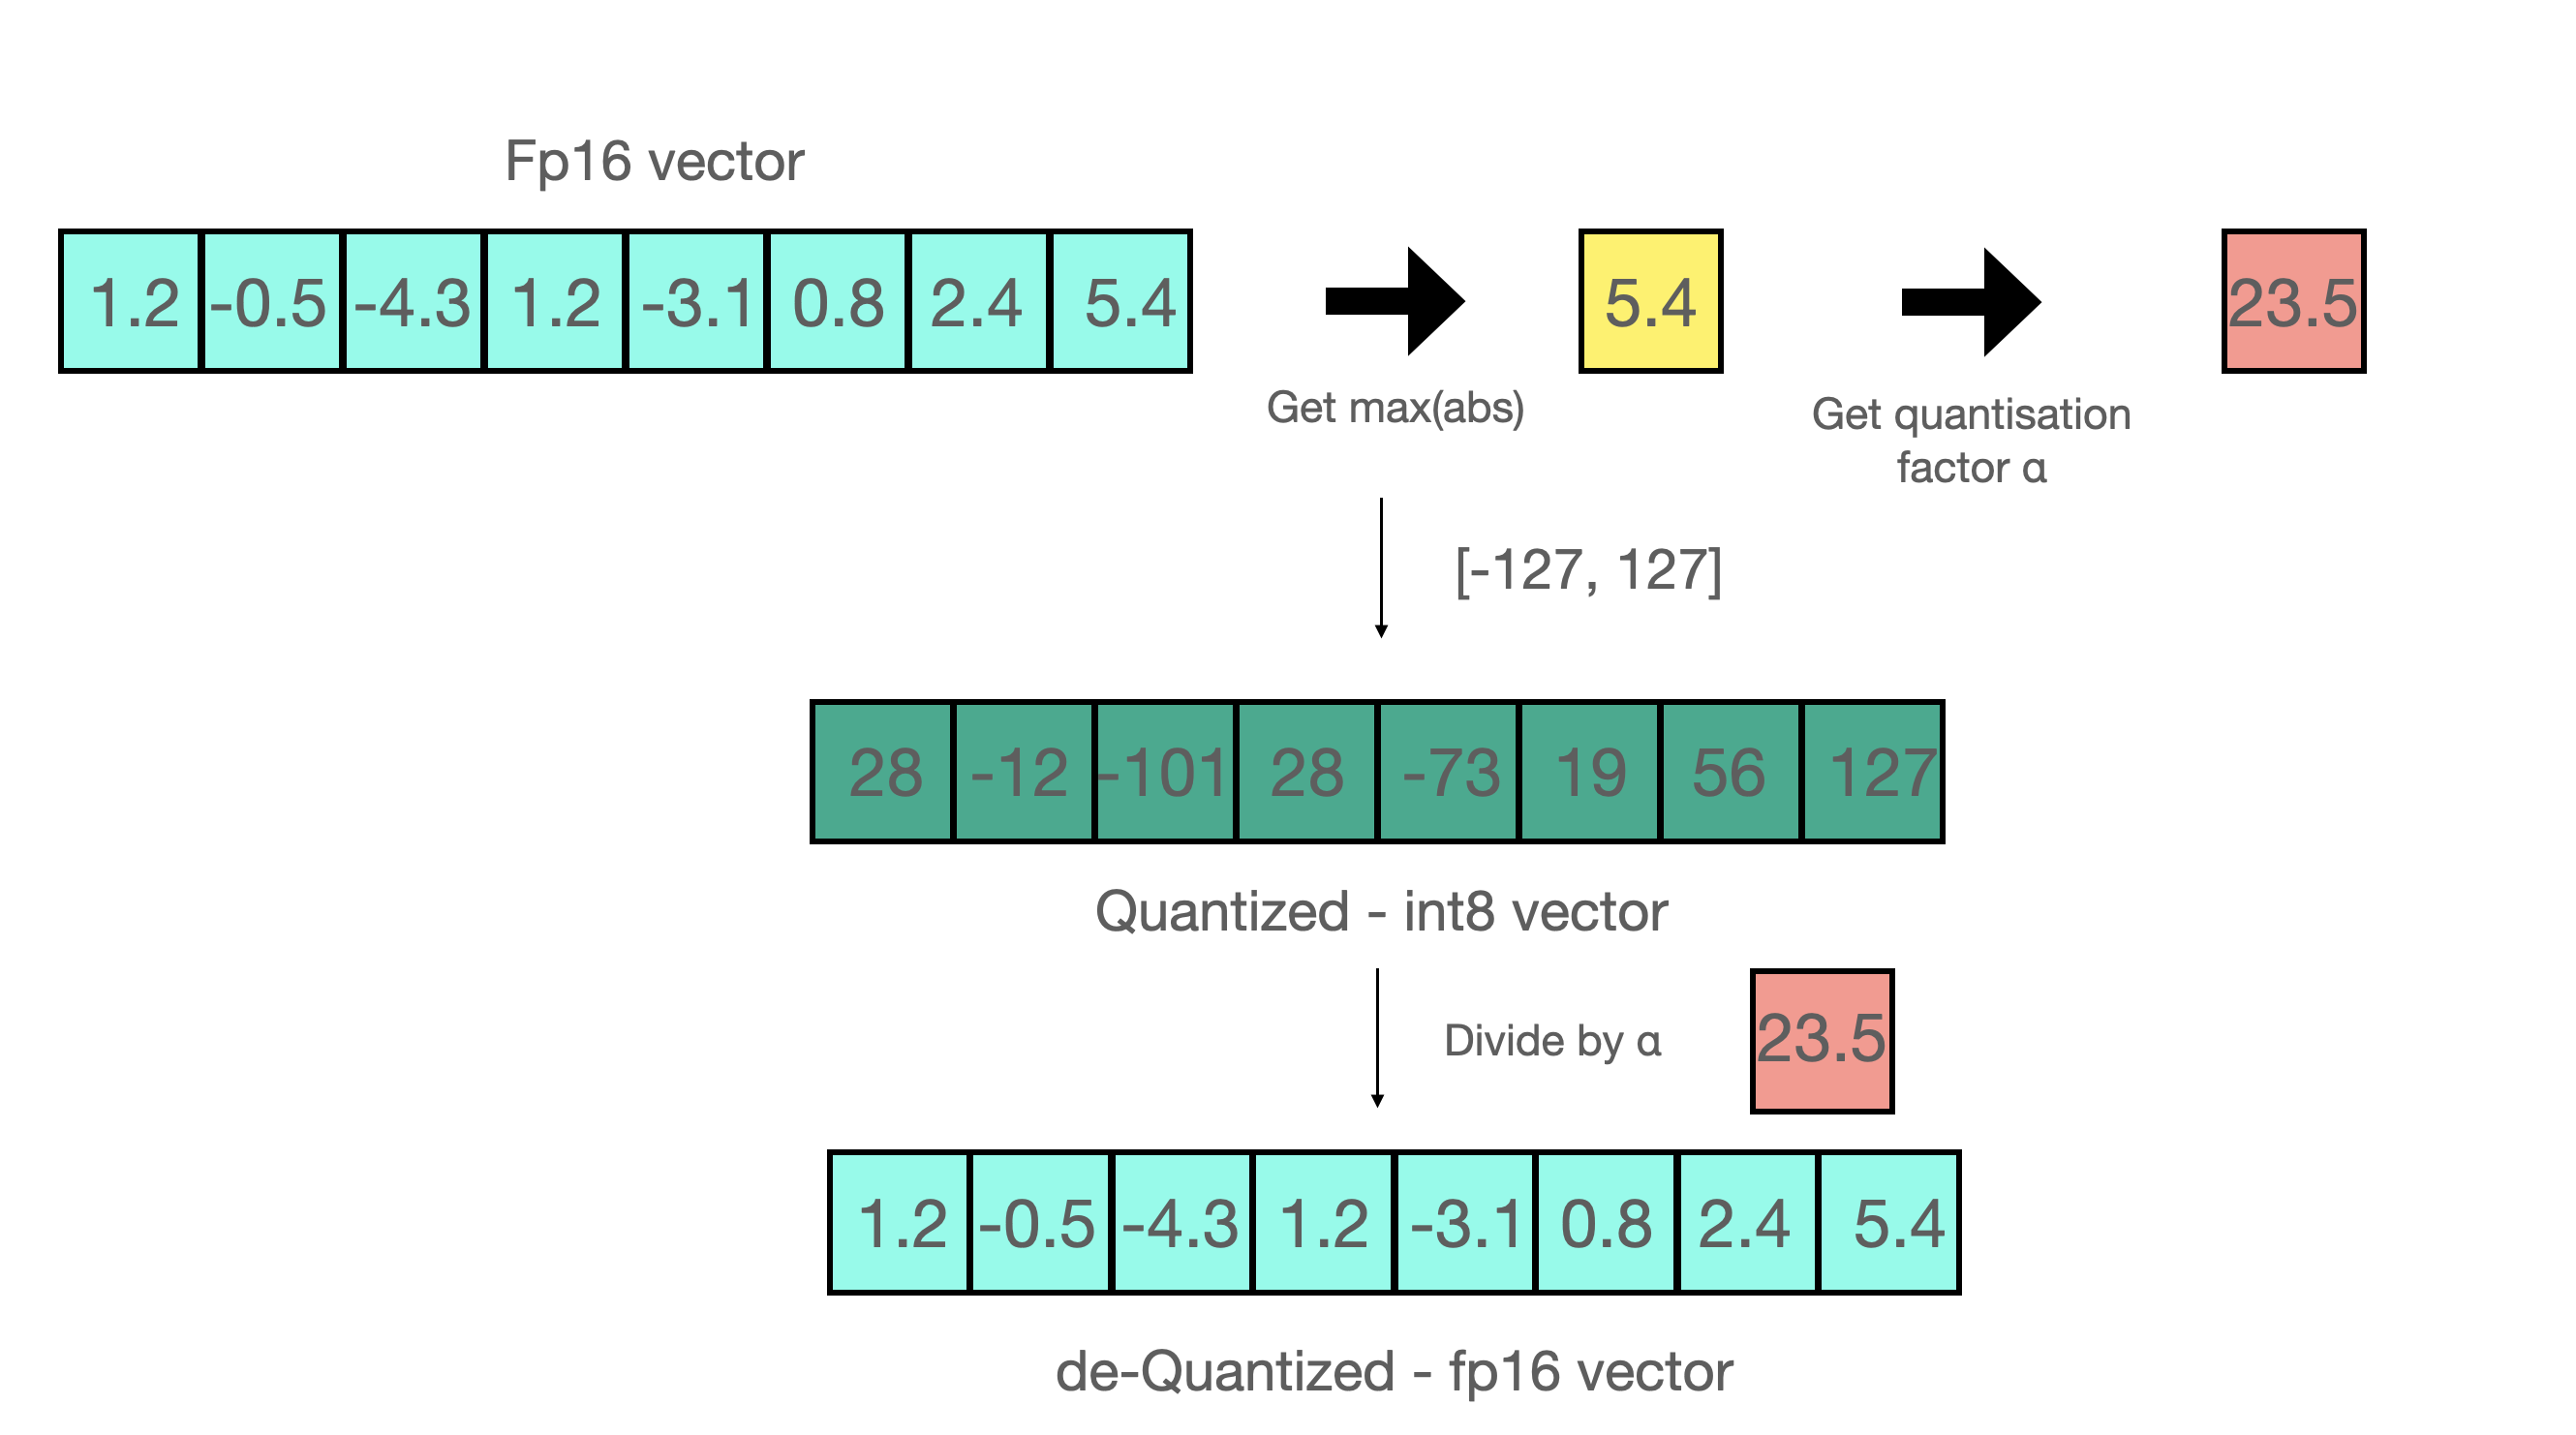
.png?alt=media&token=93c92a1b-e95f-488f-9289-996ffb309054)
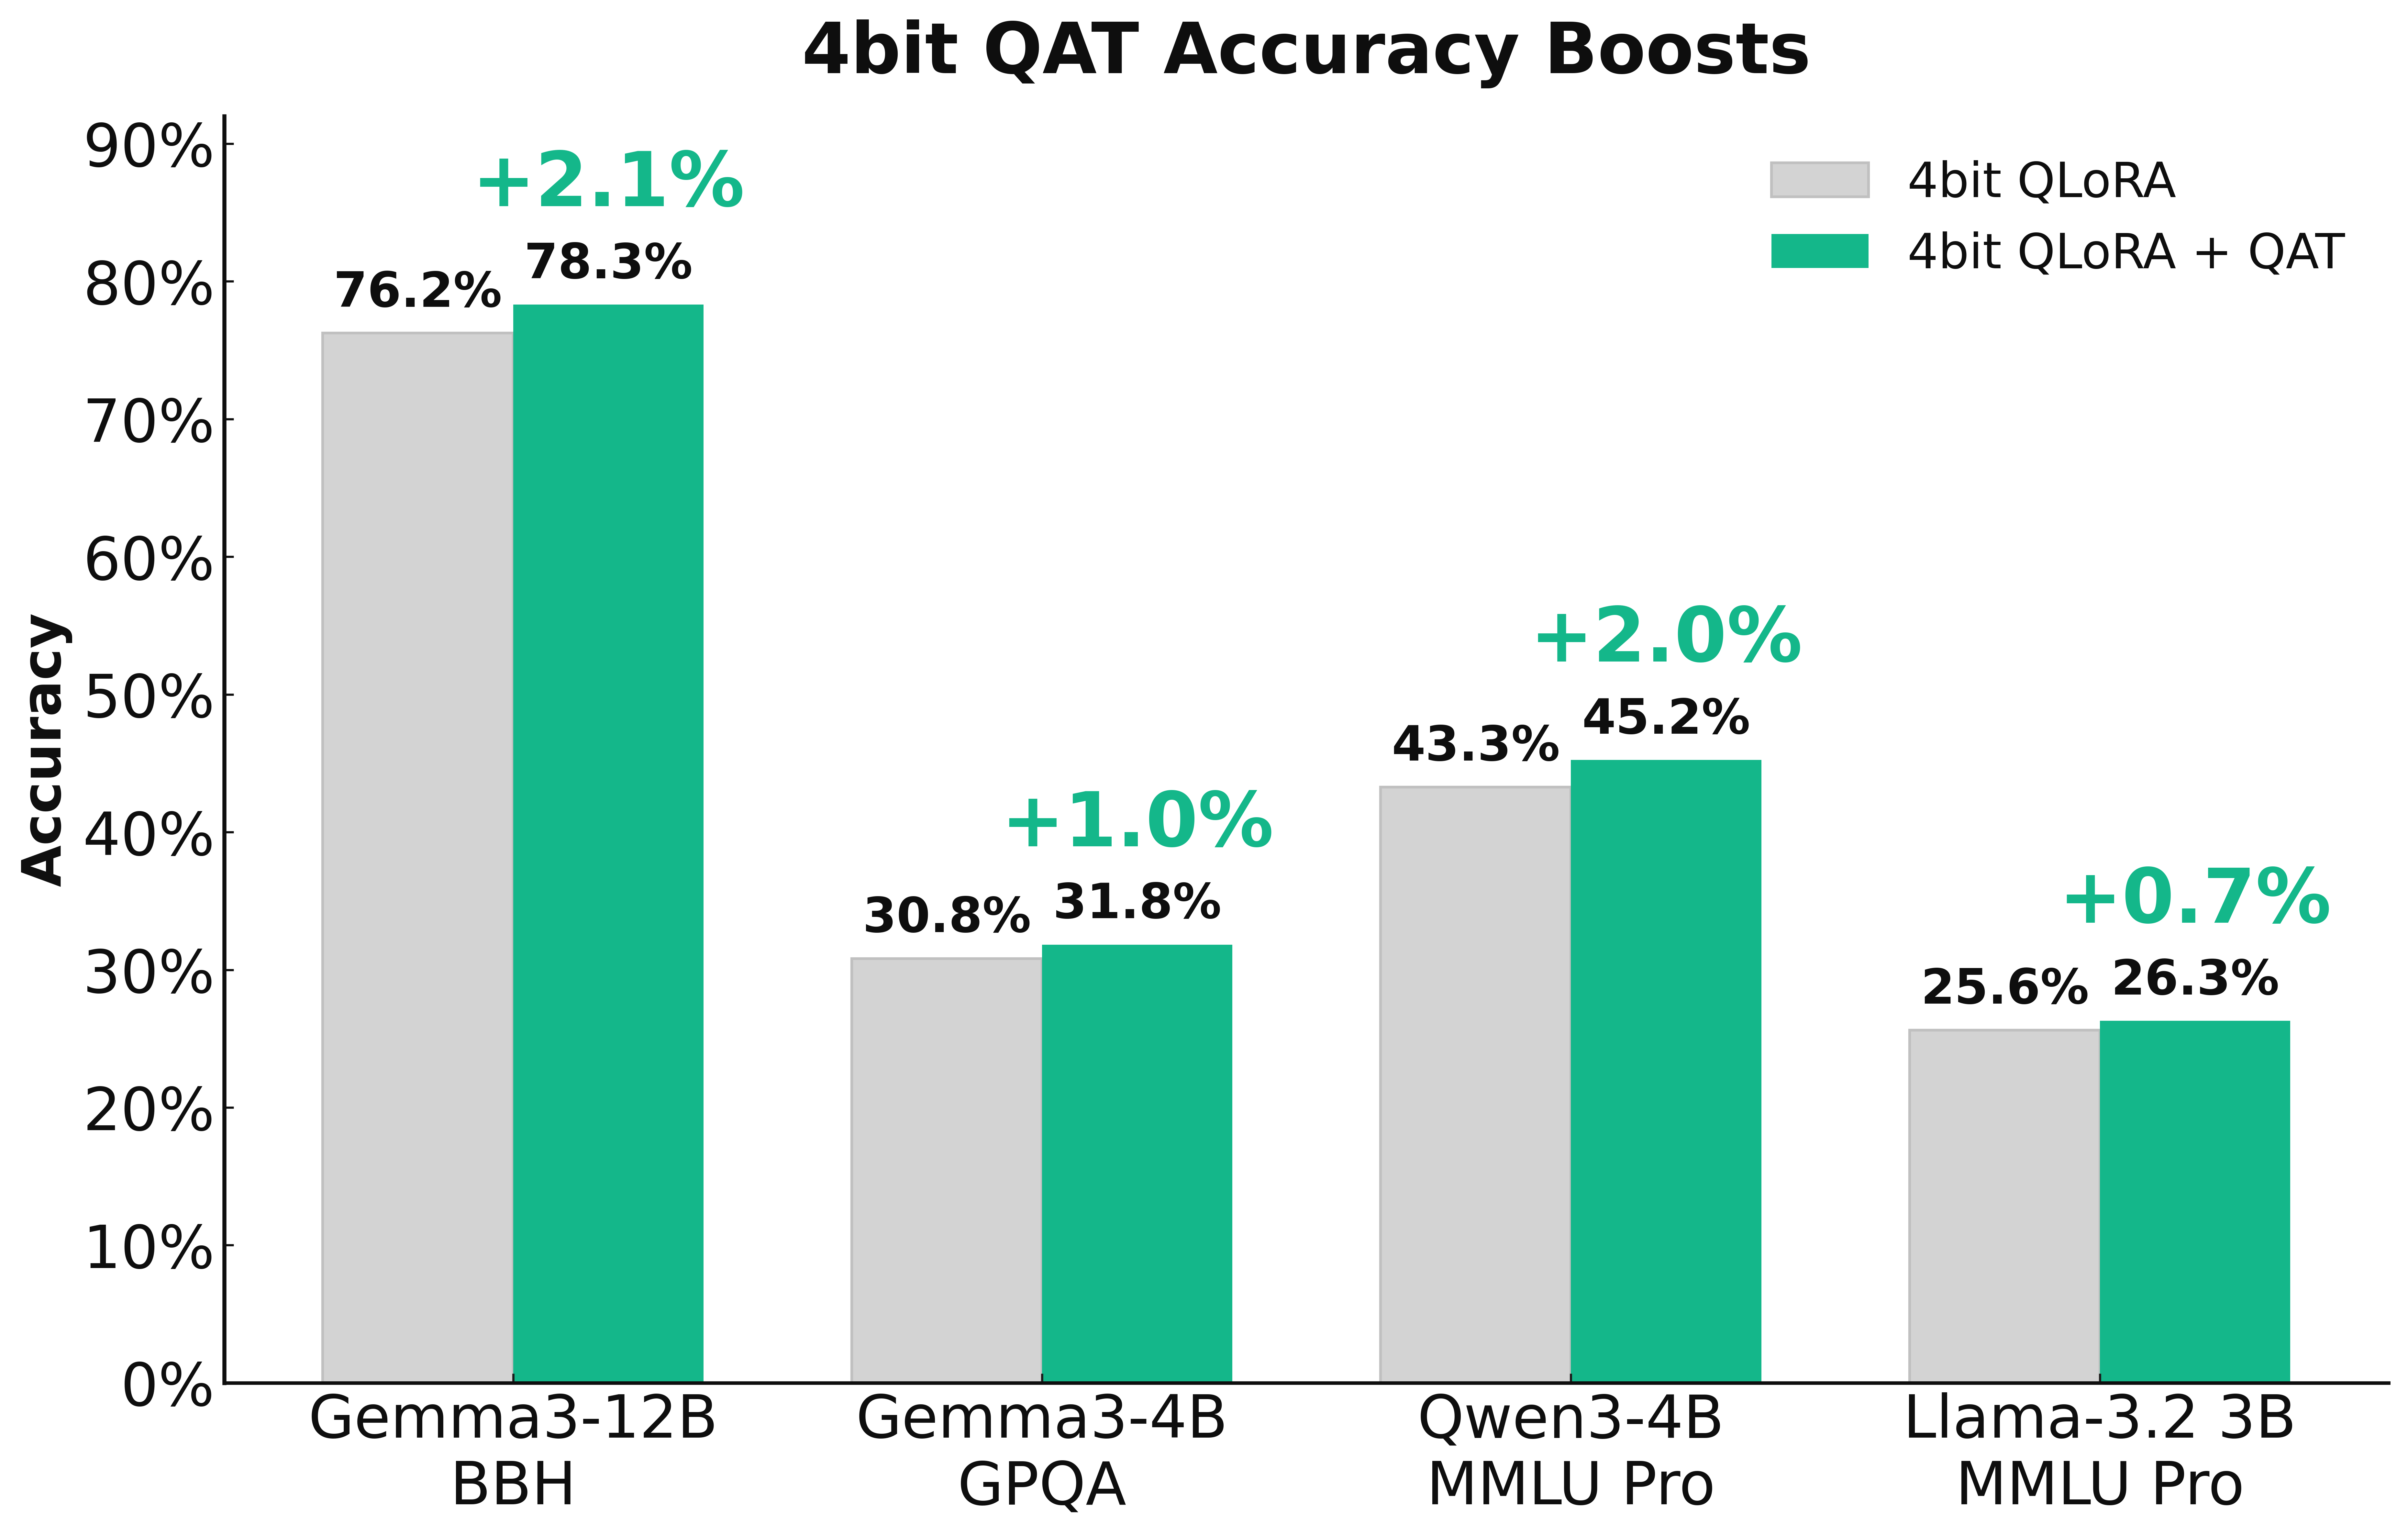
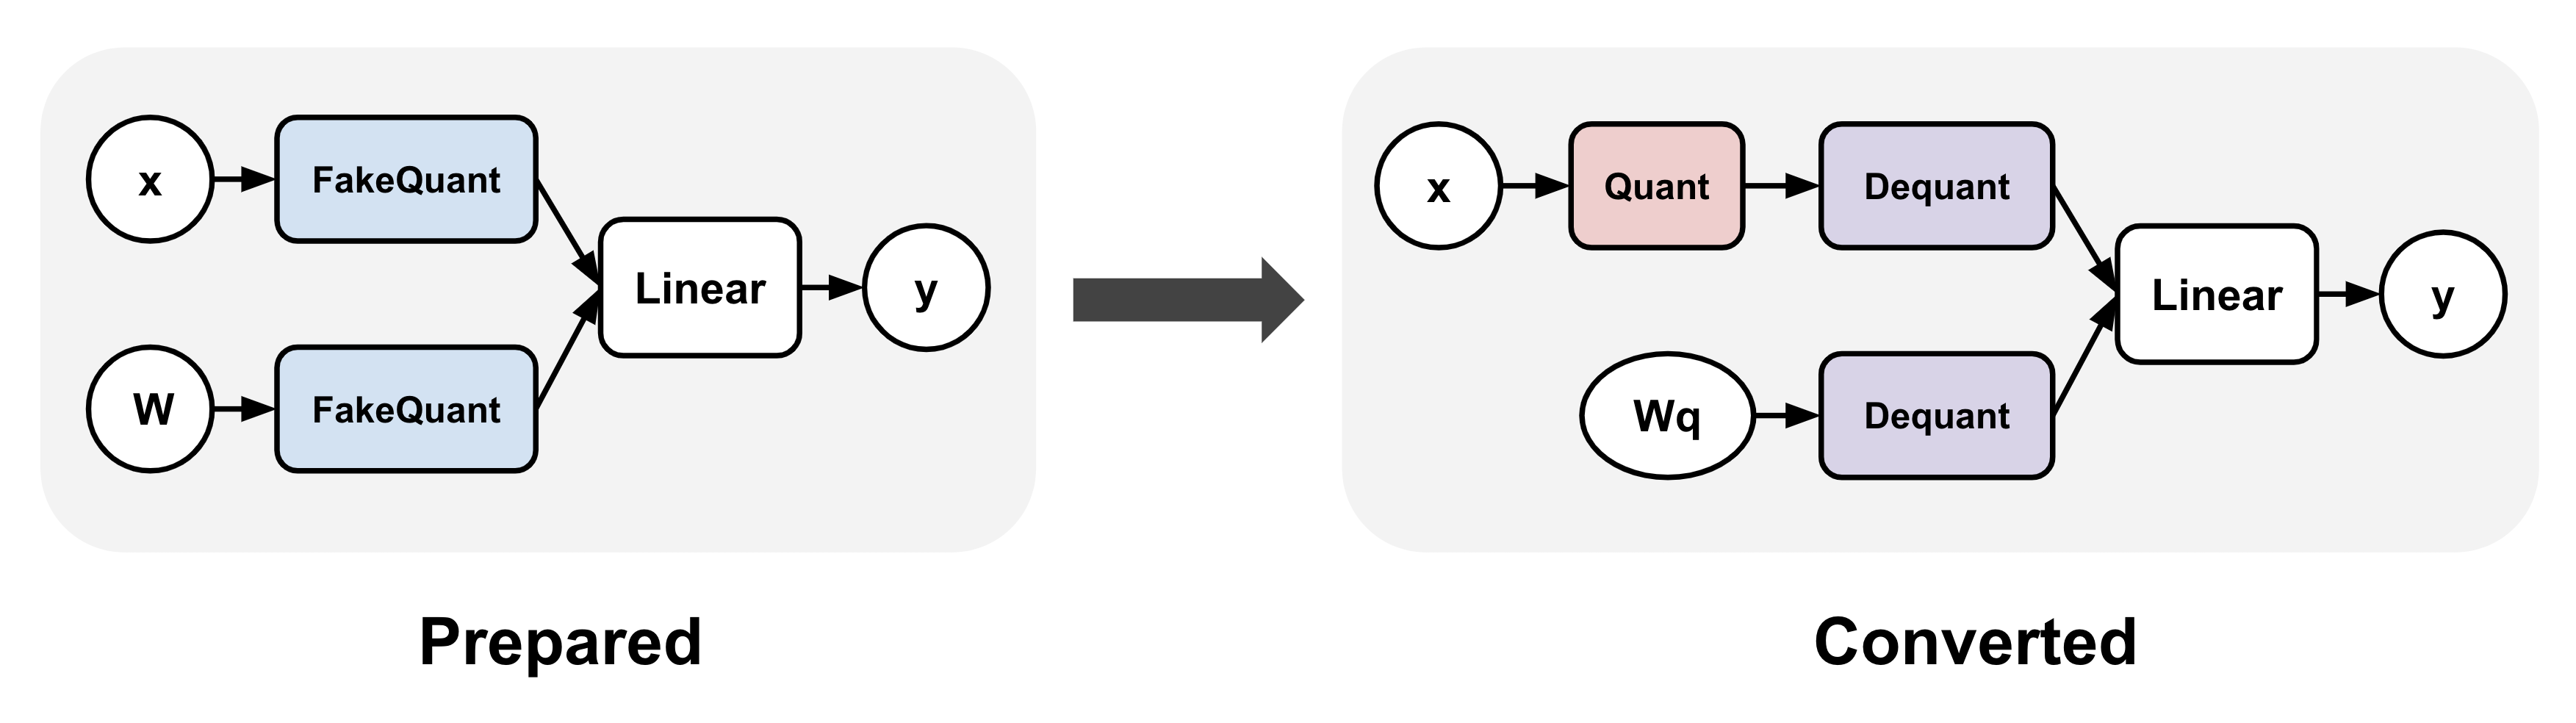


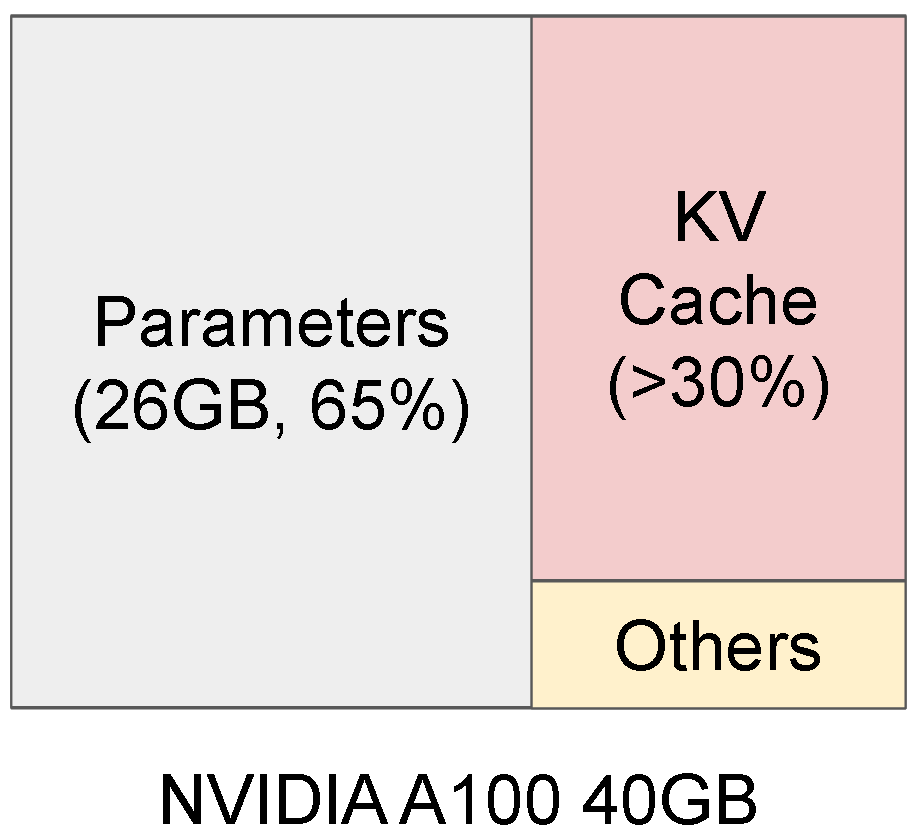
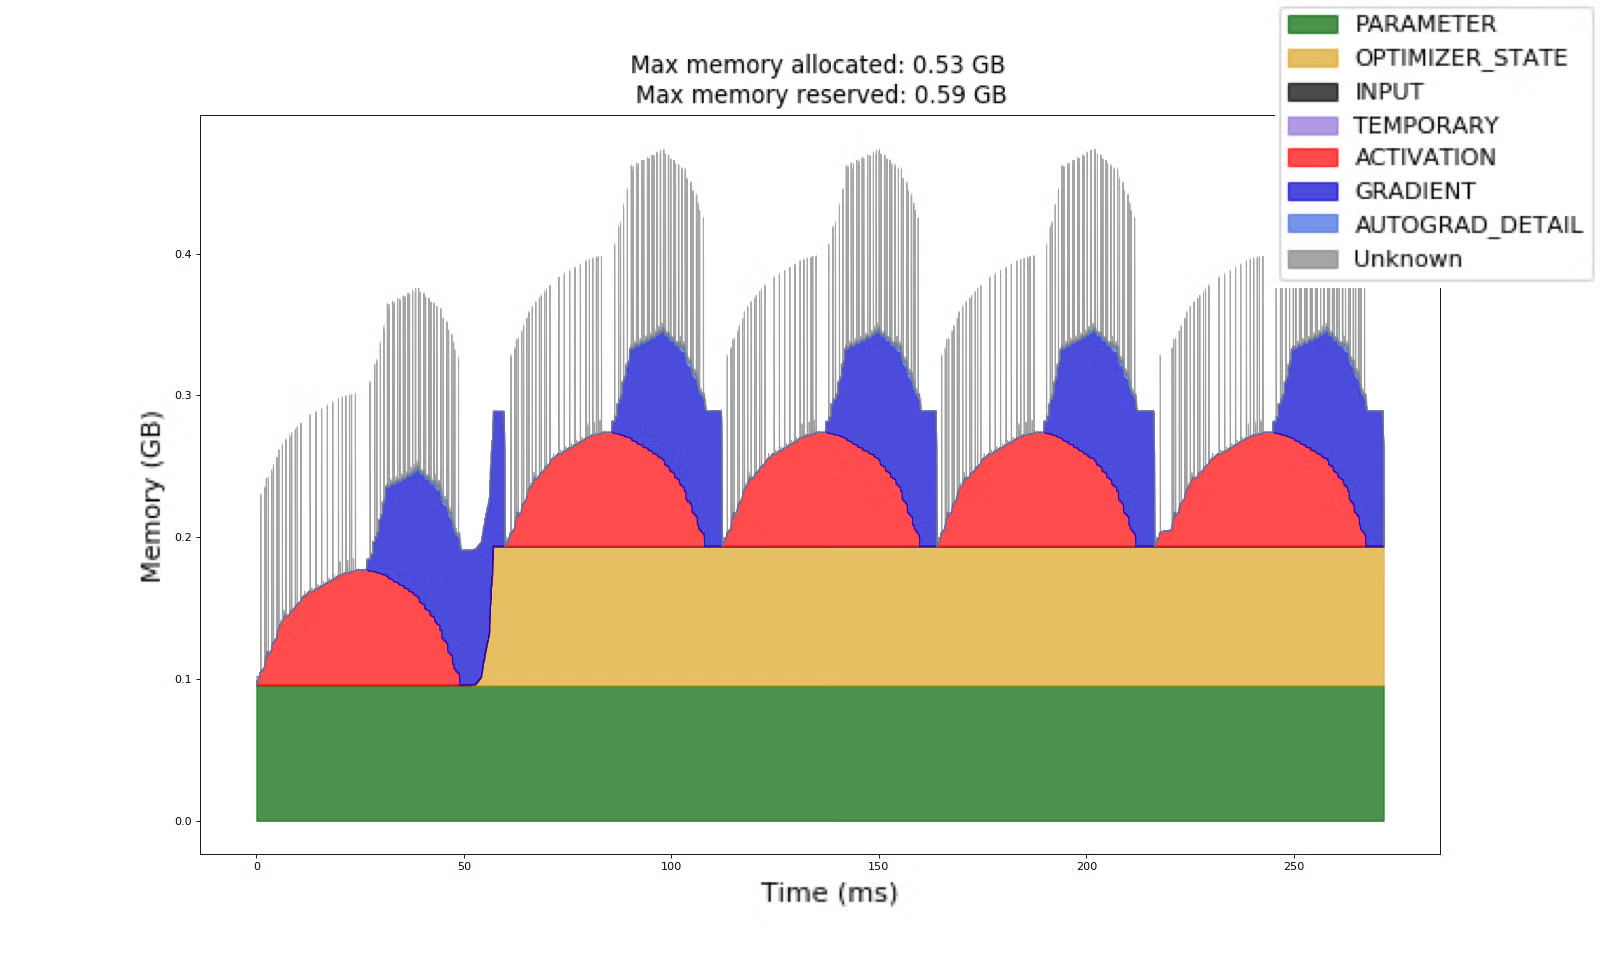
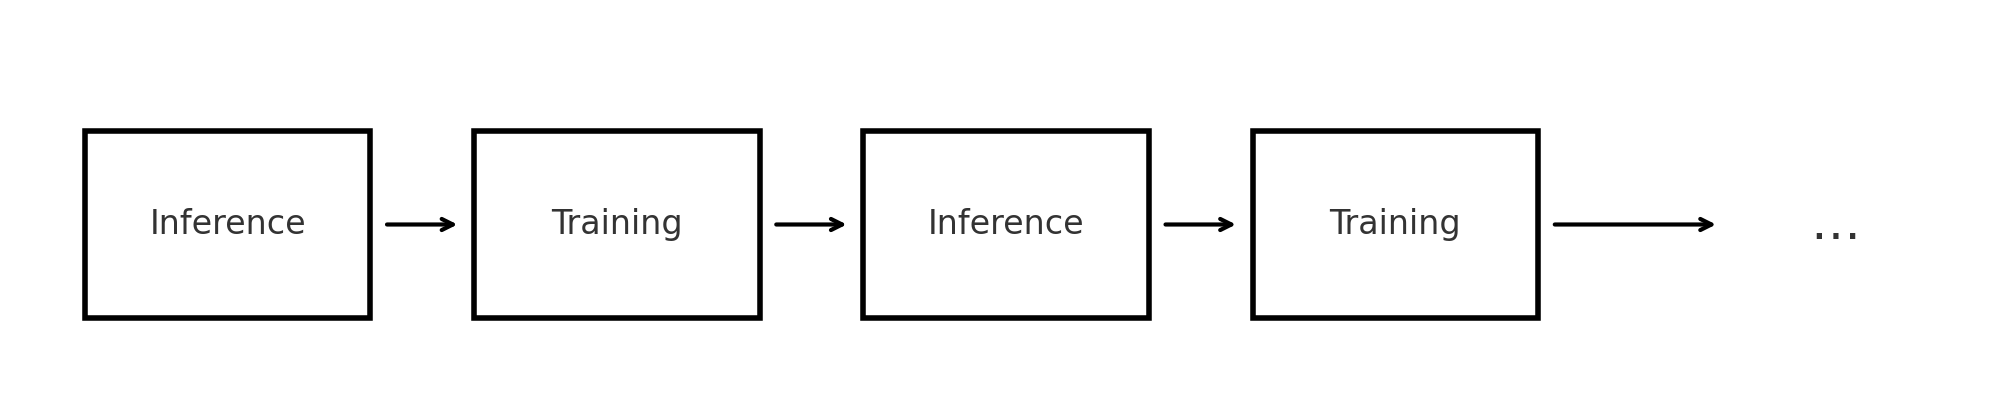
.png?alt=media&token=10f33092-137a-4d60-b652-377b5105af45)
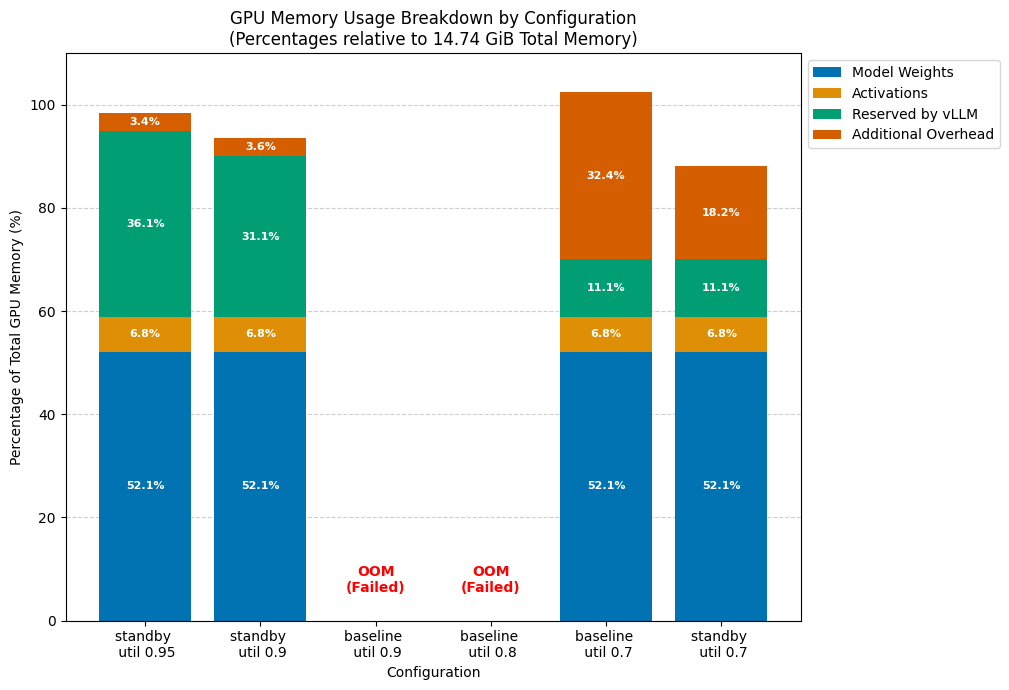

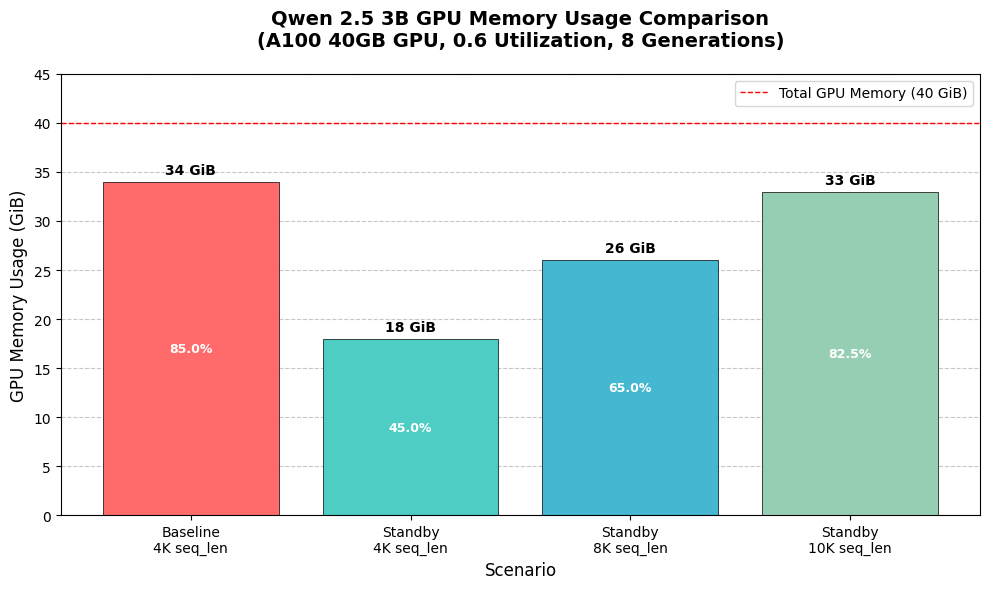


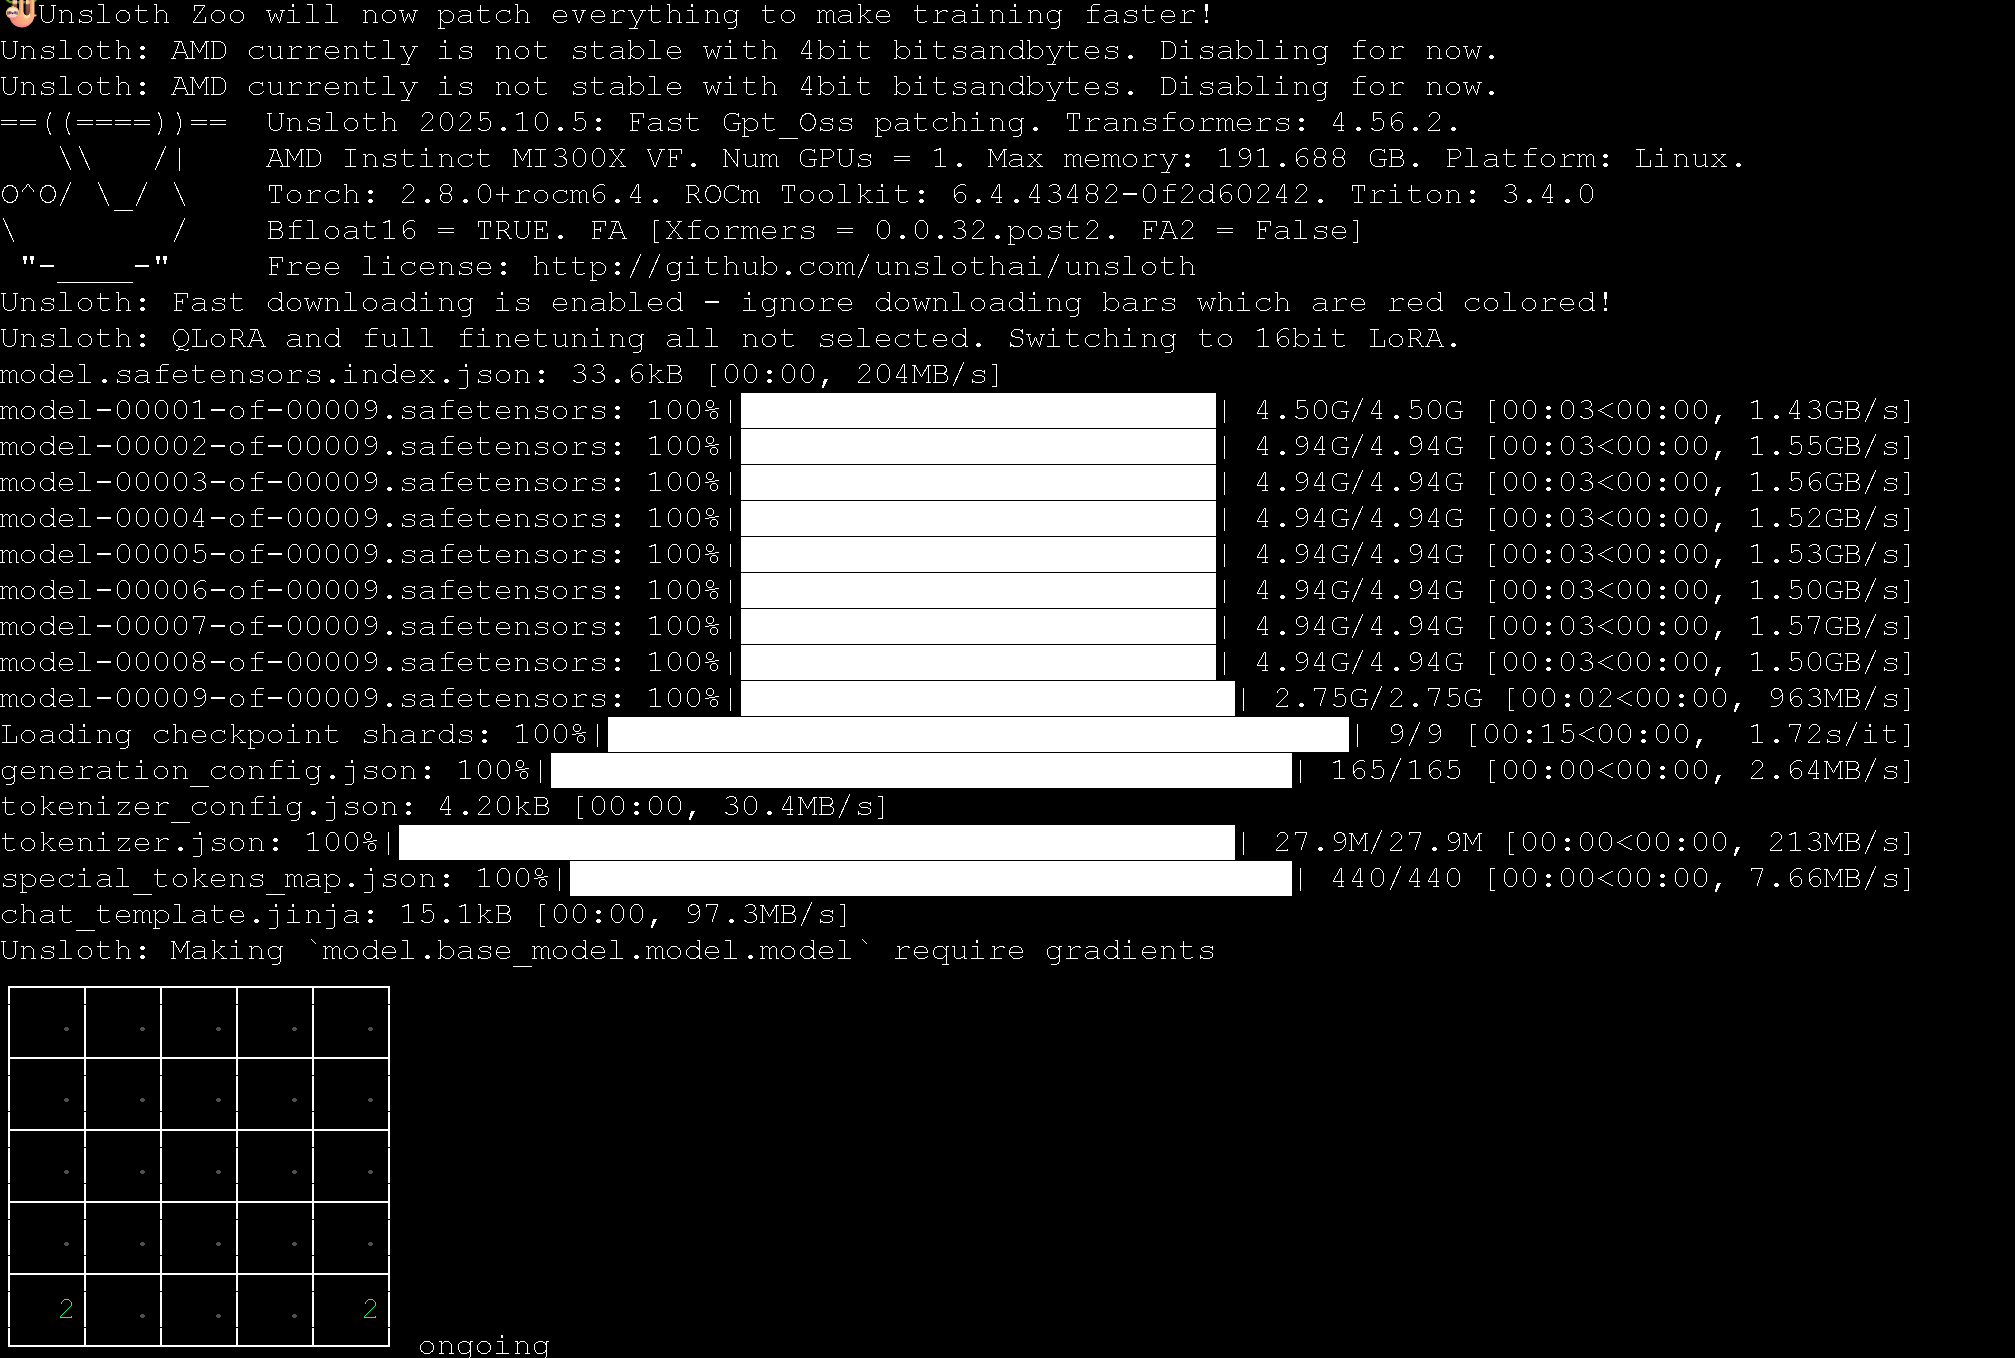
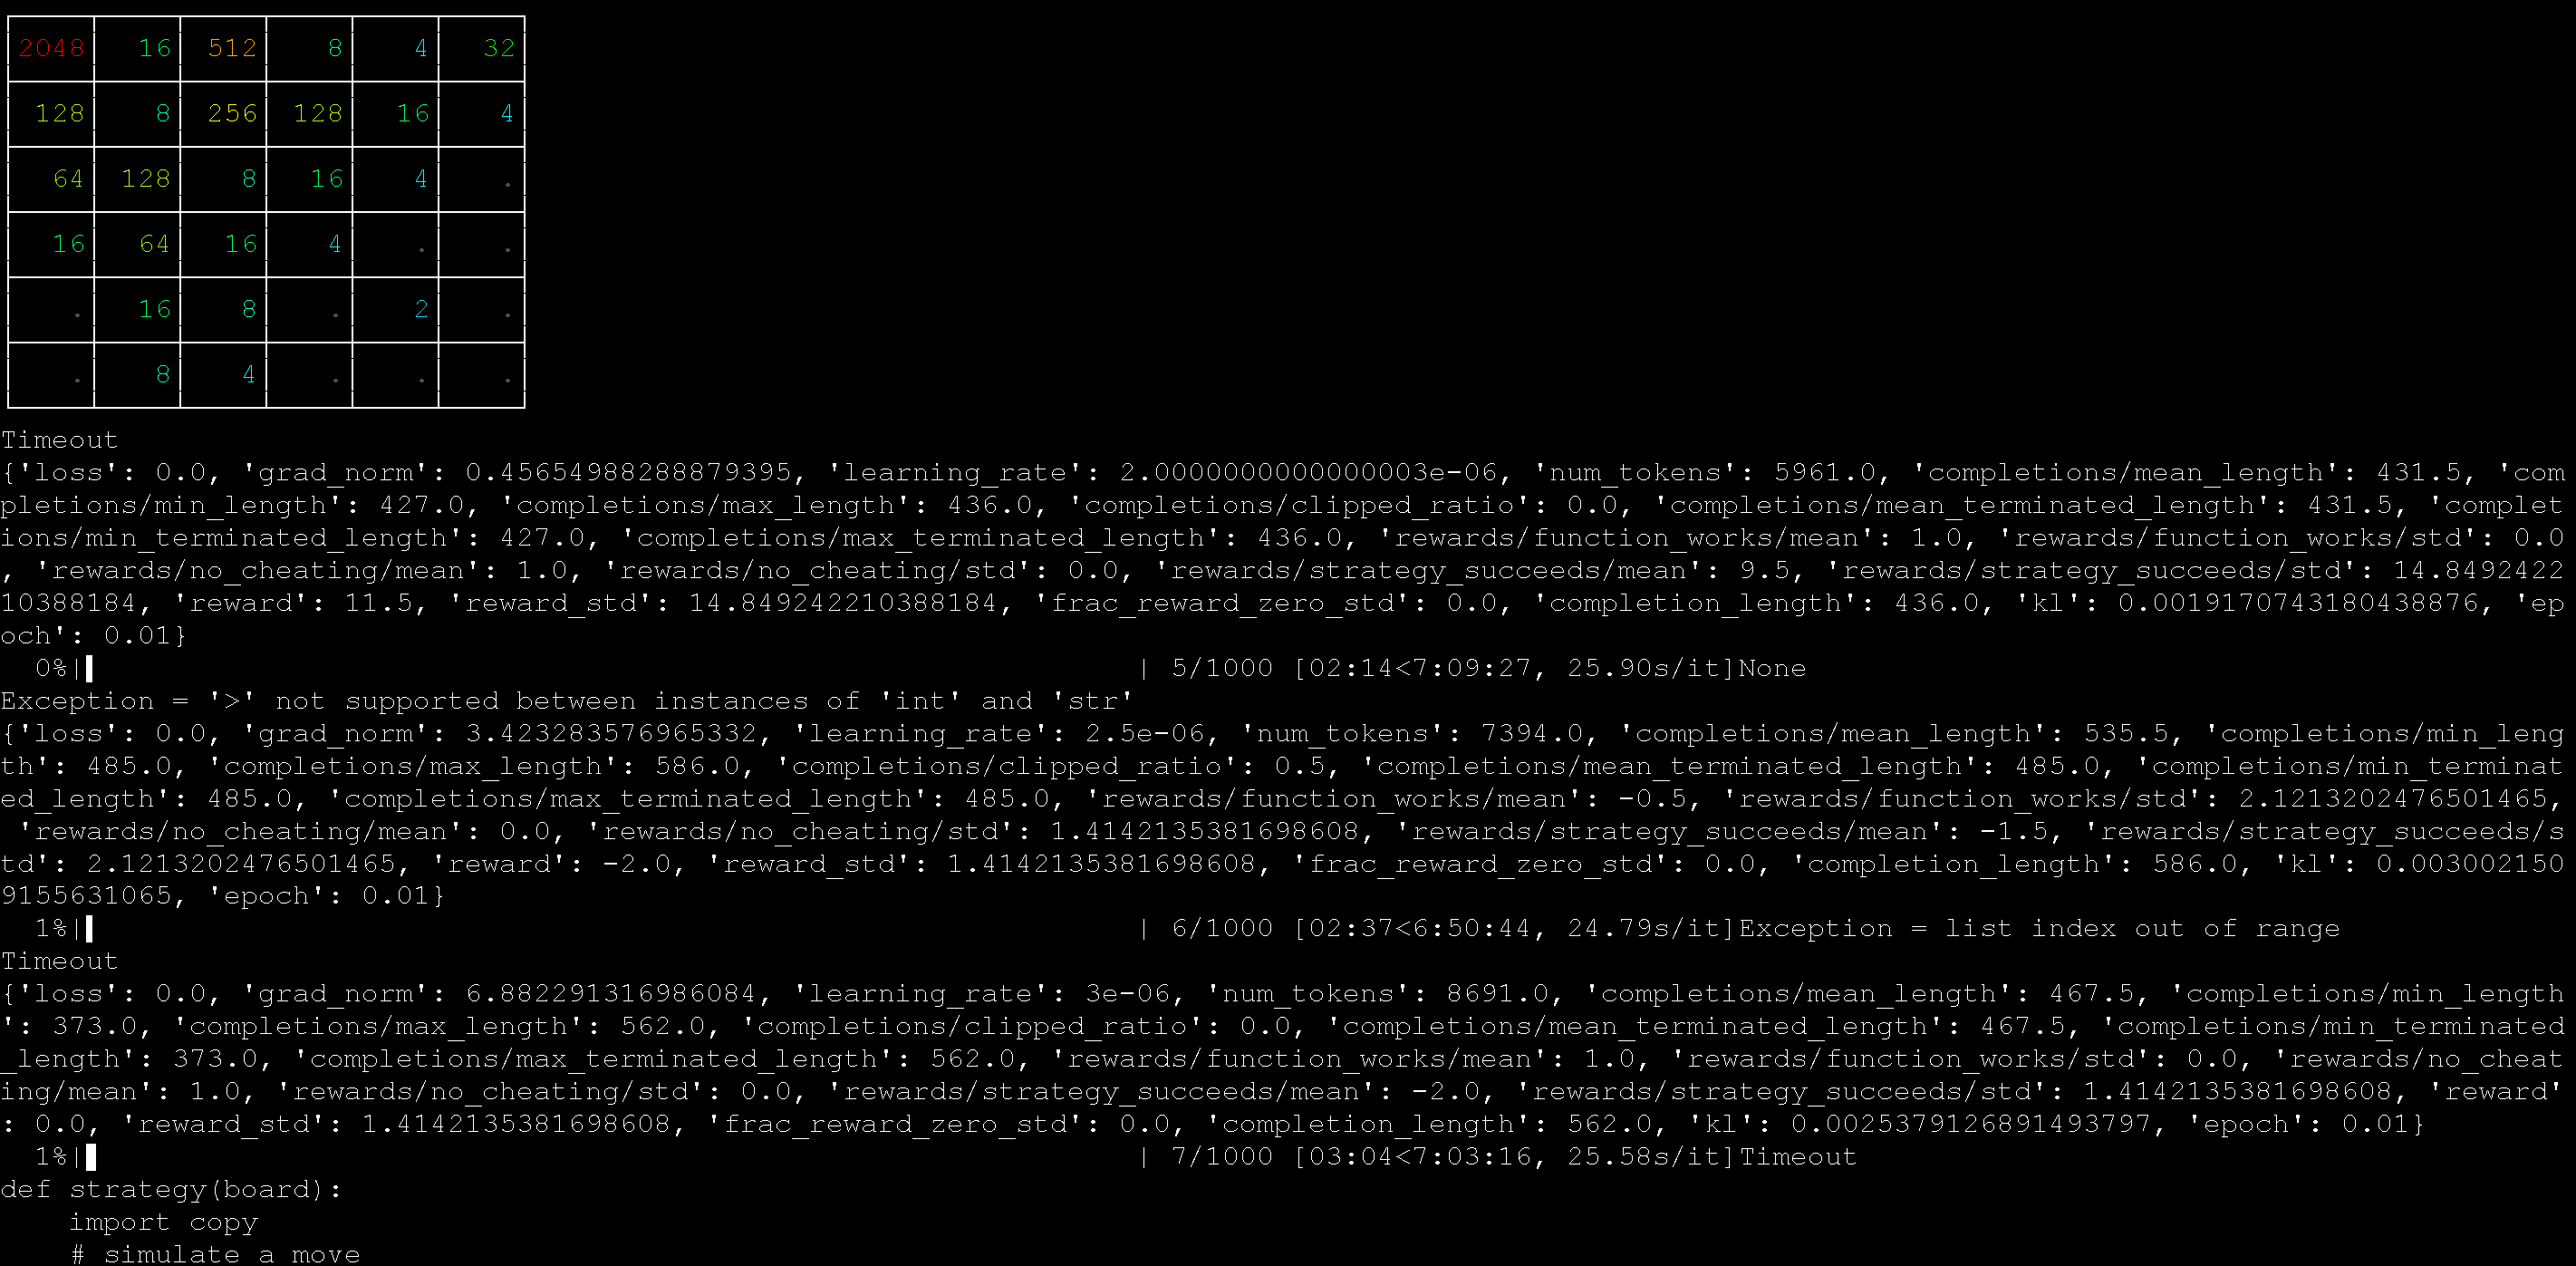


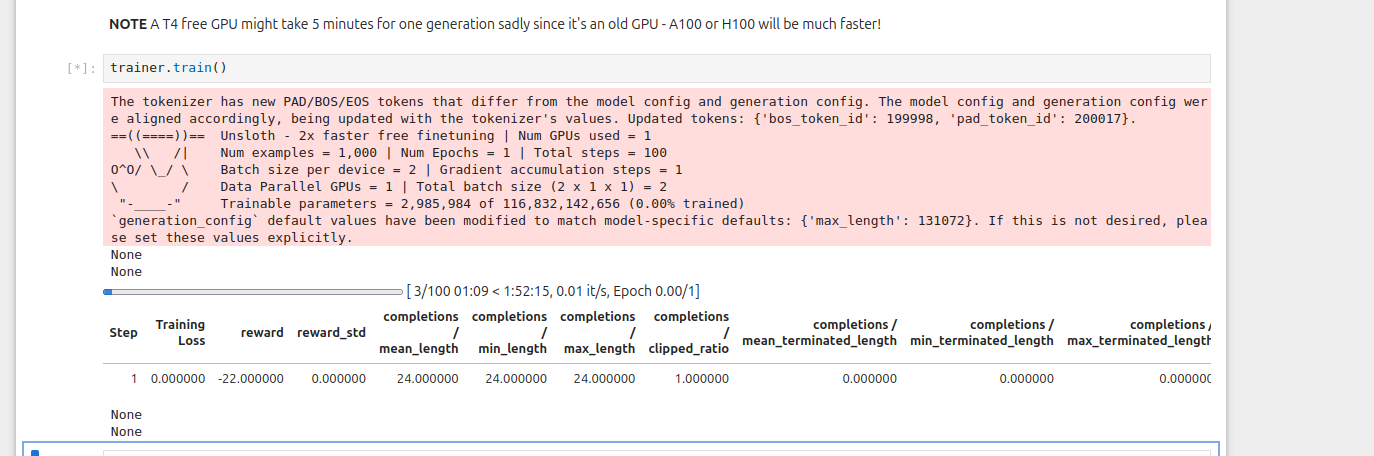
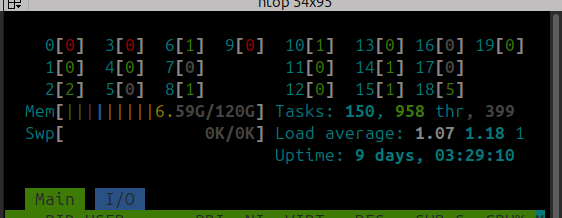
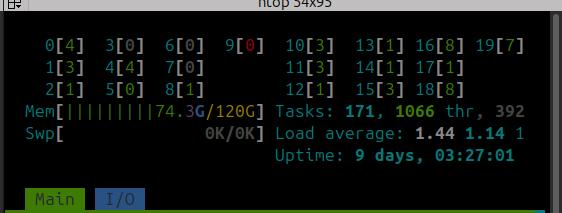
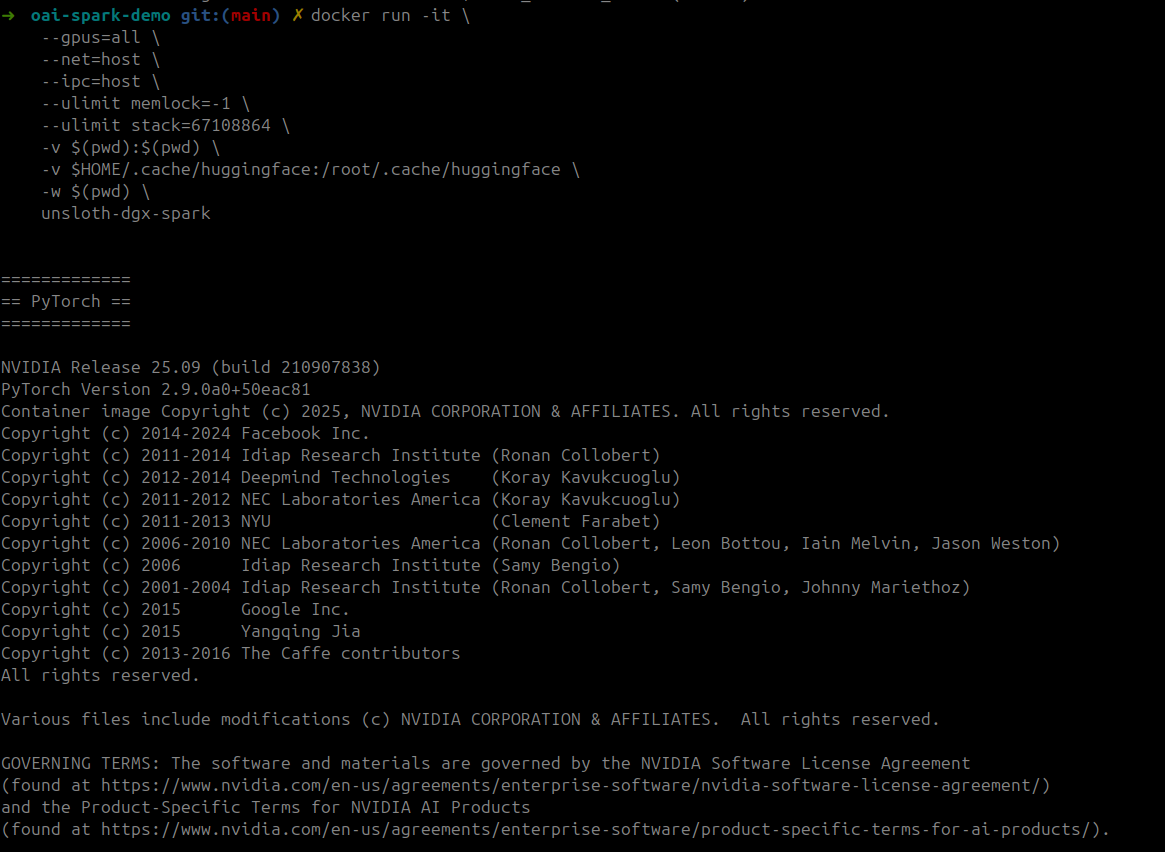
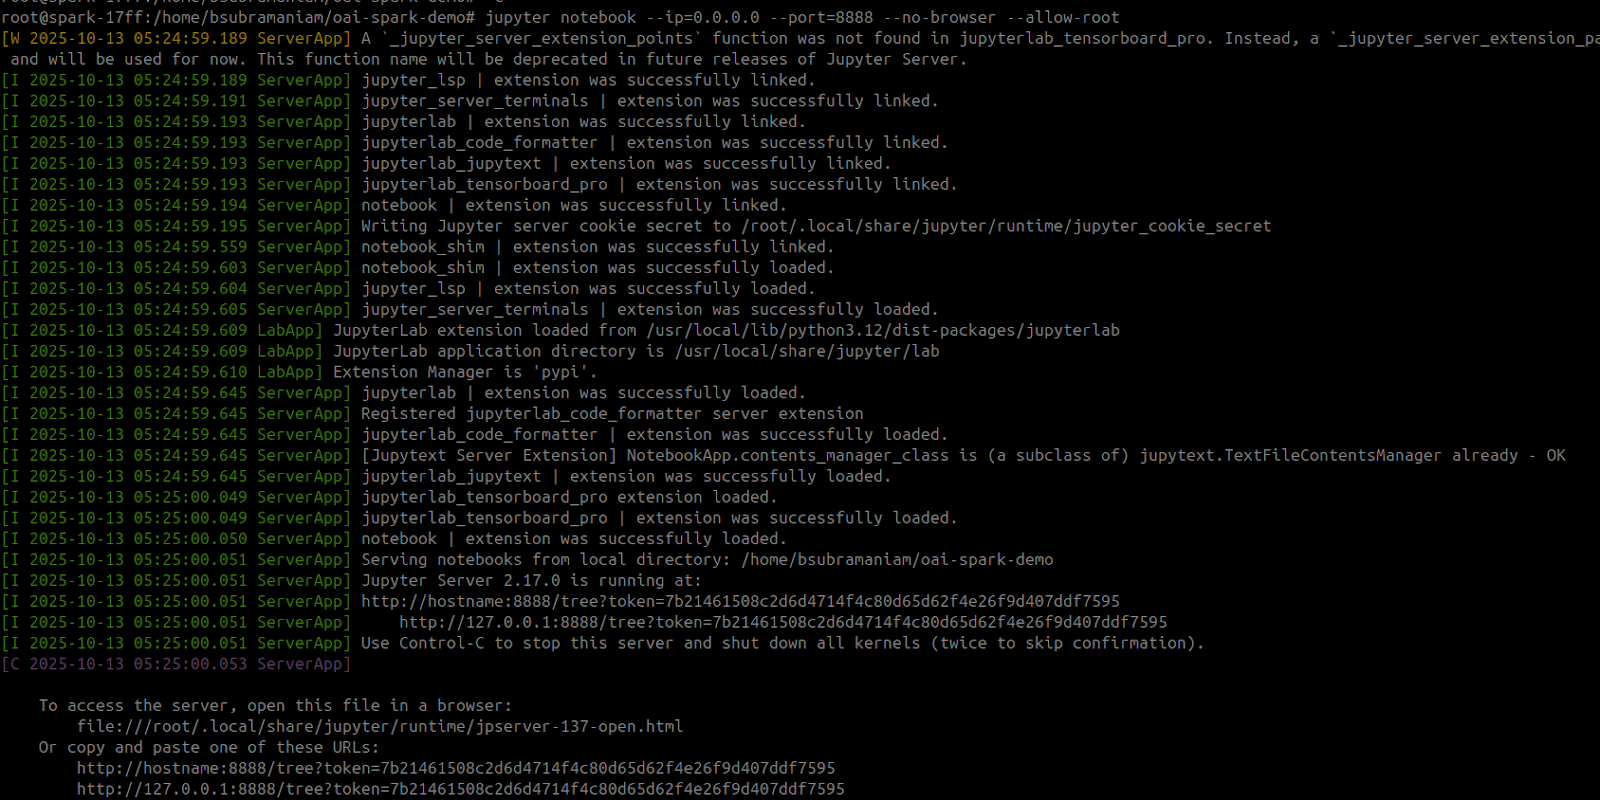
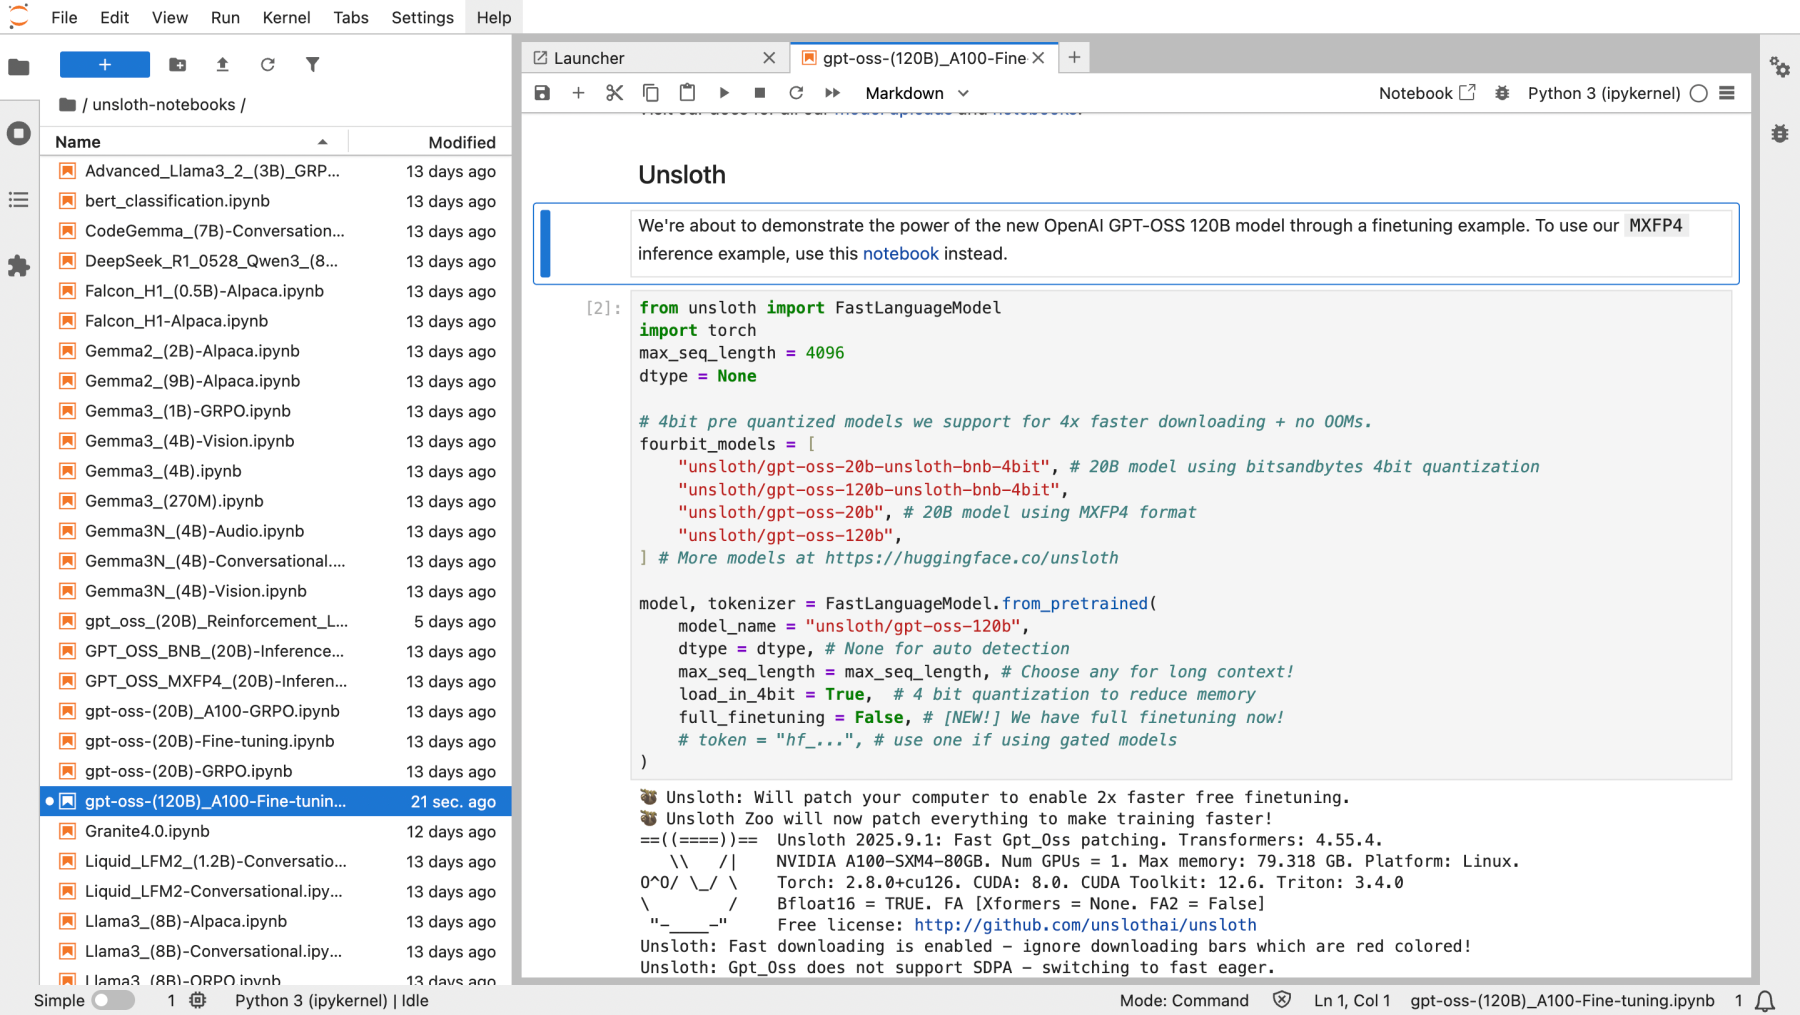


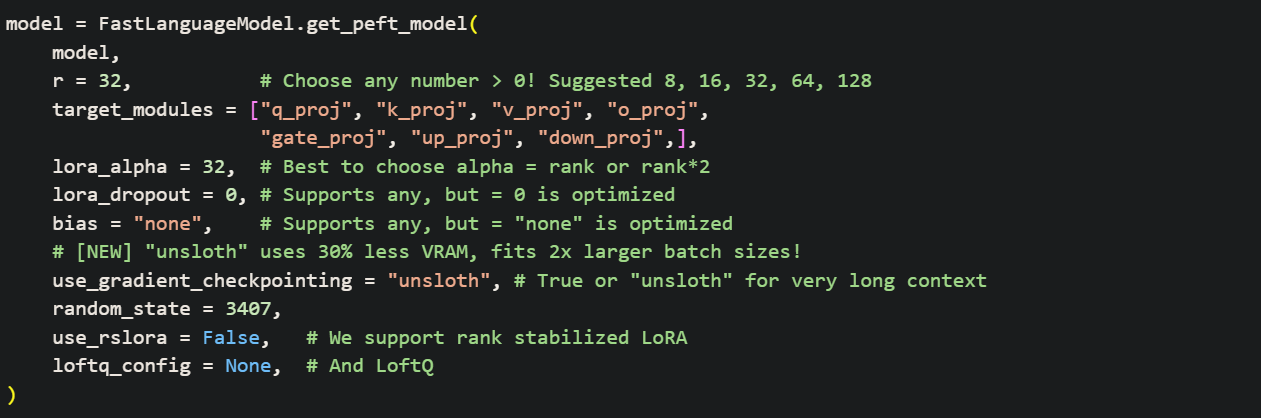





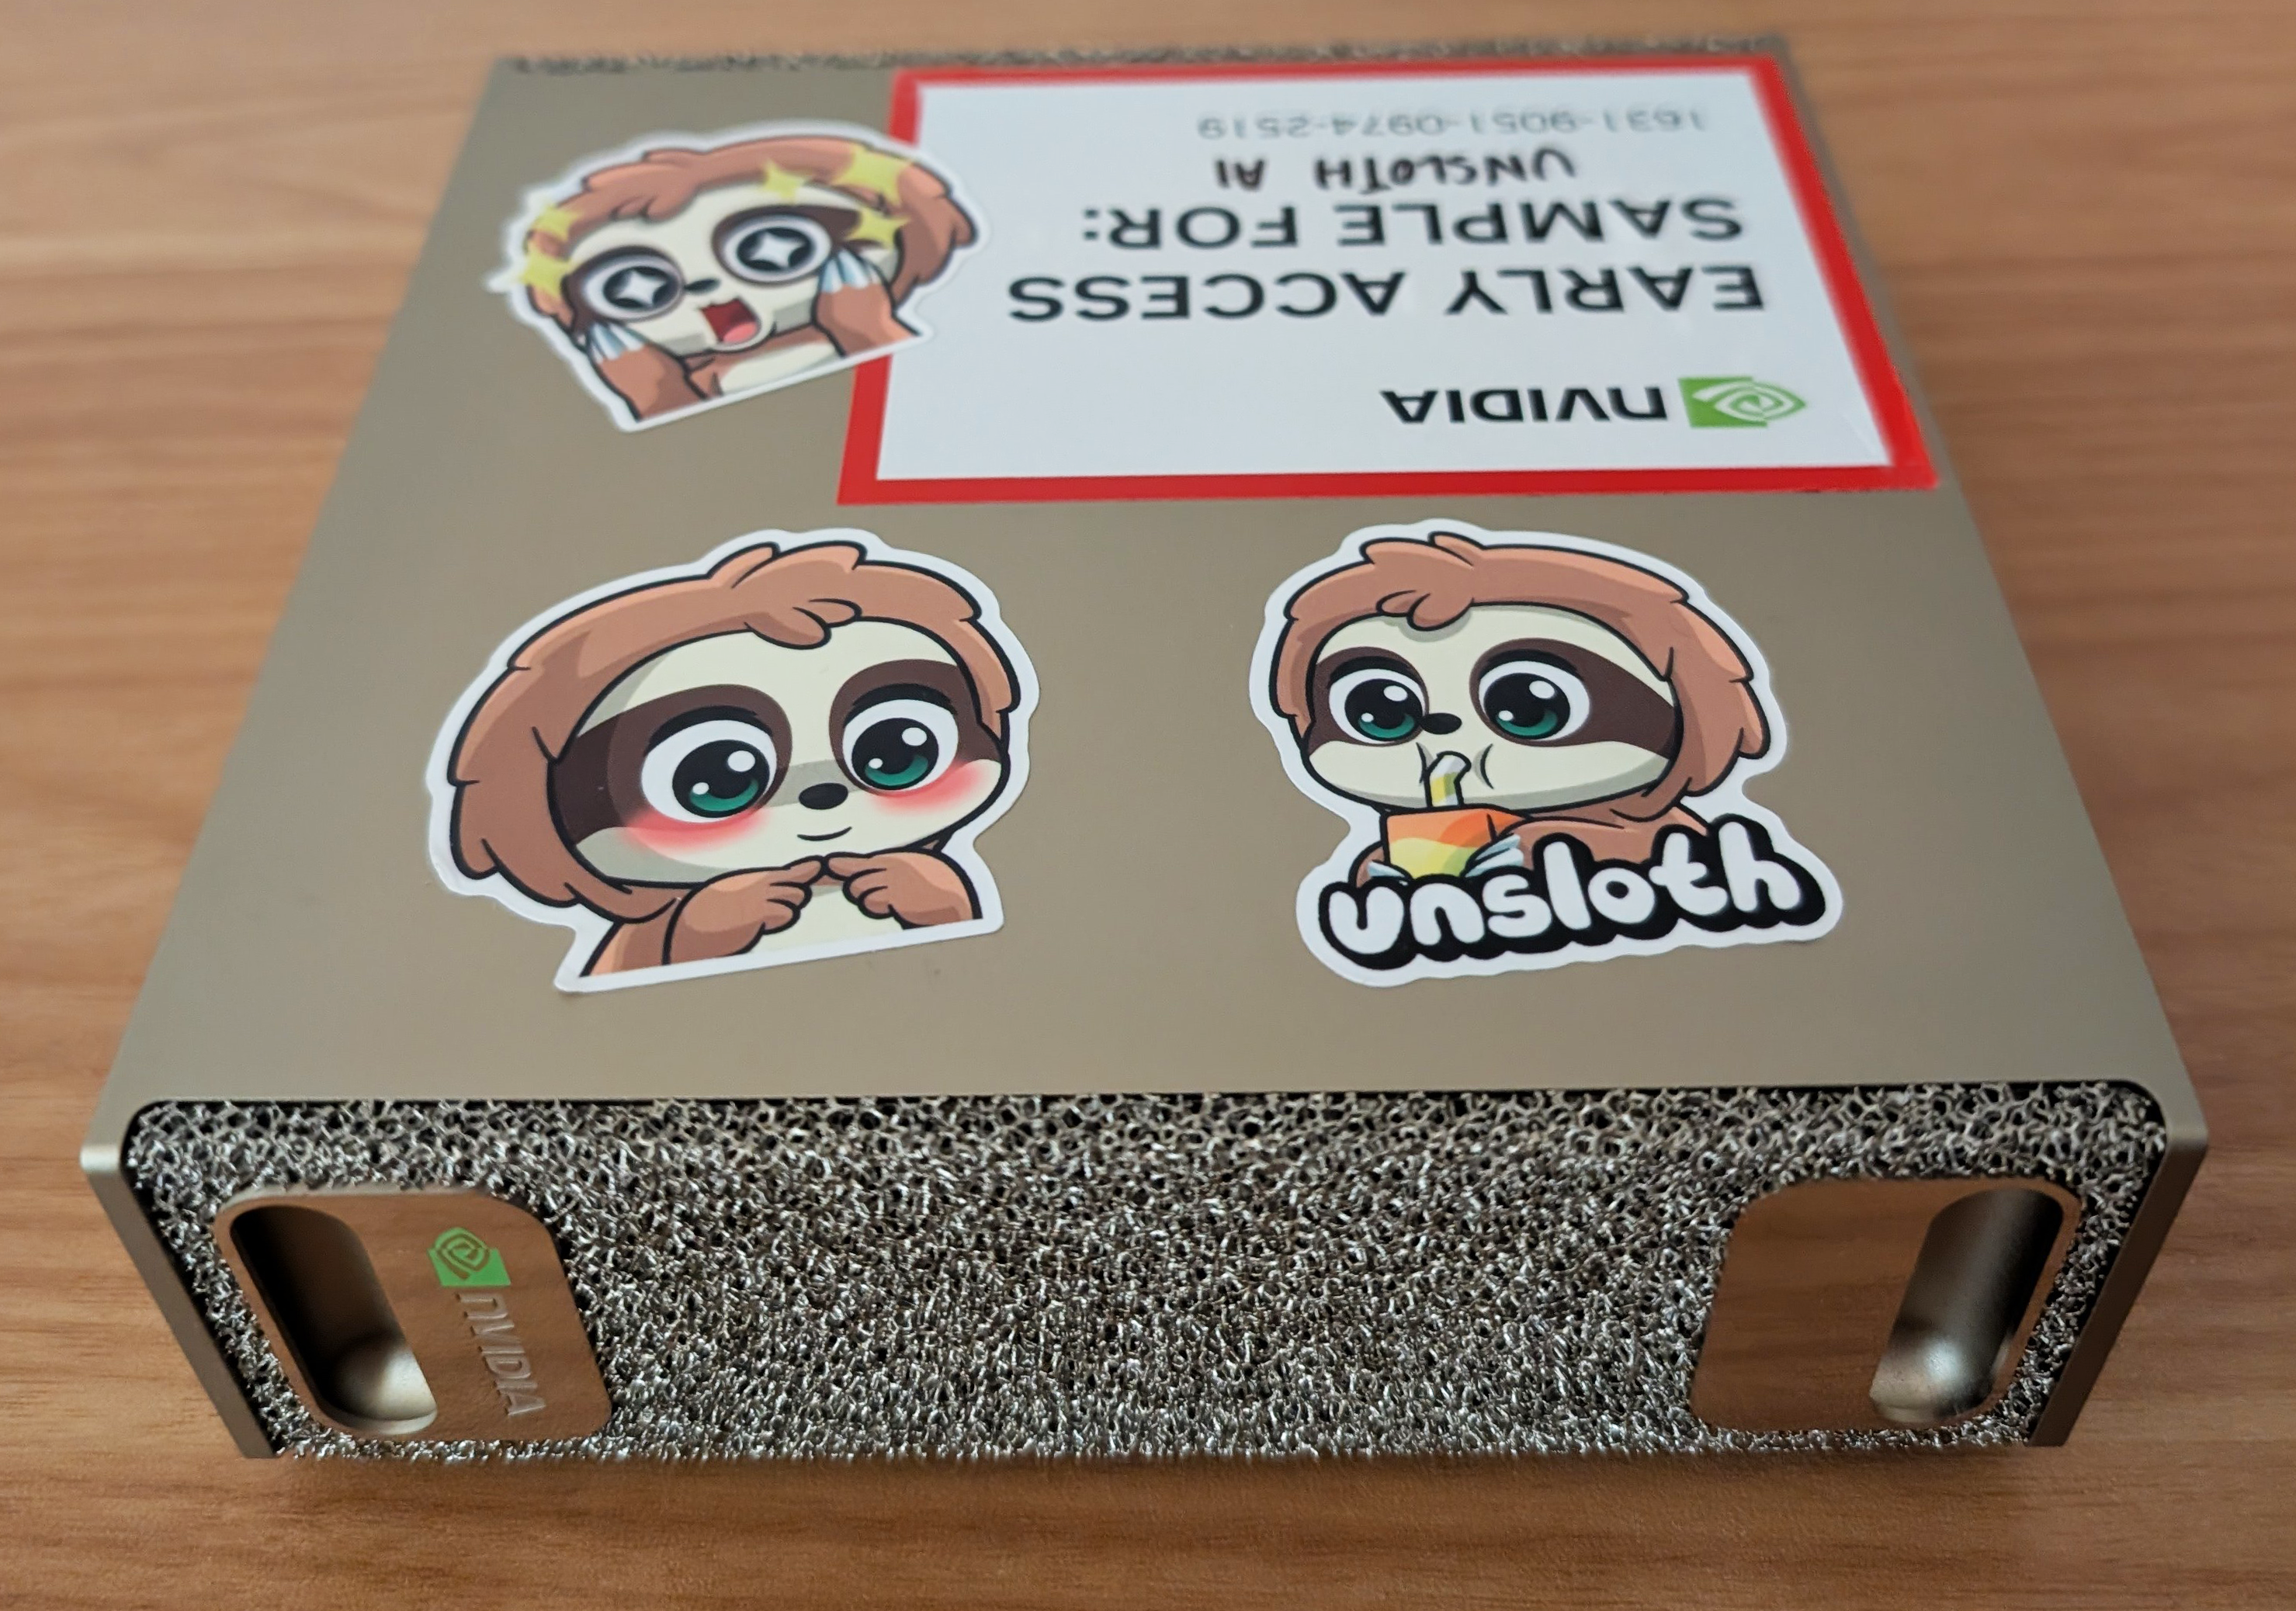
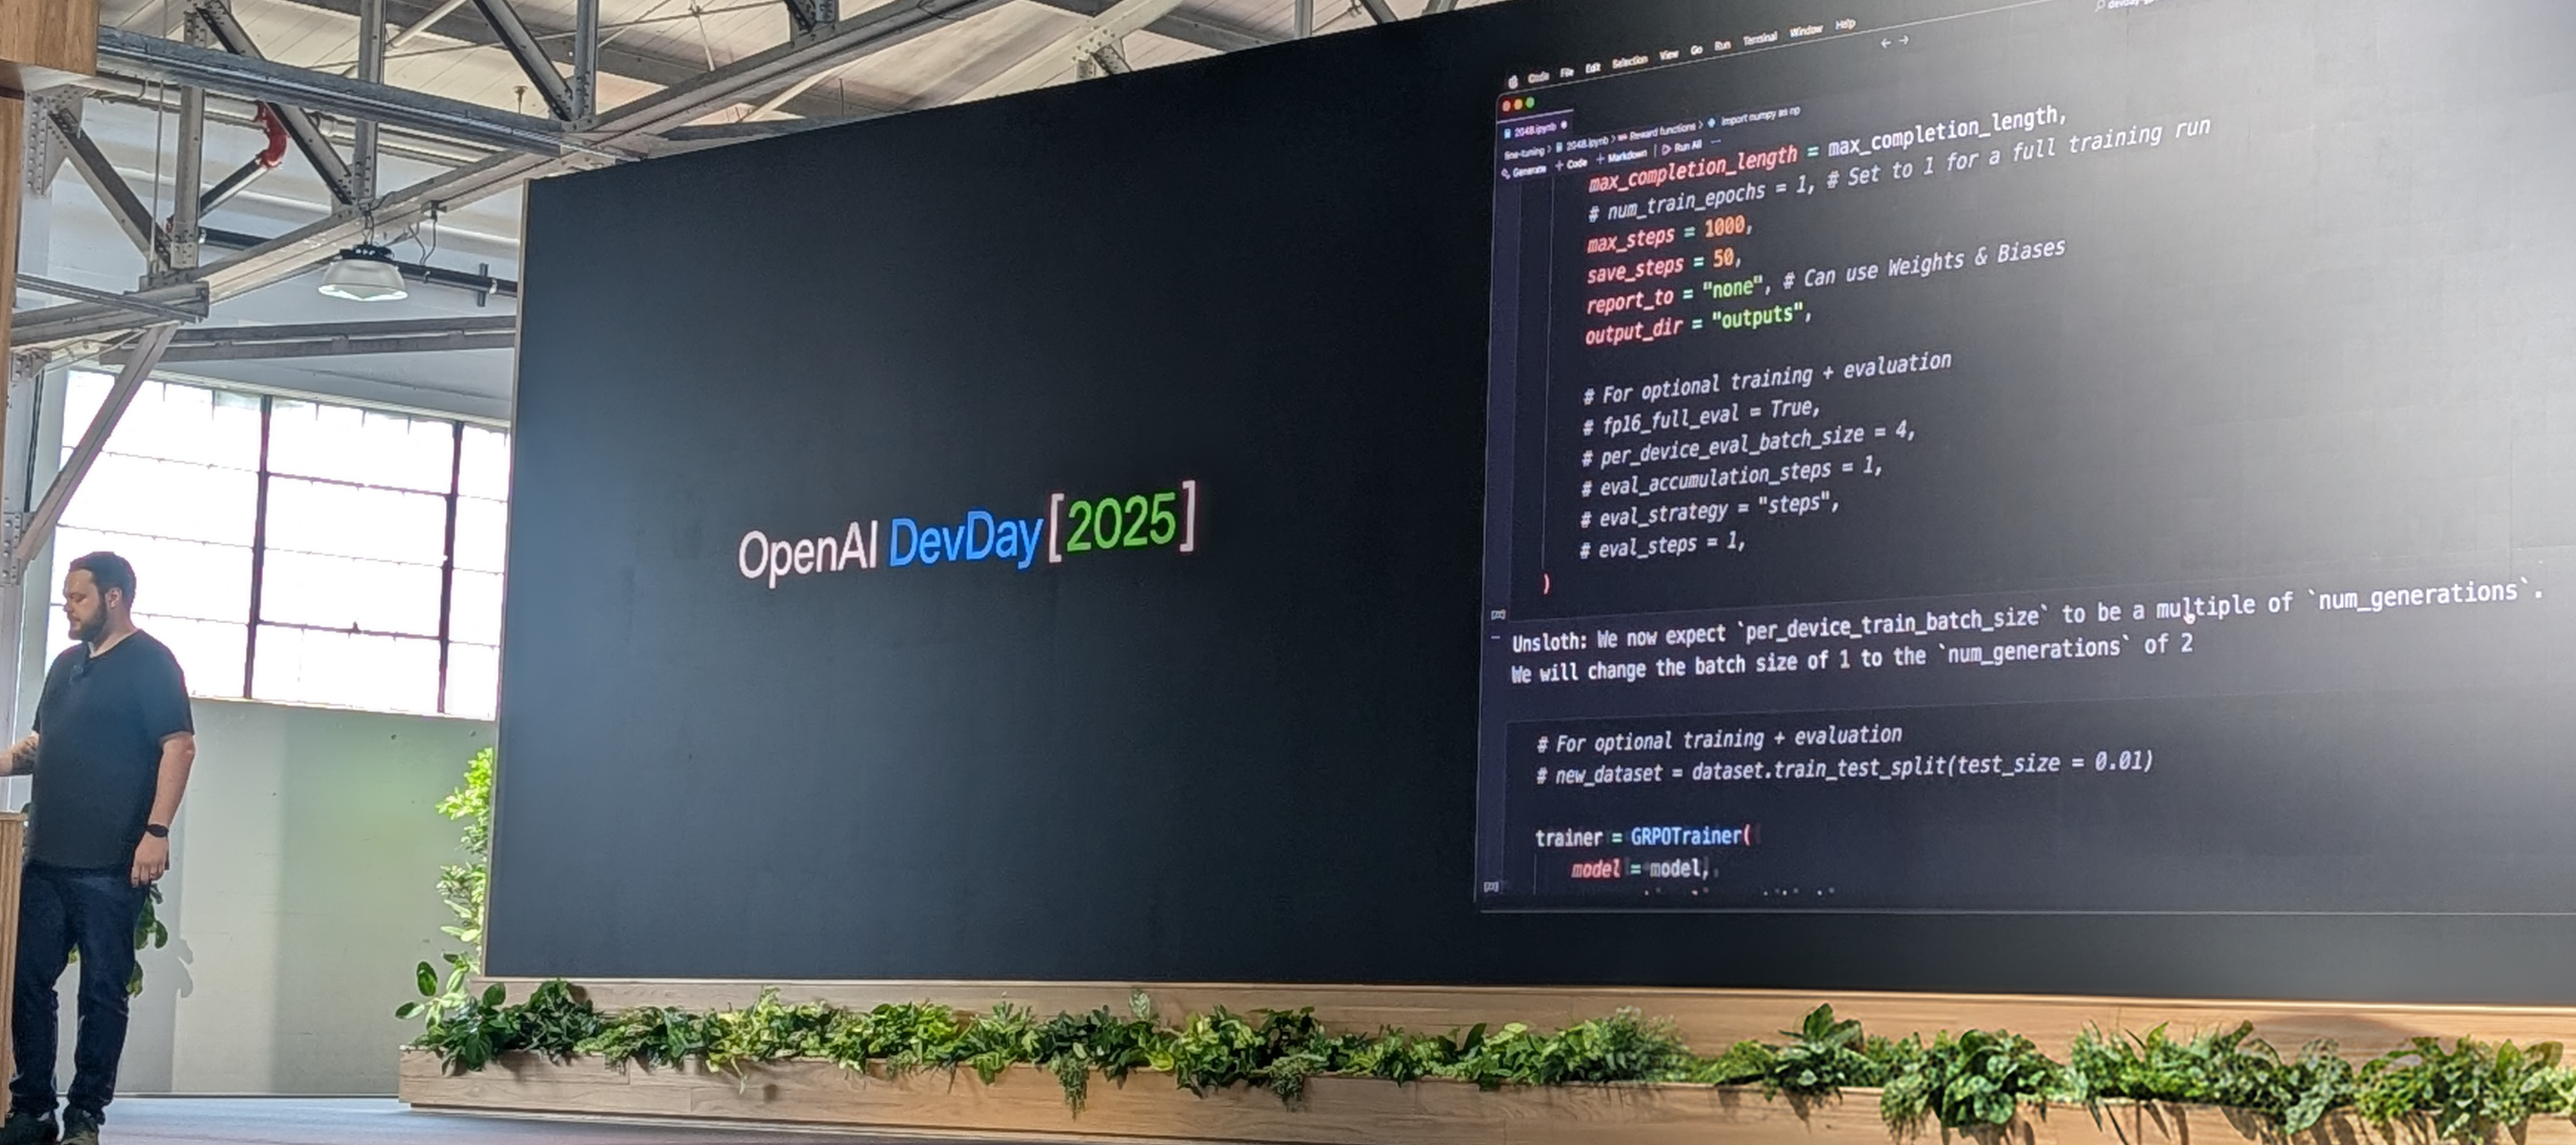
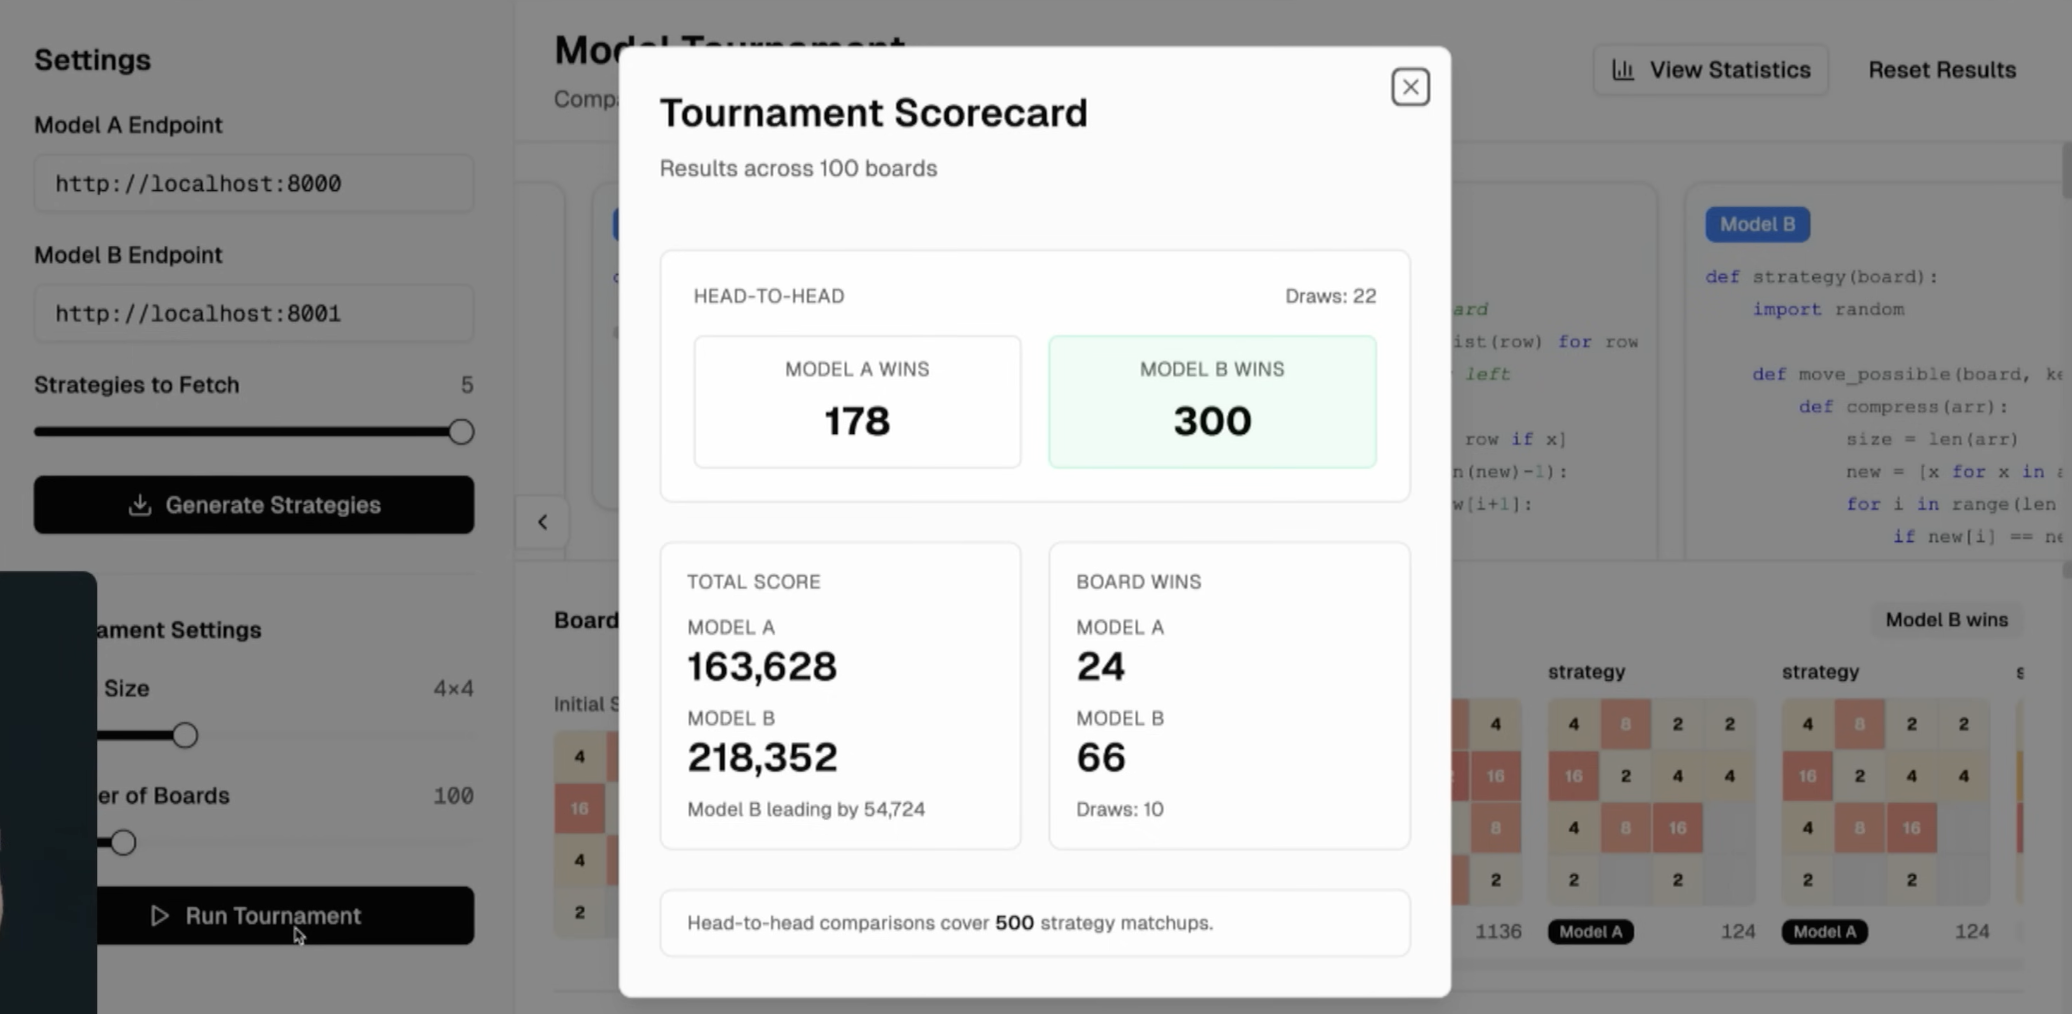
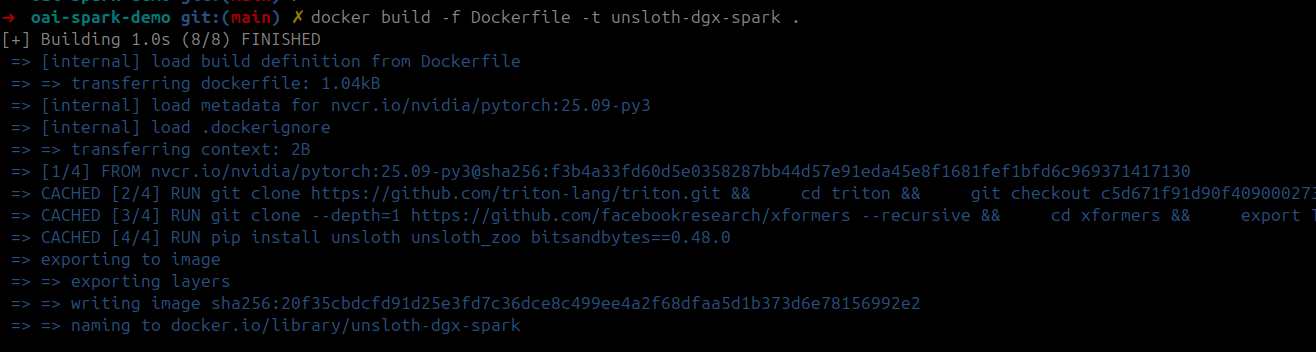


.jpg?alt=media&token=cbfad773-bcc5-4262-a4b5-ef1a178755bd)
.jpg?alt=media&token=89005ac2-d3cd-4d31-b179-2e320c874656)


.svg?alt=media&token=e87db00e-6e3e-4478-af0b-bc84ed2e463b)


.png?alt=media&token=3d7cab50-220a-4f99-b593-c32c5ce53a2d)